Snowspeeder build. 3D print w/ a little scratch build fun

mjhenks

Sr Member
RPF PREMIUM MEMBER
Not my first SS build but i am no pro. I enjoy building things and finished my Y-wing last year. I still do not have the guts to tackle my Pyro X-wing nor my Tie so how about another 3D print based build.

70129934934__13A61E6E-5115-4E6F-AA32-FD70AE3DE7C1.jpg


My plan was to find a SS 3D model to learn how to resin print with. I was given an Elegoo Mars and needed an excuse to use it. I also have good friends who build large format industrial 3D printers. Between the two of them why not tackle another Star Wars OT model. At first i was going to do the escape pod but settled on the Snowspeeder.

70129930135__D14DC0BF-1F6F-48D0-A2FB-9F6D7D46BDD0.jpg


70129931823__0A39C012-7D97-4326-B3BC-F63CABC97B35.jpg


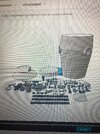
Large scale 3D printing is not free so after some horse trading i had a deal to 3D print all the parts that would not fit on my ultimaker.

One surplus measuring microscope for a few large pieces of plastic. Good deal for both parties. sort of...

IMG_5118.jpg


IMG_0777.jpg


I did not realize how wonky the flat panels would be on the print. Great for what the market they are serving but not so great for a SS model. I will be thinking quite a bit about my next steps.
 

Attachments

  • 70129930135__D14DC0BF-1F6F-48D0-A2FB-9F6D7D46BDD0.jpg
    70129930135__D14DC0BF-1F6F-48D0-A2FB-9F6D7D46BDD0.jpg
    989.3 KB · Views: 62
I am catching up on this project so while i had some thinking to do in the first post that thinking was done a few weeks back.

Here is the underside. Just as wonky as the top.

IMG_0779.jpg


Here is a the realization point on the reality that i was not going to be satisfied and that this was not going to end well. After shooting some primer and sanding some it was clear that by the time i got all those lines out there would be no panel lines and no detail parts left. I better find a plan B.

wing.jpg


Ok. Time to get some .080" polystyrene and do some major surgery. The main structure is fine as are the front facets of the wing but the rest needs to go. Serious gut check as i went over to the band saw.

IMG_0835.jpg


IMG_0837.jpg


OK. I can work with this.

I have the main structure still here and i have the basic size still in play. Time to build out some wings and get that resin printer going.
 
3D printing is fun and frustrating.

My ultimaker does great and then sometimes just falls flat on its face. (I was able to nicely recover the canopy)

IMG_0906.jpg


The Elegoo is a mixed bag so far. Small parts seem to be OK. Large parts not so good. Lots of sagging and non-sticks. Not sure why nor where to go for help so i keep trying.

IMG_1050.jpg


But then you get some good parts and all is well.

IMG_0913.jpg


IMG_0932.jpg


After keeping both printers going off and on for a few weeks we have a small collection of parts. I prime and sand as i go so some are ready to mount and some are not. Some are a bit wonky but unless i figure out the printer's issues i can use them as partials and scratch build the rest.

IMG_1049.jpg


IMG_0907.jpg


Anyways....
 

Attachments

  • IMG_0927.jpg
    IMG_0927.jpg
    547.2 KB · Views: 62
Wow...talking about major surgery on those wingso_O Seems that you have all the pieces; eager to see your next update(y)(y)
 
Ya. Was not sure if i was making a huge mistake or not.

The major bummer part was that i lost all the panel lines. I am not sure right now if i build out the wings to the body and glue it up and then scribe in the panel lines or try to scribe them ahead of time.

IMO i do that former. Build it all out solid. Otherwise my lines may not line up. That is all fine but panel lines are new to me so not sure the best way to scribe them into the panel and what the best tool to use will be.
 
Yeah, with resin printers it REALLY matters how you orient the part for printing. The back engine piece could be printed just how you have it sitting on the table (or is the print area not large enough?), with a few supports underneath. It's definitely a learning curve!

SB
 
More surgery to fix poorly printed parts.

Engines were printed standing straight up and the end ring bottom was super rough. Cut it off and machine a new ring from aluminum.

Snow Speeder build image 13.jpg


Rear grill. Not the most supportive 3D model. Third print was good enough. Lost four ribs when removing supports and both tubes. Some surgery and re-construction.

Snow Speeder build image 19.jpg


Snow Speeder build image 18.jpg


More displeasure with the main body detail. I took the .stl files and imported them into my CAD system. From there i sectioned out some of the smaller detail areas and made new .stl files for printing. That means i can machine off the areas i don't want to fix and start over.

Snow Speeder build image 07.jpg


Snow Speeder build image 20.jpg


BTW the entire rear cockpit cover and control panel was also cut out. Do not have an good image handy but i got rid of it all.

cockpit well.jpg


Regarding printing. What makes a print de-tach from the build plate on a resin printer? I have twice printed the bottom detail plate of the speeder and both times one edge detached and sagged while the other 90% was fine. I have re-aligned the build plate a few times and made sure i did not have debris in the resin pool. Frustrating as you can't see the issue until your way past it so you are blind to the progress and issues associated.

You can see it below. This part is at a 60 degree angle to fit into the printer and that sagging portion is nearest the build plate. Lots of support all around.

lower plate sag.jpg
 
Wow, this looks both impressive and daunting, almost as if the money you save in 3D printing (and NOT buying original kits to kitbash from) is made up for in all the PITA work and re-work required from 3D printing large pieces.

I have also tried and failed with 3D resin printing, so if anyone wants an Anycubic Mono X and drying station for cheap, gimme a holler.

But I'm seriously impressed by your Y-Wing, and would love to see more close-ups of that one while the Snowspeeder comes along.
 
Ya... Not the trip i though i was taking but honestly my Y-wing was also a different trip too. I'll post some Y-wing images along the way. Keeps me busy at night.

I have not found a thread out there with where the original kit parts came from. Is there one like the other OT ships have? Seems like the Snowspeeder is relegated to the back lot of the Studio Scale world.
 
Yeah this is a tough model to print even in resin because the designer made it very difficult for anyone who doesn't have a huge printer worth thousands of dollars to print this in one piece especially the top and bottom halves. He doesn't actually print his own stuff he sends it out to a company that has those large industrial printers that cost as much as a car.
 
Some more catch-up. Fitting of the upper wings.

Snow Speeder build image 36.jpg


Fitting of the lower wing. This is three pieces and was not fun. While the upper is a flat panel and can only really lay one way the bottom is three pieces and a bit of a puzzle.

Below the main panel is fit and i am working on the pattern for front scoop.

Snow Speeder build image 33.jpg


Fitting a pattern for the wing root.

Snow Speeder build image 34.jpg


Using wood blocks as my angle guides to start and then made up some plastic inner ribs.

Snow Speeder build image 38.jpg


Snow Speeder build image 39.jpg


Comparisons...

Snow Speeder build image 52.jpg


Once i got one side made i think mirrored it over and test fit the other side.

Snow Speeder build image 45.jpg


Snow Speeder build image 47.jpg


Snow Speeder build image 50.jpg


Now. Those of you who have an eagle eye will have already seen the problem. You will know why everything i have shown here i eventually tore off and thru out because it was all wrong. That sucked but oh well... The upper panels i was able to re-work but everything on the bottom was tossed.

So what do you guys see that is wrong? The side by side with the old 3D printed wing and the image after that shows the problem the best.
 
Thank you Joberg. Appreciate the comment.

Time to catch up completely on the body. I have it now totally together and i am pleased with the results.

First off i made a cradle to hold the upper wings flat so they attach correctly and stay flat.

IMG_1184.jpeg


Full support. This was a really smart of me as it kept everything solid as i test fit and built out.

IMG_1185.jpeg


Top panels mounted and solid.

IMG_1186.jpeg


Rear detail parts and rear wing close out area mounted. Had to space out this side. Hope that does not come back to bite me.

IMG_1192.jpeg


Upper wing gusset system installed. This made things very stable and provided mid span attachment areas for the lower wing panels. Each of these was fit with the lower panels tapped in place to make sure they fit and did not have gaps.

IMG_1205.jpeg


Test fit the bottom panels. Final check of the two triangles which was the issue from my last post. I did not realize the triangles were formed by the three wing panels and was trying to shape it by other means. That is why i tore it all apart and started over again.

IMG_1202.jpeg


Done. All glued up.

I taped the outer wing panels to the upper panel to serve as a hinge. I think applied glue to all the ribs and folded the lower wing into place. Once the center spar parts dried i then glued the lower panel outer edge in place. Then the front and middle panels to finish it out.

IMG_1207.jpeg


I am very pleased. The whole system is strong as i had hoped. I have some putty work to do own the center edge of both lower wings but that was expected. Now i have to start thinking about etching panel lines.

I still do not know the best tool to use for that. Do i carve them or use this styrene and make the panels to glue on. Not sure.
 
Last edited:
Looking good:cool::cool:(y)(y) I use a modified cutter blade to scribe my panel lines. It's true that, in insight, you could've made your life less miserable by scribing the lines while your parts were not assembled. Now you'll have to find a way to make those line straight while going over some of the edges of those glued parts:oops:;)
 
Laid out all the top wing main parts to start working on panel lines. Finding that some lines need to be adjusted to look right with the guns and engines. I know when done it will look fine but still…

IMG_1217.jpeg


Pencil it in. Check, erase, try again. Mix and repeat.

One side..

IMG_1233.jpeg


The other side…

IMG_1235.jpeg


Away for business so no updates for a month.
 
Back from Asia. Dumb luck I was in Singapore for their scale military model competition and met fellow RPF’r Lee S. Saw some of his work.

IMG_1360.jpeg


Other cool models on display.

IMG_1373.jpeg


IMG_1377.jpeg


IMG_1376.jpeg


Visited the local model shop too. Every corner was stacked to the ceiling with kits. Did not buy anything.

IMG_1380.jpeg


IMG_1381.jpeg


Anyways. Back and working on the lower panel layout. Also bought a scribe tool and learning to use it.

IMG_1959.jpeg
 
Finished layout of the bottom scribe lines.

Been practicing laying down actual scribe lines so I guess it is time to fish or cut bait…

IMG_1968.jpeg


I am not pleased with my center body detail resin prints so I will scratch build those. The resin prints are curling and brittle. Bummer but …

IMG_1970.jpeg


Been trying to figure out what is wrong with my rear grill.

The “engine” does not fit around the rear shelf of the body. The integrated fins are too narrow. The “engine” has the outer fins for whatever reason where the rest of the fins are a separate assy.

I think the print file is wrong. Any guidance?

IMG_1971.jpeg


IMG_1973.jpeg


IMG_1972.jpeg
 
Dang that all looks amazing. Very impressive body-shop work at the structural level.

I know this is a Snow Speeder build thread but boh oh boy do I love me some Y-Wings -- nice seeing yours, AND Lee S.'s Red Jammer from Singapore, and I think I've actually been in that hobby shop, if it's the same one.

I always buy Fine Molds products when I'm in Asia as the price is usually much better.

The Snow Speeder looks amazing, and if you haven't already tackled/solved the panel line problem, I recommend the Tamiya scribing tool with different MM widths from 0.15 all the way up to 2.5mm iirc. They're EXPENSIVE, but surely one of them will be precisely the width/look you want.
 

Your message may be considered spam for the following reasons:

If you wish to reply despite these issues, check the box below before replying.
Be aware that malicious compliance may result in more severe penalties.
Back
Top