TOS Communicator Build

Roger that, I will just sit back and enjoy the show.
Fox Tv Popcorn GIF by The Four
 
Will you offer the fx working shells?
If you mean the hollow ones, yes - My plan is to incorporate all of those into the original model on CGTrader. I'm currently wrestling with how to put all of the files into the same package without making it confusing - there are so many alternate parts depending on how it's built - the assembly instructions are going to be crazy. I think I'll have to have multiple PDFs - one for solid, one for hollow, one for the moire assembly
1748389351374.png
 
This may be common knowledge (I am certainly no expert), but while documenting and examining the many varied communicator chirps in TOS, I discovered that almost all of them are spliced out of a single 10-chirp sequence. This actually makes a lot of sense. The sound is an only slightly modified recording of an owl chirping, and there is so much variety that I can't imagine they would have relied on multiple recording sessions with a wild animal, especially considering the relatively primitive state of audio editing/processing in 1966.

I found a few sequences that were probably spliced from a different segment of the recording, but almost all of them (at least from the first season) originated in that main sequence. I've identified & confirmed 20 unique patterns so far, all from the same source. The chirps pulled from episodes look a little "fuzzy" - this is from background noise, music, talking, etc. Not only to the timings line up, but they're really obviously the same when listening to these segments side-by-side with their corresponding segment from the 10-chirp.

audio-splicing.jpg


I was fully expecting to have to scrounge for the cleanest clips I could find throughout the series and do a bunch of splicing on a chirp-by-chirp basis just to get close, but nope! The 10-chirp sequence was made available absolutely clean on the licensed "Star Trek Sound Effects" album, and can be downloaded as "TOS Chirp 1" from TrekCore. This is going to make it way easier than I expected to build a good sounding and accurate "chirp library" for random playback via microcontroller/DFPlayer in my communicator.

1748481197361.jpeg
 
Last edited:
I put together a short video to better demonstrate what I was talking about above with the whole communicator "chirp splicing" thing. It amazes me both that they went to so much trouble to make the chirp sequences different from each other as well as how many unique sounding patterns can be pulled from this single set of 10 chirps

 
My ATtiny85 microcontroller was delivered today, so it was time break her down again. I'll be redoing part of the wiring harness, but it's going to live attached to a breadboard for a while so I can iron out the firmware. I'm pretty psyched - here's the plan:

  • When the antenna is opened, it will randomly select one of 27 different chirp patterns to play, based on how often each of those patterns were present in the show

  • If powered on with the antenna open, it will just spin the moire silently for as long as it remains open. 10 seconds after closing the antenna, it will start making the incoming-call beep every 7 seconds until the antenna is opened again, cancelling the beeping and playing a random chirp
I've never worked with an ATtiny85 before, but it doesn't seem like it's going to be too bad. I've already set up my UNO as an ISP and successfully burned the bootloader and uploaded my first primitive sketch to the ATtiny.

1748910645405.jpeg
 
I think I'm finally ready to call this one done! 31 unique chirp patterns, timing fixed, and some more fun stuff worked in.


The final sound system wound up consisting of an ATtiny85 microcontroller directing a DFPlayer Mini board over a serial connection.

schematic-r2.jpg

The relatively simple microcontroller sketch for this setup can be snagged here: https://app.arduino.cc/sketches/34a15c65-3cf0-431c-ba50-ef761802dfaa?view-mode=preview
 
I think I'm finally ready to call this one done! 31 unique chirp patterns, timing fixed, and some more fun stuff worked in.

View attachment 1940197

The final sound system wound up consisting of an ATtiny85 microcontroller directing a DFPlayer Mini board over a serial connection.

View attachment 1940198
The relatively simple microcontroller sketch for this setup can be snagged here: https://app.arduino.cc/sketches/34a15c65-3cf0-431c-ba50-ef761802dfaa?view-mode=preview
It just keeps getting better. Your STL files print beautifully on my P1S.
 
I thought my journey on this one was almost done, but it turns out that I'm just getting started. I posted a video of the finished communicator in a Facebook prop-enthusiasts group and was swamped with requests to buy one. I've decided that I'm going to try to do a small run of them, and as a result, I have a few new goals:

1. Reduce production time - the antenna in particular takes WAY too long to get as smooth as I'd like. To reduce post-processing time, I finally bit the bullet and got myself a resin printer. The first thing I printed was an antenna, and holy cow - it came straight out of the wash & cure station pretty much ready for paint.

1752183054312.png


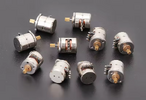
2. I want to finally get the moire up to 2 RPM. It still looks really cool at 1 RPM with the hacked up clock movement, but I want to get it up to 2. I have been investigating tiny stepper motors to drive the moire in an internal gear arrangement with a tiny bearing in the center. The motion of the original moires weren't completely smooth - as I understand it, they ticked 6 times a second, giving it a bit of a stuttering motion. I may experiment with trying to duplicate that as well, but I'll have to see how it goes.

1752182860418.png1752182890455.png

If I can get it to work and if it's quiet enough, it will have the added benefit of freeing up a TON of space inside. I will need more space since I will also need a stepper motor controller board (I have a DRV8834 ordered) as well as a charger board for the LiPo battery. I'll also be looking into getting a little "motherboard" printed up at PCBWay - I don't want to be making these with the spaghetti of wires inside like my current build has. I really want to get the DF Player board, the ATtiny85 microcontroller, the stepper motor board, and the battery charger all mounted in one place.

I'm currently waiting on a bunch of parts to come in from AliExpress, Amazon, and elsewhere - I'll keep the updates coming.
 
My stepper motor shipment isn't scheduled to arrive for a couple weeks, so I'm working in the virtual until the physical parts get here. I've built scale 3d models of the moire's motor and bearing and am in the process of roughing in the design. I went with an 8x4mm bearing (also not here yet) which may seem like overkill, but I really want everything stable and sturdy so I can get nice tight tolerances between the spinning disc and its neighbors.

1752292605148.png


I may be getting ahead of myself, though - I have no idea how loud the stepper motor will be, but I do have high hopes. If the gearing lines up the way I think they will, I only need to spin the motor at about 1 revolution about every 4.5 seconds to spin the moire at 2 rpm. At that crawl, I can't imagine it'll make any noticeable sound.

There is another option - I'll be using a DRV-8834 stepper motor driver board which has 1/32 microstep resolution. With 20 physical steps per revolution in the motor, that gives it 640 positions per revolution. I might be able to skip the gearing and mount the motor right in the middle of the disc with either 1/16 resolution and 5.3Hz updates or 1/32 resolution and 10.6Hz updates. The original stopwatches in Alpha/Beta ticked at 6Hz, so if the microstepping is accurate and quiet enough, the 5.3 should look really really close. Submitted for your approval: All 8 seconds worth of 3 scenes that exist in TOS where Alpha's animated moire is visible:


In other good news, assuming that the stepper motor arrangement will work out, I don't think I'll have any problem controlling both the sound system and the motor speed from a single ATtiny85 microcontroller. The clock movement literally took 2/3 of the space inside of the shell, so it's fortunate that so much space is being reclaimed by this approach - I still need to work in a stepper-motor-driver board and a LiPo battery charging circuit/jack.
 
I finished building virtual counterparts to all of the components this morning. This will make it a lot easier to figure out how to pack everything in there. I'm unfortunately on hold until at least 7/27 though, since that is when the stepper motor shipment is scheduled to come in. I won't know until then if the motor will work in the center of the platter, or if it will have to be off to the side driving it as a gear. For that matter, there may be some unforeseen factor that makes it not work at all. So now it's time to hurry up and wait.

1752341173290.png
 
Thanks! A lot happened today. I decided to prioritize having the stepper motor in the center of the moire platter instead of driving it from the outside gear. If the microstepping of the driver board is reasonably accurate, I think that's my best chance of having it as quiet as possible since that would spin it the slowest.

I spent some time arranging things in CAD, and landed on a motherboard setup that has the DFPlayer, stepper motor driver, and microcontroller mounted to it in the back shell. If I learn for sure that I can do the stepper motor quietly enough, I'll be working it up in KiCad and getting a run of circuit boards printed at PCBWay. This is SO different from the first model - the clock movement was so big that there was no room in the back shell for anything but the battery and power switch. Now, pretty much everything lives back there. This will mean 8 wires needed to connect the shell halves - I may have to go with a little ribbon cable.

Also, for serviceability, the FAT32 MicroSD card in the DFPlayer is easily accessible for updating sounds, and the microcontroller can be removed from its socket for reprogramming via Arduino. I'll be making the parts list, schematics, and microcontroller sketch all freely available.


1752458779180.png
 
Again, this is fantastic work!

I know you've already worked your plans a million times, but would it be possible to have a version of the back that is featureless (no screws/no button) for those that might want a static build?
 
Back
Top