You are using an out of date browser. It may not display this or other websites correctly.
You should upgrade or use an alternative browser.
You should upgrade or use an alternative browser.
Snowspeeder build. 3D print w/ a little scratch build fun
- Thread starter mjhenks
- Start date

A lot done the last week. Since it is cold and wet for California I was focused.
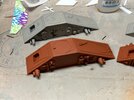
Took the prototype air brake pivot assy and built it out in CAD so I could 3D print them. Turned out nice. Small parts so I made a few sets.
Like so many things on this build I had to scratch build the air brake panels as the 3d ones just were not good enough.

Below is one full set of parts.

Spare parts

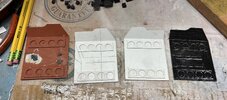
Took another stab at painting.
Using Archive-X paints this time and much better results. Had to play with the mix ratio but in the end pleased. Took two bottles of “dark grime” to cover all the parts. Super surprised at the color. Not white at all more like beige.


Can you see the problem in the below image?

Sharp eye saw that the body and detail parts are a different shade. I used a black primer for all my parts. For the top of the body I had painted it reefer white by mistake and did not start reshoot black. Dooh!
Sand it down, black prime and Repainted.


Detail painting of the engine bays and spoilers. Dark and grimy.

Getting ready for orange.

Took the prototype air brake pivot assy and built it out in CAD so I could 3D print them. Turned out nice. Small parts so I made a few sets.
Like so many things on this build I had to scratch build the air brake panels as the 3d ones just were not good enough.
Below is one full set of parts.
Spare parts
Took another stab at painting.
Using Archive-X paints this time and much better results. Had to play with the mix ratio but in the end pleased. Took two bottles of “dark grime” to cover all the parts. Super surprised at the color. Not white at all more like beige.
Can you see the problem in the below image?
Sharp eye saw that the body and detail parts are a different shade. I used a black primer for all my parts. For the top of the body I had painted it reefer white by mistake and did not start reshoot black. Dooh!
Sand it down, black prime and Repainted.
Detail painting of the engine bays and spoilers. Dark and grimy.
Getting ready for orange.
Attachments
A few more questions.
- Studio Scale Decals for a 20" long model. I do not think 1/24 decales are large enough. Anyone have a source?
- I am building Rouge 2. (Orange) Archive X lists "scarlet" as the orange color (Which seems like the wrong name) but also has "caboose red" in the Snowspeeder kit. Where does the red go? I presume your not mixing the orange. Is the red for hand making decals? Of no the where is red on the SS model.
Decals sorted. Going with moffeaton set.
“Glass” on the way.
Still not sure where caboose red is used. Right now I think maybe hand painted decals or edge pinch warnings like the engine flaps. Anyone???

Played around tonight with orange paint and chipping fluid.
Found another builder’s blog that suggested mixing 8:2 of Vallejo Clear Orange and Carmine Red. Gave it a try thinning with AX-ATR. Applied chipping fluid (first time using) and gave it a go.
Pleased. I see possibilities here.

3.5mm audio ports arrived and now I have an electrical input for my lights. Looks fine but after the fact thought about how to get that port behind the tow cable area. Hmmm.


“Glass” on the way.
Still not sure where caboose red is used. Right now I think maybe hand painted decals or edge pinch warnings like the engine flaps. Anyone???
Played around tonight with orange paint and chipping fluid.
Found another builder’s blog that suggested mixing 8:2 of Vallejo Clear Orange and Carmine Red. Gave it a try thinning with AX-ATR. Applied chipping fluid (first time using) and gave it a go.
Pleased. I see possibilities here.
3.5mm audio ports arrived and now I have an electrical input for my lights. Looks fine but after the fact thought about how to get that port behind the tow cable area. Hmmm.
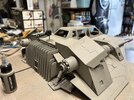
one of these things is not like the other...
Finished unit 1 and found it was too long. Dang...

Take it apart and try again.
Much better now.

Not all the correct greeblies but
1. Hard to find good images.
2. I am doing my best.
3. Happy how they turned out.


In a holding pattern now. Waiting for paints, decals and electronics.
Finished unit 1 and found it was too long. Dang...
Take it apart and try again.
Much better now.
Not all the correct greeblies but
1. Hard to find good images.
2. I am doing my best.
3. Happy how they turned out.
In a holding pattern now. Waiting for paints, decals and electronics.
Attachments
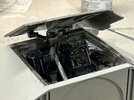
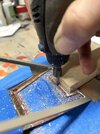
And I thought I was done with the canopy…. Waiting for electronic so I thought I would play with the canopy glass. Really quick I found I did not plan that out well. You just can’t glue clear plastic to the inside and make it look good. I also did not plan any recessed areas so…
Let’s carefully carve out glass recessed area without destroying the canopy. Set my Dremel up as router and went to town. (I did break a few joints but easily repaired)


Sanded all the window sills and touched up the paint. Really messed up some of detail work. Will repair that later. Quite ugly below but most of the ugly will be hidden.

Now let’s make some windows. How will we hide the window from the inside? Window frames I guess.

Test fitting. The front is the painful one. There is so little room at the front. Faking it. If this were a real bird i think the front window would leak and probably blow inward...

Rivets/screws to mount because why not...

A lot of work later

Close up. They look alot better farther away.

Test fitting. Not sure yet...
Better than clear plastic sheet but the glass really should inset into the frame. Thinking about it some more.

Let’s carefully carve out glass recessed area without destroying the canopy. Set my Dremel up as router and went to town. (I did break a few joints but easily repaired)
Sanded all the window sills and touched up the paint. Really messed up some of detail work. Will repair that later. Quite ugly below but most of the ugly will be hidden.
Now let’s make some windows. How will we hide the window from the inside? Window frames I guess.
Test fitting. The front is the painful one. There is so little room at the front. Faking it. If this were a real bird i think the front window would leak and probably blow inward...
Rivets/screws to mount because why not...
A lot of work later
Close up. They look alot better farther away.
Test fitting. Not sure yet...
Better than clear plastic sheet but the glass really should inset into the frame. Thinking about it some more.
Attachments
Last edited:
Messing around with windows. Decided to install them on the inner surface and cover with the frame. The test fit below sealed the seal. Gaps are because they are not glued in yet.

The rear canopy used to be a part of the rear cockpit.
Not any more so I need to test fit things and decide how I will mount the canopy solid.
See the gaps? Glue, magnets or ???
Whatever it do it has to be solid as the front canopy hinges and stays up with friction. (I need some pistons in there... hmm)

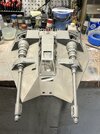
Test fitting the new front cockpit with yoke and the rear glass clearance with my updated greeblies. The front cockpit and the sides (not shown) will be glued and seam filled into the body after i get the electronics done.


This was just a cool shot. Like your getting into the ship the ride the back seat. Overwhelming if you ask me.

A few questions.
- Glue to use for windows. Elmer white? CA? Other?
- Do you guys weather the ship and then install the glass?
- Tips for weathering the ship in pieces. What challenges will I face if I weather things like the engines and guns before assy.
The rear canopy used to be a part of the rear cockpit.
Not any more so I need to test fit things and decide how I will mount the canopy solid.
See the gaps? Glue, magnets or ???
Whatever it do it has to be solid as the front canopy hinges and stays up with friction. (I need some pistons in there... hmm)
Test fitting the new front cockpit with yoke and the rear glass clearance with my updated greeblies. The front cockpit and the sides (not shown) will be glued and seam filled into the body after i get the electronics done.
This was just a cool shot. Like your getting into the ship the ride the back seat. Overwhelming if you ask me.
A few questions.
- Glue to use for windows. Elmer white? CA? Other?
- Do you guys weather the ship and then install the glass?
- Tips for weathering the ship in pieces. What challenges will I face if I weather things like the engines and guns before assy.
Last edited:
Similar threads
- Replies
- 2
- Views
- 309
- Replies
- 13
- Views
- 356