You are using an out of date browser. It may not display this or other websites correctly.
You should upgrade or use an alternative browser.
You should upgrade or use an alternative browser.
Snowspeeder build. 3D print w/ a little scratch build fun
- Thread starter mjhenks
- Start date
Yeah I would maybe try thinning it 50/50 with some IPA and then give it a go. I know this isn't much help, but I do that with the Tamiya acrylics and it sprays like a dream.This is supposed to be ready to shoot. They suggest thinning with IPA but it is so thin to begin with that making it thinner does not seem right.
SB
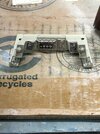
Not sure how much detail and minutiae I should share but..
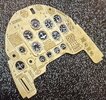
Identified the rear cockpit as using Ju-87 cockpit details. Found these in 3D but wrong scale. Bummer. Probably 1:24 originally. Trying to figure out how to adapt.
Any ideas?

Have these to play with. Cutting each out and pasting OR just deal with the smaller scale are the options unless there is some other idea.

Been trying to come up with a pivot/hinge design for the rear top engine spoilers. It needs to lift and pivot and not sure if that is just a simple pivot or a complex four bar type linkage. My mind is just not seeing it yet.

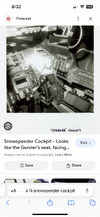
Found this image and using it to inspire my rear cockpit.

Identified the rear cockpit as using Ju-87 cockpit details. Found these in 3D but wrong scale. Bummer. Probably 1:24 originally. Trying to figure out how to adapt.
Any ideas?
Have these to play with. Cutting each out and pasting OR just deal with the smaller scale are the options unless there is some other idea.
Been trying to come up with a pivot/hinge design for the rear top engine spoilers. It needs to lift and pivot and not sure if that is just a simple pivot or a complex four bar type linkage. My mind is just not seeing it yet.
Found this image and using it to inspire my rear cockpit.
Last edited:
I've used photocopy of real plane instruments and cut them/applied them on the dashboard. Might work for you and the scale
Thank you. Kicking that around for sure right now.
I played around with the decals I have last night. IT may work for my new rear lower panel but not for the mains.
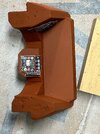
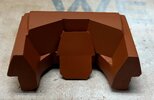
The more i played the more i became decidedly unsatisfied with the rear cockpit layout and ability to make look clean. Another 3D printed part that just does not measure up. Last night I did some major surgery.
It started with the large radar ring which IMO was not right and in the way so I cleared the deck to start over.
Did not stop there. Cleared the entire deck and carefully extracted the rear cockpit from the rear canopy to start over.
Pucker factor right there. They don't call it super glue for nothing...
Laid out a new cockpit. Main thing i wanted to add was the lower console. I then rounded out that area and put in fresh flat panels for the rest. (The front edges are not yet done)
Then did some tests with the decals I have. Gain I think they will work for the lower console but not the upper. These are from a 1/32 B-25.
Too small...
And the same for the front cockpit. This may work ok. Again 1/24 B-25. The front cockpit for the Snowspeeder is just dumb. Way too simple and not enough room to really expand it. Oh well...
I ordered some 1/24 spitfire cockpit parts. Largest scale you can buy. We will see.
If it does not work then plan B will be to do… something else.
Attachments
Last edited:
Thank you joberg
Spent the morning doing scale comparison. Seems like the cockpit wants to be 1:20 scale based on the Ju-87 gauge panel from my printed part compared to the 1/32 scale 3D decal i have. Odd scale but not surprised from a .stl file. Biggest i have found for the Ju-87 is 1/24. Found a Spitfire in 1/18...

Been looking at the production 1:1 prop and the rear cockpit is nothing like my printed part so i think i am going to care less and less about some of this and do what seems correct. Re-sculpting the cockpit again today and we will see what i end up with. Rainy so nothing is happening fast today.

Smile Mark. This layout image was good and inspired my angled changses


The rear engine spoiler pivot is still frustrating me. Think i am going to have to go with a double pivot single link and just ignore that in real live that makes no aerodynamic sense at all. (Not that the movie pivots make sense anyways as they would tear off soo fast... Its a movie thought...)


(Edit. Read my next post as I figured out how to make this paint work)
Paint. Was told by the mfg that the pigment separation is normal and to just filter it. I am no expert but i have painted a car or two and lots of other things i don't buy it. I filtered out all the pigment ended up with white water which sprays like white water providing no coverage. I then added Tamiya thinner to the pigment and guess what... Ended up with paint that actually covers. Not great but better. Will not and would not recommend this paint to anyone. Looking at Vallejo and Archive X. Also learning that reefer white may not be the right base coat either but i think that is not super important as my ship will be weathered.


Spent the morning doing scale comparison. Seems like the cockpit wants to be 1:20 scale based on the Ju-87 gauge panel from my printed part compared to the 1/32 scale 3D decal i have. Odd scale but not surprised from a .stl file. Biggest i have found for the Ju-87 is 1/24. Found a Spitfire in 1/18...
Been looking at the production 1:1 prop and the rear cockpit is nothing like my printed part so i think i am going to care less and less about some of this and do what seems correct. Re-sculpting the cockpit again today and we will see what i end up with. Rainy so nothing is happening fast today.
Smile Mark. This layout image was good and inspired my angled changses
The rear engine spoiler pivot is still frustrating me. Think i am going to have to go with a double pivot single link and just ignore that in real live that makes no aerodynamic sense at all. (Not that the movie pivots make sense anyways as they would tear off soo fast... Its a movie thought...)
(Edit. Read my next post as I figured out how to make this paint work)
Paint. Was told by the mfg that the pigment separation is normal and to just filter it. I am no expert but i have painted a car or two and lots of other things i don't buy it. I filtered out all the pigment ended up with white water which sprays like white water providing no coverage. I then added Tamiya thinner to the pigment and guess what... Ended up with paint that actually covers. Not great but better. Will not and would not recommend this paint to anyone. Looking at Vallejo and Archive X. Also learning that reefer white may not be the right base coat either but i think that is not super important as my ship will be weathered.
Attachments
Last edited:
Integrity is important to me so I need to withdraw my position on my paint. After more research I found their page stating that you can’t mix the paint by shaking but have to stir/beat it like pancake mix.
So…. I made this.

And got this.


Very little pigment in the strainer and good coverage.
I stand corrected.
So…. I made this.
And got this.
Very little pigment in the strainer and good coverage.
I stand corrected.
Agree. Thought about that way too late in the process. Next time. Once i add grime i hope things will blend a little more.I think that the instrumentation is not bad; I probably would've surrounded some of them into some kind of small frame.
But, all in all, it does the job.
What do you all use for window glass on your models?
Over the weekend I worked on fiber optics, canopy close magnetic latches and detailing the top of the canopy. Also did a prototype dual pivot engine spoiler pivot to experiment a little.
Also have on the way new paints and LED illuminators for the interior lights.
Trying not to go overboard. Difficult to photograph. Sorry.

Hard to see the dash lights.

Seat console. I also have lights in the side boards but no photos. Had to clear out space in the body and all these assemblies to route the fibers and wires. Always fun after the fact.

Brown roof “padding” with roof "locks" and other details and associated cables. Stupid me almost glued my hinges shut with too much CA glue. Yikes...

Spoiler. Hinge will work. Need to dream up ways to make it look realistic.

Over the weekend I worked on fiber optics, canopy close magnetic latches and detailing the top of the canopy. Also did a prototype dual pivot engine spoiler pivot to experiment a little.
Also have on the way new paints and LED illuminators for the interior lights.
Trying not to go overboard. Difficult to photograph. Sorry.
Hard to see the dash lights.
Seat console. I also have lights in the side boards but no photos. Had to clear out space in the body and all these assemblies to route the fibers and wires. Always fun after the fact.
Brown roof “padding” with roof "locks" and other details and associated cables. Stupid me almost glued my hinges shut with too much CA glue. Yikes...
Spoiler. Hinge will work. Need to dream up ways to make it look realistic.
Last edited:
Figured out a double pivot hinge for the rear engine spoiler. Closes properly and opens up to kick the spoiler up and back as it should. Also came up with “hydraulics” to “actuate” it and hold it in place.
For sure not cannon but realistic and fits. Now to make two pretty ones as the proton is pretty rough.
Basic dual hinge

Main lift Hydraulic cylinder

Two secondary tilt hydraulic cylinders. Back o e is hard to see. It is mirrored.

Going down.

Stowed away from the bottom

Removed to replicate


Paints and more micro drills for fiber optics arrived today.

For sure not cannon but realistic and fits. Now to make two pretty ones as the proton is pretty rough.
Basic dual hinge
Main lift Hydraulic cylinder
Two secondary tilt hydraulic cylinders. Back o e is hard to see. It is mirrored.
Going down.
Stowed away from the bottom
Removed to replicate
Paints and more micro drills for fiber optics arrived today.
Last edited:
Similar threads
- Replies
- 2
- Views
- 163