Mozzie
New Member
Project finally is far enough along that I am ready to post here.
After losing out on my Nerf M41A pulse rifle (moved to europe since the preorder and they are impos) and just can't track one down here, I decided to instead build a companion blaster from something a spotting on Aliexpress.
The base is the Lehui MG3 "nerf" gun. Which is a belt fed battery operated 75% scaled down MG3/MG42 dart gun.

Despite the scale issue it's great that the whole blaster breaks down into modules, making it easy to work on and extend for my uses.

Especially the stock, which will be important for extending the back of the receiver.

The ammo drum is at a weird angle, I think so that you can hang the belt right over it (kinda like the old soup can trick on the M60 Machine gun to feed loose belts.

It really ruins the profile though so cut the connector off, ran heat inserts into it and epoxied it back on.


Next was the barrel, which I split in half and measured how much I needed to extend it by to get vaguely the correct length. I also removed the flash hider and front/rear sights. and cylinder for the anti aircraft sight.


Taking measurements I designed a 3d printed insert to fit within the plastic and epoxied it on. Not pictured but I also printed an extension for the interior barrel. I thought about cutting all the holes out on the right side to be more accurate to the MG42 but it's all going to be covered by the forks and it adds mechanical strength to keep them.

Then using the mesh from this M56 file on thingiverse I printed out the forks. I split them in half and used wooden skewer with holes in the mesh to align them. These forks now nicely cover my extension.

After doing battle with the mesh geometry on that file I decided to freehand model all the rest of the printed parts directly in fusion using references and my own guesses. Once I've got this project finished I'm going to share the F3D file for anyone to build their own, Note though its a mix of all sorts of weird hardware/screws I had lying around with a lot of hand fitment after printing. So definitely adjust the CAD file for your needs

First part I freehand modelled was the muzzle, which I am pretty happy about how it turned out. The 4 teeth are a bit fragile though, so print with extra walls so they are 100% full. (dont use 100% infill on models though, its a waist and adds internal stress to the parts, better to increase wall count so the polymer chains are aligned with the shape)

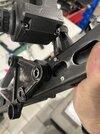
Things were really coming together with the front, so now moved onto the receiver. Which meant opening it up. There was a screw hidden under the sideplates of the pistol grip, which are just friction fit so with a flathead you can pry them off. Inside you can see just how complicated the automatic system is, but it does show that the pistol grip itself can be cut off.


I removed the bottom of the grip, and then designed and printed the rear receiver extension, it connects the same way as the buttstock did, but with two bolts running through it for extra strength. The rod is an 18mm curtain rod I had in a pile of junk. I also had an old coathanger that I'm using as the transfer bar for the trigger. Since the trigger doesn't have a good return force, I am going to put a spring on the rear brake handle so that it resets the trigger itself using the metal wire as a transfer bar.

Don't have an in progress pic, but I did a flat black primer with a graphite powder rub which really came out great. I'm actually going to get some semi matte clearcoat to tone it down, but waiting for the gun to be fully assembled before I clearcoat it, so my handling continues to "wear" and weather the graphite coating.
I printed the trigger box to cover up the cut area. Had to do a lot of careful filling to not damage the wires for the motor that run in that area. I also increased the size of the bolts holding the extension as the original ones were flexing.

Here is a video of the graphite treatment in motion.
I finished the tube for the transfer bar and the brake handle at the back. The handle itself has an extra spring I had from an old 3D printer extruder, that resets it instead of having the reset spring force on the original trigger, which just has a wimpy coil spring. It has a really nice feel, and cocking the gun in manual mode it has more than enough leverage to release the sear.

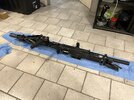
Here is the current state of the project. I put a full paint treatment just to see if the receiver extension would blend in well. The muzzle is actually graphite rubbed over silver spray, for a different tone.

Still to do is design and print the front grip assembly, the counter weight cylinder that hangs under the barrel, the top piece of the ammo drum. An extension for the cocking handle to be larger, plus 3 foam grips to attach (Which might need 3D printed inserts to increase the OD of the curtain rods) I am also thinking of hooking up the wiring to the foregrip, so there is a master "power" switch for the battery with an indicator light. I don't have plans or the money to spend on a knockoff steadicam vest yet, so leaving the clamp and bearings for a future project.
Now wish I could find an Nerf M41a as a perfect companion for it!
After losing out on my Nerf M41A pulse rifle (moved to europe since the preorder and they are impos) and just can't track one down here, I decided to instead build a companion blaster from something a spotting on Aliexpress.
The base is the Lehui MG3 "nerf" gun. Which is a belt fed battery operated 75% scaled down MG3/MG42 dart gun.
Despite the scale issue it's great that the whole blaster breaks down into modules, making it easy to work on and extend for my uses.
Especially the stock, which will be important for extending the back of the receiver.
The ammo drum is at a weird angle, I think so that you can hang the belt right over it (kinda like the old soup can trick on the M60 Machine gun to feed loose belts.
It really ruins the profile though so cut the connector off, ran heat inserts into it and epoxied it back on.
Next was the barrel, which I split in half and measured how much I needed to extend it by to get vaguely the correct length. I also removed the flash hider and front/rear sights. and cylinder for the anti aircraft sight.
Taking measurements I designed a 3d printed insert to fit within the plastic and epoxied it on. Not pictured but I also printed an extension for the interior barrel. I thought about cutting all the holes out on the right side to be more accurate to the MG42 but it's all going to be covered by the forks and it adds mechanical strength to keep them.
Then using the mesh from this M56 file on thingiverse I printed out the forks. I split them in half and used wooden skewer with holes in the mesh to align them. These forks now nicely cover my extension.
After doing battle with the mesh geometry on that file I decided to freehand model all the rest of the printed parts directly in fusion using references and my own guesses. Once I've got this project finished I'm going to share the F3D file for anyone to build their own, Note though its a mix of all sorts of weird hardware/screws I had lying around with a lot of hand fitment after printing. So definitely adjust the CAD file for your needs
First part I freehand modelled was the muzzle, which I am pretty happy about how it turned out. The 4 teeth are a bit fragile though, so print with extra walls so they are 100% full. (dont use 100% infill on models though, its a waist and adds internal stress to the parts, better to increase wall count so the polymer chains are aligned with the shape)
Things were really coming together with the front, so now moved onto the receiver. Which meant opening it up. There was a screw hidden under the sideplates of the pistol grip, which are just friction fit so with a flathead you can pry them off. Inside you can see just how complicated the automatic system is, but it does show that the pistol grip itself can be cut off.
I removed the bottom of the grip, and then designed and printed the rear receiver extension, it connects the same way as the buttstock did, but with two bolts running through it for extra strength. The rod is an 18mm curtain rod I had in a pile of junk. I also had an old coathanger that I'm using as the transfer bar for the trigger. Since the trigger doesn't have a good return force, I am going to put a spring on the rear brake handle so that it resets the trigger itself using the metal wire as a transfer bar.
Don't have an in progress pic, but I did a flat black primer with a graphite powder rub which really came out great. I'm actually going to get some semi matte clearcoat to tone it down, but waiting for the gun to be fully assembled before I clearcoat it, so my handling continues to "wear" and weather the graphite coating.
I printed the trigger box to cover up the cut area. Had to do a lot of careful filling to not damage the wires for the motor that run in that area. I also increased the size of the bolts holding the extension as the original ones were flexing.
Here is a video of the graphite treatment in motion.
I finished the tube for the transfer bar and the brake handle at the back. The handle itself has an extra spring I had from an old 3D printer extruder, that resets it instead of having the reset spring force on the original trigger, which just has a wimpy coil spring. It has a really nice feel, and cocking the gun in manual mode it has more than enough leverage to release the sear.
Here is the current state of the project. I put a full paint treatment just to see if the receiver extension would blend in well. The muzzle is actually graphite rubbed over silver spray, for a different tone.
Still to do is design and print the front grip assembly, the counter weight cylinder that hangs under the barrel, the top piece of the ammo drum. An extension for the cocking handle to be larger, plus 3 foam grips to attach (Which might need 3D printed inserts to increase the OD of the curtain rods) I am also thinking of hooking up the wiring to the foregrip, so there is a master "power" switch for the battery with an indicator light. I don't have plans or the money to spend on a knockoff steadicam vest yet, so leaving the clamp and bearings for a future project.
Now wish I could find an Nerf M41a as a perfect companion for it!
Last edited:
")