Thanks. As to writeups of this, my definite weak point is planning. I can CAD, but I never do. There weren't even any drawings for this of any sort, I do everything in my head and always have. I have no good measurements for parts either. The build was a lot of improvisation and head scratching. Documenting it would more or less need to go with a major overhaul of the design and reduction of eyeballing and custom fitting things.
I started with the base gun, in this case a Nerf Stryfe, and a squared-up framecap from a trailer showing a good side view of the rifle to get measurements, which are of course in pixels and have no conversion factor to absolute distances in the real world. To do that I equated the Stryfe lower receiver's length (front edge of magwell to backstrap, IIRC) to the original Masada lower and scaled all dimensions accordingly which yielded a proportionate, if not quite accurately scaled, result. Used with a real Masada lower (or airsoft replica) it would result in the correct actual size.
The shroud width had to deviate due to the nerf gun underneath. Also, note that the Stryfe is asymmetrical, so the left side of the receiver was shimmed out to match the right, and then the middle layer of the 3-layer shroud structure was built to fit to the result.
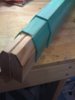
The upper shrouds were constructed panel by panel over a form starting with the base layer that covers the top of the stock, then the other two were built over that to match perfectly.
View attachment 193610
All structural bonding and gap filling involved Devcon or Loctite 2 part methacrylate "plastic welder". Be careful with epoxies, which are less forgiving on plastics and are brittle. The lower shroud in the handguard area was thermoformed. My OR does not have perfectly continuous shrouds; the lower shroud is held on with 4 screws and must be removed to strip the gun, though if I was more patient I would have made the seam flush and followed the color line like another builder on here.
The Stryfe receiver has thick PVC blocks built up on the top which are drilled and tapped to accept the middle two screws on top of the shrouds, clamping the gun and shrouds together.
View attachment 193615
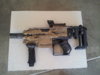
The barrel is 2 pieces of scrap Nerf barrel stock spliced together, stiffened with a PVC brace and Devconned into the Stryfe barrel nut which was reamed out to pass the barrel all the way through to the flywheel cage. The flash hider is PVC. The barrel was internally braced to the shrouds after mounting for durability.
View attachment 193608
View attachment 193613
More PVC was used for bodywork, fake ejection port, etc. on the Stryfe.
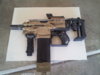
The shroud material was 4" ASTM D3034 sewer pipe available in the US. The thinner material was 3" 2729 drain pipe and some thick PVC sheets were 2" schedule 40 pipe.
View attachment 193611
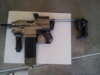
Before paint...
View attachment 193612


") keep up the good work, it only gets better from here on....
keep up the good work, it only gets better from here on....