My Raimi suit build/guide *Starts soon* *PIC HEAVY*

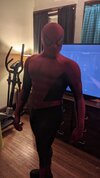
Update! I've already bought v2 of the suit. I tried hard to get the blues to a more purplish hue. Here you can see the before:
IMG_20210625_041349_809.jpg


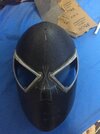
I know the colors were good before, but I tried to get the look closest to the airbrushed look in sm2.
IMG_20210619_213005~2.jpg


I struggled with the colors, but printcostume actually offered to change the colors for me and do a print test.

1631244444451_InsertPic_.jpg

Keep in mind that when worn, the color will fade slightly.
 
Are you talking leg width or depth? Maybe I'm just misunderstanding. It was between .5 and 1mm deeper in SM3, but I thought the front-on design should be the same... though they didn't always apply the spiders perfectly in SM2 lol.

I'll take a look though, wouldn't surprise me to learn something new about this dang thing after all these years. haha
I meant width I know SM3 was deeper because of the gaps behind the front emblem for the webbing (which is the only thing that makes that one better than the 2004 one)
 
Also that blue in second pic looks close to what's already given with the pattern did you restart from the unaltered pattern and put a hint of purple in there?
 
Also would You save money by keeping the red sections from your previous suit ,take it to a seamstress and have them remove the previous blue/white sections, fix your neck dip and attach the purple/blue/white fabric to it?
 
Ok! Sorry for the lack of updates. My v2 suit has arrived!
PXL_20210920_204115958.PORTRAIT.jpg

PXL_20210920_204142138.PORTRAIT.jpg

I think the colors here turned out much better
PXL_20210921_005700981.jpg

PXL_20210921_005714532.jpg

PXL_20210921_005841679.jpg

PXL_20210921_005951296.jpg
PXL_20210921_005824804.jpg

So, I know I don't have the best lighting conditions, but the suit came out so much better than expected. It's very beautiful in person. One thing that did strike me odd is the fact that Printcostume removed the neck seam digitally. There's absolutely no seam on the neck. Hopefully this doesn't affect webbing too much.
 

Attachments

  • PXL_20210921_005824804.jpg
    PXL_20210921_005824804.jpg
    1.5 MB · Views: 82
Ok! Sorry for the lack of updates. My v2 suit has arrived!
View attachment 1496449
View attachment 1496450
I think the colors here turned out much better
View attachment 1496451
View attachment 1496453
View attachment 1496454
View attachment 1496455View attachment 1496456
So, I know I don't have the best lighting conditions, but the suit came out so much better than expected. It's very beautiful in person. One thing that did strike me odd is the fact that Printcostume removed the neck seam digitally. There's absolutely no seam on the neck. Hopefully this doesn't affect webbing too much.
I think you've hit the spot man Is there any chance you could show us what it looks like outside in a similar time of day?
 
The legs shouldn’t have any noticeable difference between those two. As far as I’m aware, the only difference is the color. SM3 was more silvery/gunmetal whereas SM2 was a flat black with greyish tones.

Do you have a reference that shows otherwise because all my reference is showing what appears to be the same spider.
Comparrison SM 2 AND 3.jpg

Here it is the differences between the two as for the back I think that was just color.
 
I will get some shots of the suit in broad daylight as soon as I can. In the meantime I have something exciting. It's a little lengthy so bear with me.

I own Spideyplanets faceshell, but the problem is, because the lenses stay the same size while the shell changes, and mine being a a size small, the lenses look bigger than they should. While I'm not getting rid of my shell, I wanted to explore some other options.

A VFX artist by the name of low_res_jpg has taken a shell file created by the name of Andrey_blend
IMG_20210929_053527.jpg


He tweaked this shell for his 2004 model he's creating
IMG_20210926_025415_920.jpg

Combing a pattern made by the one who made my suit pattern:
20210929_053125.jpg

The model looks absolutely gorgeous. Unfinished, but a beauty. I spoke to jpg, and he's willing to turn the tweaks he did into a fully functional faceshell. And the best part is, the tweaks he did are guaranteed to fit the suit pattern used!
 
If your going to use those lenses I recommend you sand away the ridge above the where the bevel edges meet at the top of the frames, for when I painted my lenses the stencils Spidey planet used for the two tone appearance didn't work so I used this masking tape here:


e9-938569b98dff_1.4e70f3d033f8eca76c8691660b53991a.jpg

Can't show pics because when I was younger I put too many coats on them and the detail got lost so I had to restart.
 
Last edited:
Or you could try what I did, bought a spidey4fun perfect shape very comfortable, lightweight, blends well with your skull and most importantly has a very close shape to Spidey planet whilst not making you lenses look ludicrous, and my head shape isn't too big so I think you'll be alright if you get one, however you will need a dremel and it is kinda hard to figure out where it all goes but if you mark out the web positioning it can work,also can you tell me the circumference of your faceshell unworn cuz i dont think he does multiple sizes.
 

Attachments

  • IMG_0773.JPG
    IMG_0773.JPG
    1.3 MB · Views: 129
  • IMG_0779.JPG
    IMG_0779.JPG
    1.2 MB · Views: 122
  • IMG_0780.JPG
    IMG_0780.JPG
    1.3 MB · Views: 122
  • IMG_0781.JPG
    IMG_0781.JPG
    1.2 MB · Views: 118
  • IMG_0782.JPG
    IMG_0782.JPG
    1.3 MB · Views: 190
Or you could try what I did, bought a spidey4fun perfect shape very comfortable, lightweight, blends well with your skull and most importantly has a very close shape to Spidey planet whilst not making you lenses look ludicrous, and my head shape isn't too big so I think you'll be alright if you get one, however you will need a dremel and it is kinda hard to figure out where it all goes but if you mark out the web positioning it can work,also can you tell me the circumference of your faceshell unworn cuz i dont think he does multiple sizes.
Thank you for the tip! I figured out that this would probably be the way to go. My method of aligning mask and lenses is to purchase the suit with the circumference under an inch of your standard size, as I feel that using your normal measurements makes the mask "sit" as opposed to conforming to your face. I did this on my 2002 puff paint suit
IMG_20211013_011332.jpg

IMG_20211013_011612.jpg

The mask looks fantastic here, which is strange as this is the Spidey planet/el fett shell just with black lenses. I definitely like the way puff paint looks and will purchase one in the future. I apologize for lack of updates, as things slowed down tremendously.
 
I forgot to mention that I have a 2002 shell made by LDS_3D. I haven't used it in an actual project yet, but I have a few shots of me wearing the mask
IMG_20210723_015228~2.jpg


IMG_20210723_015238~2.jpg


The shape is absolutely fantastic. I highly recommend it. I should tackle a 2002 suit, as not alot of people like it, and is constantly overshadowed by the 2004/07 suits. While visually inferior, the 2002 suit is very underrated.
 

Your message may be considered spam for the following reasons:

If you wish to reply despite these issues, check the box below before replying.
Be aware that malicious compliance may result in more severe penalties.
Back
Top