Trying a cheaper way to achieve raised webbing for Raimi suit

EatYourGreenVeg

New Member
Hello! I have been really getting a lot out of reading past posts as I’ve started cosplaying in the last year or so and wanted to share something I’m working on.

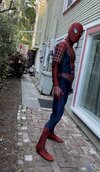
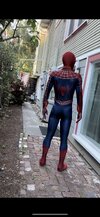
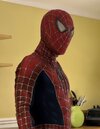
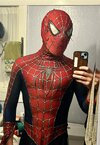
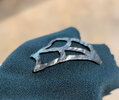
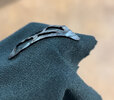
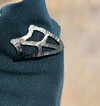
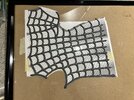
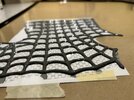
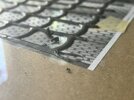
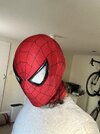
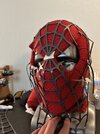
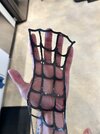
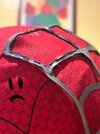
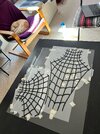
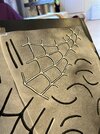
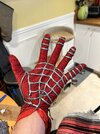
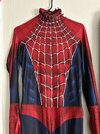
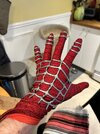
I am at the beginning of making a Raimi spidey suit and while I have most aspects figured out, the webbing has been the big question mark. I’m not able to spend the money on urethane webbing right now but would like to achieve some kind of 3D webbing. I have looked at many people who have done normal puffy painting and I think it works great for the ASM 1 and 2 suits as well as the MCU suits. However, the rounded quality of the webbing when you puff paint doesn’t look as accurate to the Raimi webbing given it has the sharper bevel and more rectangular shape. SO, I’ve been trying to figure out a way to use puffy paint in a way that can look more accurate to the real suit.

The method I’m experimenting with essentially involves puffy painting the web lines on a flat, smooth surface (glass ideally), and then once the paint dries, you carefully peel it off. You then flip the painted pattern so that the flat side that was against the glass will face up. You can carefully clean up the edges of the dried webs with an x-acto knife to fix any errors you made when puffy painting. You then glue the webbing, rounded side down to the fabric. What you will then finish with is a slightly raised webbing that has a flat surface and also creates a slight shadow on the fabric, adding to the 3D effect.

I just finished my first test with this approach and I think it’s encouraging (see photos). I painted this webbing on a plastic ziplock bag which is why it is a little warped/bumpy.

Anyways, curious to see what people think of this approach and would be interested to know if anyone else tries it!
 

Attachments

  • IMG_5288.jpeg
    IMG_5288.jpeg
    1 MB · Views: 163
  • IMG_5287.jpeg
    IMG_5287.jpeg
    986 KB · Views: 172
  • IMG_5286.jpeg
    IMG_5286.jpeg
    1.2 MB · Views: 152
Did a more ambitious test today… used a ratio of about 1/3 liquid latex to 2/3 paint this time to see how the stretch is. Gonna give it 2 days to dry before attempting to peel (very carefully).
 

Attachments

  • IMG_5311.jpeg
    IMG_5311.jpeg
    3.6 MB · Views: 189
  • IMG_5310.jpeg
    IMG_5310.jpeg
    2.6 MB · Views: 207
Update:

The test I posted pics of above unfortunately did not work, but I learned! I did it on a large piece of plexiglass (from a big cheap poster frame) and the dried webbing would not peel off, but would only come off in small chunks (see pic below). Something about glass must make it release way easier. I also think the ratio for the liquid latex to puffy paint that I used was too high.

I’m going to try another larger test on glass this time and see if I can get it to fit on the mask I recently got from printcostume.
 

Attachments

  • IMG_5340.jpeg
    IMG_5340.jpeg
    2.1 MB · Views: 132
Here’s the current state of my costume if anyone cares to see! The blues came out more vibrant than I would have preferred but otherwise I’m really happy with it. Pattern by insomnia.cbr and printed/sewn by printcostume.com. Face shell and lenses by spideyplanet
 

Attachments

  • IMG_5531.jpeg
    IMG_5531.jpeg
    587.5 KB · Views: 243
  • IMG_5516.jpeg
    IMG_5516.jpeg
    484.2 KB · Views: 239
  • IMG_5519.jpeg
    IMG_5519.jpeg
    439.9 KB · Views: 204
  • IMG_5523.jpeg
    IMG_5523.jpeg
    412 KB · Views: 217
  • IMG_5526.jpeg
    IMG_5526.jpeg
    274.4 KB · Views: 213
  • IMG_5520.jpeg
    IMG_5520.jpeg
    438.7 KB · Views: 215
  • IMG_5496.jpeg
    IMG_5496.jpeg
    1.2 MB · Views: 244
My test has dried and although it made me aware of some challenges, it’s still promising! See the pic of me laying it on the mask just to see if the scaling/placement is working. I intended to make the webbing a lighter color moving forward.

Things I learned:
1) a single layer of puffy paint ends up being really thin, making it really hard to peel the dried webbing off the glass. Since the flat underside is the side that matters, I went ahead and did another layer of puffy paint over the whole pattern after the first layer was pretty dry (essentially traced over the first layer). This results in the webbing being a little thicker (which also contributes to the raised webbing effect when you lay it on the fabric).
2) You have to be REALLY careful when peeling the webbing off the glass and handling it. It is very flimsy (so can tear if you’re not careful) and also easily sticks together due to the tackiness. I think it’s best to break the webbing pattern into smaller sections so you don’t have to handle such a large section at once.
3) Cleaning up edges with a brand new xacto blade was much more difficult than expected and I gave up on it quickly. The tackiness of the puffy paint is mainly responsible for this I think. Maybe letting it cure another day or so would help with this? I think the best bet is to just do as precise job as possible when painting so only minimal touch ups are needed with the xacto.
 

Attachments

  • IMG_5510.jpeg
    IMG_5510.jpeg
    2.9 MB · Views: 212
  • IMG_5542.jpeg
    IMG_5542.jpeg
    1.6 MB · Views: 353
  • IMG_5533.jpeg
    IMG_5533.jpeg
    1.4 MB · Views: 209
Okay, another update. While I am still going to use the technique I came up with of puffy painting on the glass, I have had to alter my plan. It became clear that using the underside of the puffy painted pattern is not a feasible plan for a couple reasons: 1) the rounded surface of the puffy paint lines does not give adequate surface area for the glue to adhere it to the fabric (as opposed to the gluing it down with the flat side against the fabric) and 2) the puffy paint does this weird thing where the edges curl up when you glue it with the flat side up (see first photo).

I decided I will still paint on glass and then glue the webbing onto the fabric, but I will glue the flat side down, resulting in it appearing as if I just puffy painted directly onto the fabric. I still think it’s worth doing this despite it adding some extra steps because it means wet paint will never be near the fabric, minimizing the chances of any mistakes, and I can take my time and be super neat when painting. When I have a bad air bubble or make an error while painting on the the glass, I can simply wipe it off with a paper towel and try again (or I can do slight touch ups with Xacto when it dries).

I decided to add an extra step after painting, before gluing, which is to spray down the puffy paint lines with a couple light coats of grey plastidip. I am doing this for a couple reasons: 1) the plastidip has a matte finish, covering the really glossy finish of the puffy paint (which doesn’t look as accurate to the Raimi web lines), and 2) the plastidip seems to actually slight strengthen the web lines AND it makes the puffy paint not stick together as easily (this will be really useful when storing the costume).

I am using the technique I have seen others do to finish the web lines, which is draw over the middle with a silver sharpie. I think this looks pretty dang convincing! I did the first round of webbing and just started gluing on some finger webbing and a section on the back. Excited to finish this!
 

Attachments

  • IMG_5561.jpeg
    IMG_5561.jpeg
    767.1 KB · Views: 185
  • IMG_5577.jpeg
    IMG_5577.jpeg
    817.9 KB · Views: 179
  • IMG_5589.jpeg
    IMG_5589.jpeg
    2.5 MB · Views: 199
  • IMG_5598.jpeg
    IMG_5598.jpeg
    1.7 MB · Views: 193
  • IMG_5600.jpeg
    IMG_5600.jpeg
    1.8 MB · Views: 209
This is really cool, and I look forward to how it turns out— And I'm not trying to say don't continue down this path, it looks like a lot of effort and if I may offer a different suggestion to try sometime that is roughly the same amount of work:

Sculpt the webbing in clay over the plastic/glass in the pattern you want. Roll thin but even strands of clay, lay it out where the puff paint would go, and smooth the tops. You'd be laying it similarly to how you're laying the puff paint, and but also sculpt and cut the clay in a more controlled way.

For $15 you can then get several rolls of plaster bandages— make a mold of the webbing using this (or just by pouring straight up plaster, that's what I did.)

With $25-$35 you can get two part VytaFlex urethane rubber. The size it comes in, you can definitely make a all the webbing and then some. Get some pigment/powder that's either silver or black too.

Like I said, I'm not suggesting you abandon this, it's very cool what you're accomplishing, I bring this up because laying the puff paint down over the glass/plastic/the pattern is very smart if not time consuming, and made me think of this alternative way were you can re-cast the webs as many times as you need with a lot more control over web-shape pre-molding.
Thanks for offering this! This definitely seems like something I’d like to try in the future. How hard was it to get the web lines really clean using that method? The method I’m using is certainly turning out to be time consuming.
 
Most of the chest is done and got a good start on one hand. I was a little concerned I got the scale wrong when sizing the webbing on the hands but it actually worked out great.
 

Attachments

  • IMG_5649.jpeg
    IMG_5649.jpeg
    1.8 MB · Views: 229
  • IMG_5638.jpeg
    IMG_5638.jpeg
    2 MB · Views: 244
  • IMG_5648.jpeg
    IMG_5648.jpeg
    1.8 MB · Views: 229
Thanks for offering this! This definitely seems like something I’d like to try in the future. How hard was it to get the web lines really clean using that method? The method I’m using is certainly turning out to be time consuming.
Never used the method myself, it's just something that occurred to me while I was reading this— but you can make the web lines pretty consistent and clean with clay before molding. If something looks off to you, you can simply cut/smooth/re-sculpt until it looks right and scrape off the excess.

I have some clear film I can lay over a printout of the web designs and try this out myself sometime on a small scale (the sculpting part, not the molding part) and I'll get back to you :)
Oh I see, yea please let me know once you e tried it :)
 
Making progress each day… I will soon have all the webbing down except for the mask (waiting on a new one with a zipper from printcostume). One annoying thing I realized pretty far into gluing is that I have not been the most consistent with the thickness of the webbing on the different parts of the body, and it’s pretty noticeable (at least of you’re standing a few feet away or less). Something I’d need to solve if I were to use this approach again! I also decided to craft a foam muscle suit using upholstery foam (there’s some good YouTube tutorials) and I think it’s helping me achieve a similar physique to what Tobey had in his suit.
 

Attachments

  • IMG_5725.jpeg
    IMG_5725.jpeg
    903.2 KB · Views: 172
  • IMG_5731.jpeg
    IMG_5731.jpeg
    798.3 KB · Views: 158
Hello again to anyone who is looking at this thread! Wanted to give a little update on my suit. I’m nearly done after about 3 months of pretty intense work on it. Just doing some to gluing touch ups and fixing some little errors on the webbing with silver/black sharpie. I don’t plan to ever take this approach to the webbing again but I’m pretty happy with how it’s coming out! Sorry for the low image quality on some of the photos…
 

Attachments

  • IMG_8099.jpeg
    IMG_8099.jpeg
    323.1 KB · Views: 158
  • IMG_8006.jpeg
    IMG_8006.jpeg
    65.7 KB · Views: 155
  • IMG_7804.jpeg
    IMG_7804.jpeg
    971.1 KB · Views: 171
Did a photoshoot today of the finished suit. So glad to be done!
 

Attachments

  • IMG_9254.jpeg
    IMG_9254.jpeg
    1.4 MB · Views: 126
  • IMG_9101.jpeg
    IMG_9101.jpeg
    1.9 MB · Views: 112
Did a more ambitious test today… used a ratio of about 1/3 liquid latex to 2/3 paint this time to see how the stretch is. Gonna give it 2 days to dry before attempting to peel (very carefully).
Where to buy liquid latex
 
If you want to make a specific suit, if you want to make it, how many mm is the thickness of the webbing
 
Back
Top