My PKD Bladerunner pistol build.

By the way, a point of order for B1RDY—

The title of this thread is “My PKD Bladerunner 2049 pistol build.”. The BR 2049 version of the pistol used the Weaver knob, not the slotted screw. If you’re going for 2049-accurate, then you don’t need to worry about the screw!

Just sayin’!


Mind you, my tongue is firmly in cheek, here. Build your PKD however you wish. It just now occurred to me that you’ve been hunting for the screw from BR 2019, but mentioned BR 2049 in the thread title!
Sorry, forgive my ignorance. I am not as well informed or knowledgeable as you guys and made a stupid error. I couldn't tell you the difference between the 2019 or 2049 version I just like this pistol and didn't mean to rub anyone the wrong way with post. I will try to rename the post to my PKD blaster build.
 
By the way, a point of order for B1RDY—

The title of this thread is “My PKD Bladerunner 2049 pistol build.”. The BR 2049 version of the pistol used the Weaver knob, not the slotted screw. If you’re going for 2049-accurate, then you don’t need to worry about the screw!

Just sayin’!


Mind you, my tongue is firmly in cheek, here. Build your PKD however you wish. It just now occurred to me that you’ve been hunting for the screw from BR 2019, but mentioned BR 2049 in the thread title!

I also created a "quick & dirty" model of a main hammer spring. It's not 100 accurate, but I think should be good enough when seen through the amber grips.
I used an M3 bolt and a spring.
 

Attachments

  • 20210519_203707.mp4
    33.7 MB
  • 20210520_010338.mp4
    6 MB
Sorry, forgive my ignorance. I am not as well informed or knowledgeable as you guys and made a stupid error. I couldn't tell you the difference between the 2019 or 2049 version I just like this pistol and didn't mean to rub anyone the wrong way with post. I will try to rename the post to my PKD blaster build.

Oh, no one’s rubbed the wrong way! Just kidding around. No worries!
 
Re-tapped the hole on the top front of the receiver to accommodate a more accurately-sized M4 button head screw (rather than the supplied M3), as well as replacing the hex-cap screw on the rear of the bolt with a button head.

I also cut down the threading on the 1/4”-20 screw to allow it to fit in the hole where the Weaver knob was. I drilled out a larger hole, but had a slight blow-out on the side of it, so I’m reinforcing it with JB Weld before tapping the hole.

I also finished glazing and polishing the grips. Just recoating the textured areas with polish, now, since the glazing knocked it back a bit.
I've decided the same with the M4 button head on the receiver also swapped the cap head from the rear for a button head. Also looking at getting a slightly larger front post.
One problem I am having is second guessing some of my decisions to countersink some 1.8mm slim M3 nuts into certain parts and fixing them in with JB weld or something. I am looking at adding them int the front sides and bottom of the barrel as well as the grip frame and at some points in the bulldog frame.
But my anxiety is stopping me incase I screw it up. Also ttrying to decide whether to buy an airbrush or use cans?
 
This is a bit of a way away yet but looking at the paint scheme for this build and would like to ask is it me or does the steyr mag appear to be a satin black while the revolver shrouds look like a gloss black?
 

Attachments

  • LEIDH9E.jpg
    LEIDH9E.jpg
    220.9 KB · Views: 166
This is a bit of a way away yet but looking at the paint scheme for this build and would like to ask is it me or does the steyr mag appear to be a satin black while the revolver shrouds look like a gloss black?

Looking at reference photos taken from different angles, both seem to be the same glossy-but-worn-by-use black.
 
No worries! I’ve only been heavily researching the prop and its history for a few weeks, and am also looking for tips, tricks, and constructive criticism. This is a learning curve for both of us!
 
Bit of a mixed day today. When I started this build I had the most basic of tools, I'm talking about cheap drill bits, small files, and very little else.
So as I come across a process that requires a certain tool which I don't have I race into town and look for what I can find and afford.
I have ideas and plans to do something but my skills can be lacking.
A prime example of this is threading the holes. I purchased the only tap and die set I could find and returned home to attempt this daunting task.
I quickly realised that the tap handle was seriously to big and I overlooked the fact that it's much easier to tap threads if you item is held securely in a vise .
You guessed it I didn't have a vice but fueled but enthusiasm I pushed on only to struggle to cut a decent thread and after test fitting certain parts and taking them apart they deteriorated.
Lesson learned
I returned into town purchased a vice, some JB weld and found a more suitably sized tap set.
I've applied the JB weld and managed to modify a few slim nuts to add in places not visible once the kit is assembled.
I think there will be parts I will re drill with accompanying parts attached to make sure I get decent alignment.
I was previously drilling the holes that held M3 bolts with a 2mm drill bit and I am wondering if I should drill using a smaller drill bit using 1.5mm to give the threads more meat to grip.
I did get a fillister screw arrive today which I ordered before a generous member offered to send me a 3d printed one.
If I have to use mine it will need serious work to thin the shaft.
 

Attachments

  • 20210521_185423.mp4
    34 MB
  • 20210521_184927.jpg
    20210521_184927.jpg
    4.1 MB · Views: 113
  • 20210521_185139.jpg
    20210521_185139.jpg
    1.7 MB · Views: 112
  • 20210521_185307.jpg
    20210521_185307.jpg
    1.6 MB · Views: 110
  • Screenshot_20210521-192736.png
    Screenshot_20210521-192736.png
    1.7 MB · Views: 116
  • Screenshot_20210521-192715.png
    Screenshot_20210521-192715.png
    1.7 MB · Views: 119
  • Screenshot_20210521-192641.png
    Screenshot_20210521-192641.png
    2 MB · Views: 116
  • Screenshot_20210521-192629.png
    Screenshot_20210521-192629.png
    1.7 MB · Views: 116
  • Screenshot_20210521-192605.png
    Screenshot_20210521-192605.png
    1.5 MB · Views: 115
I’m wondering about the thickness of the fillister screw’s side flange (between the domed top and the threading). Seems a bit thick compared to the reference and the Tomenosuke screw. Hmmm.
 
I’m wondering about the thickness of the fillister screw’s side flange (between the domed top and the threading). Seems a bit thick compared to the reference and the Tomenosuke screw. Hmmm.
The fillister screw looks right. The Tomenosuke had a shallower head, but the hero had that deeper one much like the size of the Weaver knob. That can be seen on kits going back to the post World-con Coyle kits which were modelled after the hero.
Tomenosuke:
19A689F1-C5F6-4148-A5FE-FC2FA7120ADB.jpeg
 
Bit of a mixed day today. When I started this build I had the most basic of tools, I'm talking about cheap drill bits, small files, and very little else.
So as I come across a process that requires a certain tool which I don't have I race into town and look for what I can find and afford.
I have ideas and plans to do something but my skills can be lacking.
A prime example of this is threading the holes. I purchased the only tap and die set I could find and returned home to attempt this daunting task.
I quickly realised that the tap handle was seriously to big and I overlooked the fact that it's much easier to tap threads if you item is held securely in a vise .
You guessed it I didn't have a vice but fueled but enthusiasm I pushed on only to struggle to cut a decent thread and after test fitting certain parts and taking them apart they deteriorated.
Lesson learned
I returned into town purchased a vice, some JB weld and found a more suitably sized tap set.
I've applied the JB weld and managed to modify a few slim nuts to add in places not visible once the kit is assembled.
I think there will be parts I will re drill with accompanying parts attached to make sure I get decent alignment.
I was previously drilling the holes that held M3 bolts with a 2mm drill bit and I am wondering if I should drill using a smaller drill bit using 1.5mm to give the threads more meat to grip.
I did get a fillister screw arrive today which I ordered before a generous member offered to send me a 3d printed one.
If I have to use mine it will need serious work to thin the shaft.
Good looking build!
There are screws available with a thinner thread shaft. I believe this one came from a Weaver scope. Probably the same or similar model that the infamous Weaver knob came from. They do have the same thread.
B83324C2-7A5D-461D-B7EE-CB1BFF33F217.jpeg
 
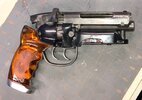
Okay, cool. Kinda hard to find reference on the screenused screw. The photos of the resin cast stunt props are a bit murky.

I’ve only been hardcore-researching this prop for a few weeks, so I don’t know all the ins and outs of it.

I also gave the film a rewatch, the other night. A few observations:

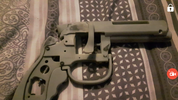
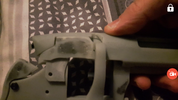
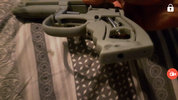
* Slotted screw only, no Weaver knob in sight.

* I think a good number of shots—even some close-ups—actually feature the rubber stunts, despite some people using those shots as reference for hero prop details. For example, the close-up of the blaster hitting the ground when Deckard drops it during the final chase with Roy. Looks like a stunt, to me. Literally so, since the prop falls to the floor and bounces. The hero only seems to appear for live-fire moments and non-action close-ups (Deckard stalking along the rain-soaked wall during the final chase, Deckard slowly reaching down to remove the blanket from Rachael at the end, etc,).

*I didn’t notice the green LEDs illuminated at any point. Also, the (definitely cut) white wires coming from the sight seem only visible in that one close-up of Deckard stalking along the rain-soaked wall. The rest of the time, they appear either absent entirely, or covered with black tape. Either way, no lit LEDs the movie that I could see.
 
Well guess what I'll be watching tonight.
Only question is which version lol.

Listen, I popped open my BR Blu-Ray briefcase boxset, and decided to watch the theatrical cut, since it has the original color-timing (which makes for more accurate blaster reference study).

Of course, once you pop, you just can’t stop, so I’ll soon be rewatching the other versions AND all of the special features. I’m not sure there is such a thing as a casual rewatch of BLADE RUNNER, especially with that treasure-trove of Blu-Ray extra content to dive into.
 
Back
Top