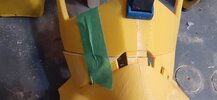
We call that building character... 
You are using an out of date browser. It may not display this or other websites correctly.
You should upgrade or use an alternative browser.
You should upgrade or use an alternative browser.
My Early Disasters pt 2 - A Biker Scout Helmet - How hard can it be?
- Thread starter Dtrasler
- Start date
Dtrasler
Sr Member
I think I've hit the point where I take a break from armour building for a while. Not that I'm going to be building anything else, as such, but I don't have enough PLA to start the next section (the butt - and I need a BIIIIG butt), and I should take some time to do the surfacing right, or at least better than usual. I also have vague ideas about fitting the snaps 'n' straps to actually stop the stuff falling off my manly frame, but I can't really put those into practice until the surfacing is done on the main sections.
Domestic cashflow is down, thanks to various issues, and my valiant attempts to raise capital by selling my plays and e-books (mostly just going on Twitter and yelling "Buy my Stuff!' every lunchtime) have not brought in wads of cash. It's weird, you'd think that in the aftermath of a global pandemic, people would be lining up to grab e-books on helmet-making and plays about writers who are suffering from writers' block....
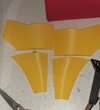
Anyway, here's a picture of the cod, the last piece I'll be printing until my new reel arrives in July.

Looking good. We'll miss the updates and will hold out until July 
davewhite152
New Member
I do love your updates. Very honest and refreshing, makes me realise I am not the only one struggling!
Dtrasler
Sr Member
Thanks Dave, that'sgood to hear. What I've always loved about the RPF is that everyone is helpful, whatever their "level". I have asked the STUPIDEST questions in the past, and been met with kindness. When you're frustrated over build issues (as I so often am) coming here can be daunting because of the professionalism on display, but the people behind it are golden. Don't lose the joy of the hobby!I do love your updates. Very honest and refreshing, makes me realise I am not the only one struggling!
Dtrasler
Sr Member
During my hiatus from armour building, I have attempted to use my new soldering kit to fix up the failed Dalek Voice Ring Modulator. It IS now much neater:
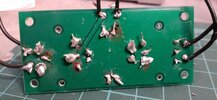
but it still doesn't work, which is really something of a downside. I'm considering hurling it enthusiastically into the bin, which won't fix it or be a good use of the money it cost, but MIGHT make me feel better. Probably not though.
What's annoying is that I have followed all the instructions in my least ham-fisted way. I honestly did the best I could, and it doesn't work, so now I have no idea what to do next. I can't unplug it all and start again, because it's soldered. Off to find an infinite void I can scream into for a while.
Dtrasler
Sr Member
So, here's some thoughts about a issue I have encountered many times over the years I have been a mediocre builder:
Glue: Does it really?

Like everyone even vaguely into this stuff, I have a hot glue gun. I have No More Nails clear-version-in-a-tube. I have gorilla brand superglue. I have some stuff with an orange lid that is weaker than superglue, but stronger than gluesticks. I have that white glue they use in school. Oh, and I have a tin of evil-smelling contact cement.
Over time, I have tried to glue a lot of flooring foam, sometimes some leather, a lot of different plastics, and sometimes some wood. Recently, of course, I've been trying to glue together the sections that make up my armour, 3d printed out of PLA. Generally, hot glue has worked to hold the pieces in place while I reinforce across the back of the join with glued foam or cardboard. Of course, the other day the backplate just...fell in half. Wasn't trying to put it on or anything, hadn't dropped it. The whole chest piece was sat on the holder and the lower back half just fell off.
I'm rubber, you're glue, it bounces off me and won't stick to any bloody thing in the universe.
The other things I'm trying to adhere right now are the strips of elastic and velcro that make up the straps for the armour. The most important right now are the strips of elastic at the shoulder joins. These need to stretch a little so I can get my head through them, but pull together enough to hide the join. I actually did some research for this. Videos on foam armour strapping aren't too helpful, because the issue of weight is different, plus the surfaces act differently. Hot glue was just not going to cut it. Eventually, I found a video by a guy making straps for his 3d printed armour and masks. Same materials as me. Same issues. He suggested I get INDUSTRIAL STRENGTH velcro, but not to use AS velcro. No, he suggested using it as selotape. The industrial velcro sticky side is SO STICKY that it will hold no matter what. He gave a convincing demonstration of being unable to pull off a strap he had secured in this way.
I went out and spent $30 on a box of Industrial Strength velcro. I know that's what it is, 'cos it says it on the box. I use it to tape in the elastic straps for the shoulders. I wait the required fifteen minutes before allowing any stress on it. Almost immediately, the straps start to pull the velcro off the armour.
I don't like coming here to whine - it's a place of inspiration and encouragement, after all. But there is a part of me that wants to howl in despair. Why does this work for everyone else? How many times have I watched folks on the internet neatly stick together two edges of foam with contact cement? Just zzzzip! and it's bonded! I put the glue on and wait as instructed, and there are only two possible results - first (and most likely) the glue is still wet and both sides slide off each other. Second, the glue has dried on both sides - dried solid and NON-STICK.
So, what have I done with the armour? Well, for now I'm using very small, very short screws to hold the velcro in place so it can hold the elastic in place. I can see a day not far off when I will be putting duct tape over the screws to hold them in place....
I have a vision of me arriving at whatever convention and just falling to pieces.

Glue: Does it really?
Like everyone even vaguely into this stuff, I have a hot glue gun. I have No More Nails clear-version-in-a-tube. I have gorilla brand superglue. I have some stuff with an orange lid that is weaker than superglue, but stronger than gluesticks. I have that white glue they use in school. Oh, and I have a tin of evil-smelling contact cement.
Over time, I have tried to glue a lot of flooring foam, sometimes some leather, a lot of different plastics, and sometimes some wood. Recently, of course, I've been trying to glue together the sections that make up my armour, 3d printed out of PLA. Generally, hot glue has worked to hold the pieces in place while I reinforce across the back of the join with glued foam or cardboard. Of course, the other day the backplate just...fell in half. Wasn't trying to put it on or anything, hadn't dropped it. The whole chest piece was sat on the holder and the lower back half just fell off.
I'm rubber, you're glue, it bounces off me and won't stick to any bloody thing in the universe.
The other things I'm trying to adhere right now are the strips of elastic and velcro that make up the straps for the armour. The most important right now are the strips of elastic at the shoulder joins. These need to stretch a little so I can get my head through them, but pull together enough to hide the join. I actually did some research for this. Videos on foam armour strapping aren't too helpful, because the issue of weight is different, plus the surfaces act differently. Hot glue was just not going to cut it. Eventually, I found a video by a guy making straps for his 3d printed armour and masks. Same materials as me. Same issues. He suggested I get INDUSTRIAL STRENGTH velcro, but not to use AS velcro. No, he suggested using it as selotape. The industrial velcro sticky side is SO STICKY that it will hold no matter what. He gave a convincing demonstration of being unable to pull off a strap he had secured in this way.
I went out and spent $30 on a box of Industrial Strength velcro. I know that's what it is, 'cos it says it on the box. I use it to tape in the elastic straps for the shoulders. I wait the required fifteen minutes before allowing any stress on it. Almost immediately, the straps start to pull the velcro off the armour.
I don't like coming here to whine - it's a place of inspiration and encouragement, after all. But there is a part of me that wants to howl in despair. Why does this work for everyone else? How many times have I watched folks on the internet neatly stick together two edges of foam with contact cement? Just zzzzip! and it's bonded! I put the glue on and wait as instructed, and there are only two possible results - first (and most likely) the glue is still wet and both sides slide off each other. Second, the glue has dried on both sides - dried solid and NON-STICK.
So, what have I done with the armour? Well, for now I'm using very small, very short screws to hold the velcro in place so it can hold the elastic in place. I can see a day not far off when I will be putting duct tape over the screws to hold them in place....
I have a vision of me arriving at whatever convention and just falling to pieces.

Don't dispair (sp?) -I think most of us fight adhesives. There's a reason most Cons have a repair station...
I have awful luck with rubber cement on fake leather, it starts to come apart as soon as I've put the two pieces together. For most other issues with rubber cement it's usually my fault, I'm too impatient.
Hot glue? Total love/hate relationship.
Sorry, not much by way of advice. But did want to provide a little empathy
Dtrasler
Sr Member
It's very much appreciated!Don't dispair (sp?) -I think most of us fight adhesives. There's a reason most Cons have a repair station...
I have awful luck with rubber cement on fake leather, it starts to come apart as soon as I've put the two pieces together. For most other issues with rubber cement it's usually my fault, I'm too impatient.
Hot glue? Total love/hate relationship.
Sorry, not much by way of advice. But did want to provide a little empathy
Dtrasler
Sr Member
At the risk of putting people off this thread, I'll admit, I'm having trouble with my butt.
Like almost all the parts of this armour, the butt has to be split up. I originally thoughtI could do it in four pieces, but now it's six. I printed the first three and learned why buying that super-cheap roll of PLA was a bad idea - it's not so good with the layer adhesion, so the parts all split as I levered them off the bed. Flimsy, is a good word for it. Of course, I have the walls as thin as I dare, and the infil down to 5% because I'm a skinflint, and that doesn't help, but the performance is definitely worse than the rolls that cost $10 more.
Then today I tried to get part 4 going. It wouldn't even adhere to the plate. This one is the third attempt, abandoned when it became clear that even adding extra tape wouldn't hold the print down, and was just making things even worse.
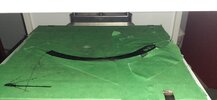
I have to clear off all the tape and start over, which I'm annoyed about. I can't get a better roll for another couple of weeks, so I have to soldier on with this one. I'd rather print this in the Flash Forge Finder, instead of the Tinkerine, but that would mean splitting the parts AGAIN. Plus I have the joy of trying to glue these flimsy parts together into one piece, if I ever get them all printed.
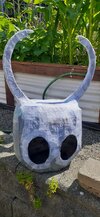
As a result, I'm doing more work on my kid's Hollow Knight headpiece, because no one is asking me to.
Like almost all the parts of this armour, the butt has to be split up. I originally thoughtI could do it in four pieces, but now it's six. I printed the first three and learned why buying that super-cheap roll of PLA was a bad idea - it's not so good with the layer adhesion, so the parts all split as I levered them off the bed. Flimsy, is a good word for it. Of course, I have the walls as thin as I dare, and the infil down to 5% because I'm a skinflint, and that doesn't help, but the performance is definitely worse than the rolls that cost $10 more.
Then today I tried to get part 4 going. It wouldn't even adhere to the plate. This one is the third attempt, abandoned when it became clear that even adding extra tape wouldn't hold the print down, and was just making things even worse.

I have to clear off all the tape and start over, which I'm annoyed about. I can't get a better roll for another couple of weeks, so I have to soldier on with this one. I'd rather print this in the Flash Forge Finder, instead of the Tinkerine, but that would mean splitting the parts AGAIN. Plus I have the joy of trying to glue these flimsy parts together into one piece, if I ever get them all printed.
As a result, I'm doing more work on my kid's Hollow Knight headpiece, because no one is asking me to.

Dtrasler
Sr Member
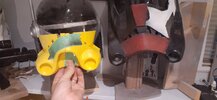
Sometimes the butterfly approach actually works. I was down and grumpy about the problems with my butt, so I decided to go off in a different direction and printed a small piece of the helmet on the Finder. Yes, I already scratch built a helmet for this outfit, but it's not quite right, and I couldn't resist buying the plans from the Galactic Armoury to see what a 3d printed one might be like. To fit it on the finder I had to cut it into twelve pieces, but that meant I was confident the end of roll left in the finder might be enough for this first piece.
It was, so I started a second one going. Then, since I was down in the basement anyway, I cleared off the Tinkerine plate one more time, and tried printing part six of the butt. Had two false starts, but the third held up. So, I have one more piece of butt to print, then there are only six more armour pieces to go. Meanwhile, I have the lower front portion of a helmet and a serious urge to print the rest. Here it is, next to the scratch build to show how off I was...
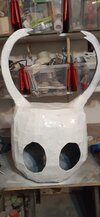
Also gave the Hollow Knight another coat of white paint:
It was, so I started a second one going. Then, since I was down in the basement anyway, I cleared off the Tinkerine plate one more time, and tried printing part six of the butt. Had two false starts, but the third held up. So, I have one more piece of butt to print, then there are only six more armour pieces to go. Meanwhile, I have the lower front portion of a helmet and a serious urge to print the rest. Here it is, next to the scratch build to show how off I was...

Also gave the Hollow Knight another coat of white paint:

Dtrasler
Sr Member
That tape is covering a multitude of sins, but I have fitted two more pieces to this helmet. Got a nasty feeling that the last couple are going to be the ones where all the kinks meet up and need sanding into oblivion.
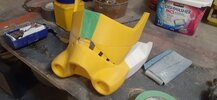
Ran some replacement blaster parts through the Tinkerine and it ate them, so I still don't trust it to do the final piece of butt armour. In the meantime, the waist section fell off my mannequin because the tape holding it together failed. Not because of anything, just decided to not be sticky anymore.

Ran some replacement blaster parts through the Tinkerine and it ate them, so I still don't trust it to do the final piece of butt armour. In the meantime, the waist section fell off my mannequin because the tape holding it together failed. Not because of anything, just decided to not be sticky anymore.
Dtrasler
Sr Member
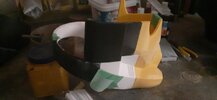
Just before leaving home for my two-day break at Whistler, I switched the cheap PLA to the Flash Forge Finder and printed off a couple more pieces. They came out ok, leading me to suspect that the Tinkerine is a less-than-stellar machine, especially with cheap materials. So that's nine pieces printed, of the 18 total for the helmet. Then I have to figure out all the issues with keeping the armour pieces from falling apart, then work out how to get them on me.

davewhite152
New Member
I share your pain with the gluing. I've tried various glues which don't seem to work as well for me as the for the quys in the YouTube videos! I moved to using a soldering iron on the back of the joints along with some extra filament. Works a treat. Not 100% rock solid but certainly good enough to keep it together until I have finished making it. I plan to use fiberglass matting inside to strengthen it all anyway
Dtrasler
Sr Member
Thanks for the tip! Definitely considering fiber glassing the back of my armour, which has fallen in half three times now. Seriously considering gluing the backpack on the back piece permanently as a bridging piece.I share your pain with the gluing. I've tried various glues which don't seem to work as well for me as the for the quys in the YouTube videos! I moved to using a soldering iron on the back of the joints along with some extra filament. Works a treat. Not 100% rock solid but certainly good enough to keep it together until I have finished making it. I plan to use fiberglass matting inside to strengthen it all anyway
Dtrasler
Sr Member
So, in an ironic twist that will surprise no one, it turns out the cheaper black PLA works just fine in the Finder. The prints are coming out as clean as you can expect from low-res settings (because I am cheap, and I have to do a ton of surfacing ANYWAY, that's why). The irony is that it's the pricier yellow parts that I printed a couple weeks ago that seem to be duff. Fitting the latest piece onto the one below so it lines up nicely means there's a shocking gap between it and the piece next to it. Not only is the yellow piece short of where it should reach, it's also leaning out a couple of degrees more than the next piece.
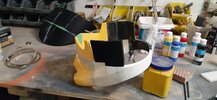
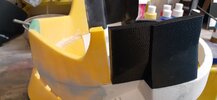
Never being one to admit defeat, I refuse to go back and start again. Instead I'm gluing the pieces in, and am considering taking a heat gun to that yellow part to try and even up the gap, before plugging it with a monumental (accent on the MENTAL) amount of Bondo. Is this a good plan? No. Is it different to any of my other plans? No. Is anyone surprised? No.
You know, I was scrolling through Instagram reels today and saw a time-lapse of someone printing an Iron Man Helmet. Most of it, anyway, in one go. Just, WHOOOSH! and a few hours later you have most of the helmet as one neat piece. I'm proud of my two little workhorses (even if one of them is a bit workshy) and I know I'm damn lucky to have either one of them, considering the state of the pieces I made before now. But even so....
Remind me again, we're in this for the fun of the challenge, sort of thing, right? If it were easy, we'd be what? Selling the stuff on Etsy and regretting our life choices? Right?
Dtrasler
Sr Member
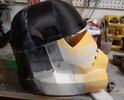
The last piece has a couple more hours to go, and then the shell of the helmet will be done. There'll be a couple of greeblies to print out afterwards, but that can wait until the heavy duty surfacing gets done. Aside from that huge gap shown in the above post, the pieces fit together reasonably well, but it's low-res and needs a lot of smoothing. I've been reinforcing the inside with papier mache, intending to coat that with fiberglass resin once it's all together. Thing is, the hardener for the resin is empty, so I have to get a new one of those before I can do that stage. Birthday's at the end of the month, so I might be lucky.


Similar threads
- Replies
- 19
- Views
- 1,723
- Replies
- 0
- Views
- 195
- Replies
- 33
- Views
- 2,109
- Replies
- 5
- Views
- 622
- Replies
- 9
- Views
- 1,096

