You are using an out of date browser. It may not display this or other websites correctly.
You should upgrade or use an alternative browser.
You should upgrade or use an alternative browser.
Marcus Vending Machine from Borderlands 3 - full scale
- Thread starter SentencedToBurn
- Start date
-
- Tags
- borderlands
SentencedToBurn
Active Member
Dude thanks very much!!my current favorite project on here. keep up the good work mate.
SentencedToBurn
Active Member
Got the bulbs and bulb sockets today so mounted them up. Still waiting for the indicator controller thing I ordered. So glad I wired this thing up like a car so all 12v car accessories can be installed without any issues.


Also started on the front panel with the keypad, only just realised the scale of the keypad, standard size keypads / keyboard keys definitely won't be enough. Need to find something larger. To scale, width of 3 keys needs to be 110mm which is exactly double of the standard keys.


Also started on the front panel with the keypad, only just realised the scale of the keypad, standard size keypads / keyboard keys definitely won't be enough. Need to find something larger. To scale, width of 3 keys needs to be 110mm which is exactly double of the standard keys.
Attachments
SentencedToBurn
Active Member
Have been looking all around trying to find a keypad with larger keys and figured I might as well just make them. it's only 10 plus two "enter" looking keys.
Using 1.2mm sheet, making them to scale so 25x25mm each with a 10mm gap. They look ridiculously oversized but that is all to scale anyway.
Thinking at this point I'll have 2 or 3 of them mounted on a switch of some sort so they can be used for whatever (so far I only need 1 to reverse the direction of the chain), but i'm sure a couple more on/off switches will be handy to have.
Made up 10 of the standard squard keys today:


Here is one of them against a standard keyboard key:

Using 1.2mm sheet, making them to scale so 25x25mm each with a 10mm gap. They look ridiculously oversized but that is all to scale anyway.
Thinking at this point I'll have 2 or 3 of them mounted on a switch of some sort so they can be used for whatever (so far I only need 1 to reverse the direction of the chain), but i'm sure a couple more on/off switches will be handy to have.
Made up 10 of the standard squard keys today:
Here is one of them against a standard keyboard key:
SentencedToBurn
Active Member
Got both bottom/side keys sorted, decided to use the top 3 with actual switches - at this point one of them will be used to drive the relay to reverse the chain drive, the other 2 will be spares until I find something to use them for.


SentencedToBurn
Active Member
Haha thanks dude. I think BL's art suits my rough approach to making things. I wasn't sure about the keys until I bolted them up, and then the hand-bent sections that aren't perfectly straight almost mimic the way BL games are drawn.I love how chunky the switches are, they look hand-drawn already.
SentencedToBurn
Active Member
I got the feature shelf to work today. Pretty stoked. Such a small thing but man it definitely makes it look a lot more complete, in my eyes anyway.
The 3 lights in the corner are powered using an aftermarket brakelight module where you get 3 lights to light up in a sequence, and a Honda Civic flasher relay - although I did have to add a few extra caps to the relay so slow it down a bit. Still, pretty happy with how it turned out!
The 3 lights in the corner are powered using an aftermarket brakelight module where you get 3 lights to light up in a sequence, and a Honda Civic flasher relay - although I did have to add a few extra caps to the relay so slow it down a bit. Still, pretty happy with how it turned out!
SentencedToBurn
Active Member
Made the drawers outer skin today. It always annoyed me how looking from the front you can see the bottom of the top drawer instead of some kind of a floor of the shelf compartment. My sheet bender is only 780mm wide and this piece was 820mm wide so I ended up splitting it into two pieces. Plus at 1mm thickness the bender struggles to bend full width as well so splitting it in half was probably for the best anyway.


At the last minute I decided not to weld it straight to frame but make it removable incase I need to get to the drawers from the back for any reason, so made up 5 mounts with M5 bolts/nuts.

Doesn't look like much from the front but it is a lot tidier now that it has an actual floor of the compartment.

At the last minute I decided not to weld it straight to frame but make it removable incase I need to get to the drawers from the back for any reason, so made up 5 mounts with M5 bolts/nuts.
Doesn't look like much from the front but it is a lot tidier now that it has an actual floor of the compartment.
SteelDragon
Member
This is one of the coolest projects I've seen in a while! Definitely looking forward to seeing this finished!!
SentencedToBurn
Active Member
Thanks mate. Might take a while but quite enjoying the process tbh.This is one of the coolest projects I've seen in a while! Definitely looking forward to seeing this finished!!
Hey thanks dude, there are some proper fabricators on here for sure. I'm definitely not one of them but I still like to attempt and make stuff. Next on the list is more sheetmetal work, and also gear reduction for the chain drive as soon as the new gear arrives in the mail.Absolutely fantastic
This forum makes me so jealous of all your skills.
Cant wait for what's to come .
SentencedToBurn
Active Member
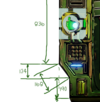
Had a go at the front panel today. Got the glowing slot sorted, there was also some kind of a triangle mark there so I decided to make that instead of painting it later, and also made up the coin slot surround and the catcher.
The coin slot is to scale so ended up being 80mm high lol. Not sure what i'll do with the catcher, thinking of putting some sort of a sensor or a switch there, but that's later.


The coin slot is to scale so ended up being 80mm high lol. Not sure what i'll do with the catcher, thinking of putting some sort of a sensor or a switch there, but that's later.
SentencedToBurn
Active Member
Super stoked with today's progress. I've always been concerned with the speed of the chain drive being too high while the torque was so low that it struggled to move the shelves at certain points.
I ended up using the reduction gearbox out of my broken angle grinder to reduce the speed / increase the torque 4.5 times. I'm defintiely happy with the result, everything now feels a lot stronger, I was able to tighten the chain up a bit which means the shelves move a lot smoother.
Gearbox parts that I salvaged:

And here is a lengthy update of my original plan, talking through every component and the end result.
I ended up using the reduction gearbox out of my broken angle grinder to reduce the speed / increase the torque 4.5 times. I'm defintiely happy with the result, everything now feels a lot stronger, I was able to tighten the chain up a bit which means the shelves move a lot smoother.
Gearbox parts that I salvaged:
And here is a lengthy update of my original plan, talking through every component and the end result.
Last edited:
SentencedToBurn
Active Member
Got the monitor for the top section today. Unfortunately unless I get an ultra wide screen one I won't be able to make it to scale so this will have to do. At least it's the right height, and ill see what it looks like once the rest of the top section is done.
The screen is 20" diagonal and runs off 14v - took ages to find this particular model as I want it to run off the battery and this was the size that I needed (for the right height).
Dissassembled the entire thing, was left with the panel and the controller. Mounted it up using the existing mounting points and tested it out just to see if it works. Next step will be to get an rPi and work out how to boot it up straight into a gif or mp4 on repeat.
SentencedToBurn
Active Member
I ended up swapping the screens around, took a bit of work to fit a 24" panel instead, had to hide the bottom section to achieve the "Ultra wide screen" shape. Still not to scale, the original is meant to be even wider, but this is definitely much better.
SentencedToBurn
Active Member
Connected the Raspberry Pi today to power the screen. One issue I encountered though is that the 14V Samsung LED panel didn't want to run off my old car battery which was only pumping out about 11.8V. So I will get an adapter to up the voltage from 12 to 14 to make sure the panel gets enough voltage. For now the panel is still powered by a power adaptor plugged into the mains.
The RPi however is powered through a 12 to 5v USB charger, I followed a super simple instruction on YouTube on how to convert the RPi to a video looper and also remade the MKV file that runs on the screen so now it's a 3 minute file on repeat.
The RPi is super old, I think its one of the first ones. I had a similar one which recently died, so this is a 2nd hand replacement I found online for next to nothing and this one seems to work great.
AjaxIronside
Member
Man, this project is really coming together. It looks amazing!
Similar threads
- Replies
- 8
- Views
- 1,055