Okay Mandos, so who makes the most screen accurate jumpsuit?? Minus color, [emoji38]
Id like to know this as well
Okay Mandos, so who makes the most screen accurate jumpsuit?? Minus color, [emoji38]
Alright. So the way I do Beskar is as follows.
Black primer (duplicolor)
2K automotive clear over the black.
Chrome (Alumaluster) sprayed at about 65/75% opacity. You want more of a gun metal tone.
2K clear to seal the chrome.
Oil paints thinned with Naptha to weather.
That is a very basic overview of the process. It’s also how Legacy does it. Unfortunately this method isn’t available for a lot of hobbyists due to the cost, and health risks of the 2K. You really need a full spray booth to spray that stuff.. it’s nasty.
There are good alternatives though. For chrome, you can use Alclad products, Spaz Stix chrome, quicksilver (water based) chrome, etc. You can seal with products like Liquitex High Gloss Varnish, Aquagloss, weather with acrylics.
I spent a lot of time developing a way to put the 2K clear directly on the chrome without dulling the finish noticeably so my Beskar actually retains a little more reflectivity than is “accurate.” But I prefer it that way over how something like say the Anovos looks.
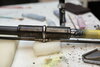
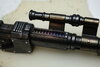

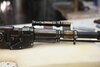
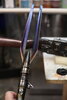
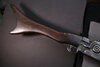
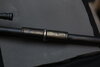
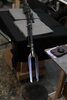
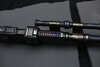
Today’s work was a Mandalorian Rifle. Thought I’d share as I’ve been posting my other work here anyways.
This is Rob Pauza’s file to the best of my knowledge. Painted with Alumaluster and Oils. Unfortunately this beast came to me all in one piece, barring the end. I had to drill a vise into my table to hold it and it ended up higher than my lights! It was a very interesting experience clear coating it on a step stool, haha
There is a video showing the whole thing on my Instagram @Jackrupert133 if anyone wants to check it out.
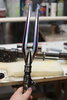
Yeah... These photos are going in my reference.Today’s work was a Mandalorian Rifle. Thought I’d share as I’ve been posting my other work here anyways.
This is Rob Pauza’s file to the best of my knowledge. Painted with Alumaluster and Oils. Unfortunately this beast came to me all in one piece, barring the end. I had to drill a vise into my table to hold it and it ended up higher than my lights! It was a very interesting experience clear coating it on a step stool, haha
There is a video showing the whole thing on my Instagram @Jackrupert133 if anyone wants to check it out.
Anyone have any ideas or reference?This looks INCREDIBLE. I want to work on the rifle so badly - but I convinced myself to do the Blaster first to ease into it. The heat-weathered prongs at the end look so good O_O
Dude... it isn't out until August. Volume 2 is supposed to be out in September.Did anyone get this book yet?

