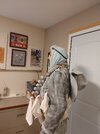
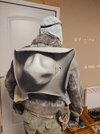
MacReady Final Battle Cosplay Costume (The Thing)

Boneman

Member
Hello RPF! Surreal and glad to finally be on here. I taking a stab at my first cosplay costume (for me at 50). This came about as I've very much enjoyed helping my now 15yr old daughter with her various, Anime inspired costumes for the past few years. It's been very enjoyable being able to spend time with my teenage daughter (not always an easy task) and share in something we both enjoy! I've always enjoyed scale model building and when she started getting into cosplay, it really reignited my creative side. We even purchased a laser cutter to make cutting EVA foam easier.

So a few months ago as she was working on her latest costume (Tengen from Demon Slayer), she kept asking/bugging me, "so Dad, when are you going to make a costume and dress up with me?". This hit home as I didn't want to miss out on what opportunities I have left to do stuff with my kid, so I got to thinking about what costume I wanted to spend the time, effort and money into , but only have about 3 months before September Fan Expo Edmonton 2023 that we are all going to. I've been known to go off the deep end on projects so as much as I briefly thought about a full EVA Iron Man suit, I grounded myself and needed something simple, comfortable and somewhat iconic. Then it hit me, MacReady!! I had recently watched Adam Savages MacReady cosplay on YouTube and figured that would be doable (both timeframe and cost).

I decided to narrow down the costume and do the specific "last battle" version of MacReady where he's all frozen looking with the bandoliers of dynamite and Molotov cocktails. This 'version' seemed more appealing to me plus it meant that I didn't need or have to build a flame thrower as at this point in the movie he no longer has/uses it.

mac01.jpg


What I'm doing here is not new and has been done many times before, so I will simply stick with documenting my process and build techniques I used to make this costume. There are plenty other resources out there to get all the costume details and specifics so I won't get into all that here. I'll will try my best to break it down into the individual components of the costume.

Some things I kept in mind for this build were:
  • Cost. I'm keeping track and wanted it to be 'reasonable' (already at $700 CAD.....)
  • Comfort (for walking around Cons all day)
  • Find or make items that can be 'ruined' as everything will be painted over with 'frosted white'
  • Stay as close as I can to screen accurate, but not really going to sweat the details (see all previous points).
  • Time. I have 3 months to get it to a wearable/Con state, but can always improve on later for other Cons
Stay tuned....

20230827_210241.jpg
 
Last edited:
The Iconic "MacReady Hat"

I don't think there is a more iconic 'movie hat' than R. J. MacReady's hat! Finding a replica one is not too hard, however the $400+ price tag is a tough pill to swallow, and considering mine will need to be 'frost' painted with white, I don't really want to do that to a nice replica hat. So I decided to build mine out of 6mm EVA foam. I've done a little bit of working with foam with my daughters costumes, so I figured I'd just give it a whirl. The hat will also really only be 'worn' hanging around my neck off my back anyway.

I started with measuring my head diameter, then 'eyeballing' the overall hat size of the hat and settled on a 19.5" overall diameter. I purchased some 'dome templates' so I could make an 8" dome for the top.

20230822_200530_HDR.jpg
20230822_211539_HDR.jpg
20230822_214507_HDR.jpg


The brim is easy to shape using a heat gun and used mostly contact cement to glue the sections together. To put the 4 "dents/folds" into the dome of the hat, I simply heated it and pressed my hand/palm into it. Used DAP Kwick Seal for filling the seams, then sanded and primed.

20230823_172315_HDR.jpg
20230823_174454_HDR.jpg
20230824_181511.jpg


As for the colour, well these seems to be a lot of different ones out there and it even appears to change colour in the movie from dark green to brown. Pretty sure the hat is brown (Beaver pelt) so I did start off with a basic Army Olive green just to see and yeah, it looked like a plastic green army man! So I resprayed with an Espresso Brown spray, followed up by some darker brown highlights.

20230825_110717.jpg
20230825_111126.jpg
20230825_135053_HDR.jpg


I then added some 14mm grommets and found some scrap vinyl and 'hat band' looking material at the local fabric shop. Again, not screen accurate but looks good and the price was right! If you want the actual hat band as seen in the movie, there is a seller on Etsy who makes them. I then finished it off with a dusting of air brushed flat white, followed by some glitter covered flat clear to give off a slight 'frost' glint.

20230825_150146_HDR.jpg
20230825_150245_HDR.jpg
20230825_150141_HDR.jpg
 
The Boots

Mac wears Vietnam era US Army Jungle boots in the movie. I tried to find some reasonably priced second hand ones with no luck (remember I'm up in Canada). I managed to find a pair of barley used tactical boots locally for $50 so I snagged them.

I airbrushed on flat white acrylic paint and then used some 'crafting snow' product that looks like snow but hardens when dry. It's easy to apply as it's like Marshmallow frosting! I mixed in some of the glitter into the crafting snow and then added additional glitter and sealed with flat clear coat.

Now they will always have that 'just out of the freezer" look.

20230806_165633_HDR.jpg
20230806_165620.jpg
20230806_165649.jpg

20230806_165656.jpg

20230812_134932.jpg
 
Last edited:
Flight Suit (Pants)

Mac wears a cotton US Flight Suit throughout the movie. Most of the time it's upper portion is tied around his waist. Keeping this fact in mind and knowing that all people will see are just the 'pants' portion, I found some surplus Canadian Helicopter Flight Trousers and figured they would work and be comfortable. Designing this costume for a Con, I want it to be as cool and comfortable as possible and figured there was no point in having a bunched up upper half of a flight suit around my waist to add weight and hold in the heat!

I airbrushed them with flat white acrylic paint.

361614008_10159179737386050_4822273108329049376_n.jpg
20230811_155717.jpg
 
The Jacket & Hoodie

This one I got VERY lucky with and really kick started the whole costume into high gear. I wasn't going to drop the $$$ to buy a real Schott jacket so I spent a few days searching online, as well as locally in thrift shops and Facebook Marketplace. A few days later I stumbled upon a listing on FB Marketplace for what looked like the exact jacket!!! I was worried it would be a little small, but met the person and tried it on and it was a fit!! I got lucky on this one and snagged it for $70 CAD.

Got it home and there were no labels in it, but if it's not an actual Schott, then it's a darn close knock off! Everything matched up to the movie/Schott jacket (collar, linings, pockets, colour). I removed all the lining in order to try and keep as cool as possible, then got to work on painting it to give it it's frost effect.

358057828_10159156564291050_8242680202472137584_n.jpg
358393925_10159158689621050_2016783321560784371_n.jpg

20230806_170207.jpg

361199990_10159172549956050_3919732846272492092_n.jpg


As for the blue hoodie, I found one at a local thrift store. I cut the arms off as well as the body of it to about mid chest. Just enough to still see it if I unzip the jacket midway. It resembles more of a cowl or tunic now. Again, tying to minimalize clothing and layers to keep myself cool as possible. I then added some white paint and frost effects around the hood opening.

20230811_155723_HDR.jpg
 
Dynamite, Molotov's, Pouches & Belts (oh my)

I fist found the necessary (and screen accurate) pouches needed, which were two USMC Thompson Magazine pouches for the dynamite and one, USMC BAR Magazine pouch for the 3 Molotov's. I found both on Amazon.

magpouches.jpg
BAR pouch.jpg


Dynamite Sticks

I then made my first attempt at dynamite sticks, which I would later re-do. My first ones were 1" OD wooden dowels, but after checking reference photos, the sticks in the movie seemed to be a larger OD, so I redid them using electrical PVC conduit that was about 1.25" OD. The basic process to make them was the same:
  1. Cut to 8" lengths
  2. Cut plain brown packing paper to 9" lengths, then crumple and flatten (for my 2nd attempt I made a stencil and sprayed it onto the paper)
  3. Spray on contact cement spray on both paper and sticks and roll.
  4. Fold and glue ends
  5. Apply sealing compound to give them a 'waxy' look.
  6. Drill hole for 'fuse" (wire)
  7. Spray on frost white effect
358149007_10159158689471050_1995766139002303416_n.jpg
20230827_163910.jpg
20230827_202408.jpg


The second and larger ones turned out much better IMHO.

20230827_165922.jpg
20230827_173421.jpg

20230827_174648_HDR.jpg


Molotov's

As I'm designing this costume for a Comic Con, you cannot have glass bottles, so I was able to find green plastic wine bottles online. I had to buy 6 so it was a little pricey but worth it. I then ordered some J&B sticker labels off Redbubble for the bottles and went to my local wine making store and bought some red heat shrinkable wine toppers. I then 'frosted' the bottles using matt clear coat spray, some airbrushed white and a little bit of glitter.

359811364_10159162410006050_2904821214881081174_n.jpg
360105277_10159177901541050_3787565651081612999_n.jpg
363341803_10159192285386050_5784064411007228846_n.jpg


Pouches & Belts

In the movie they taped together 4 black belts in order to make 2, cross harness for the pouches. I ended up just using 2" black nylon webbing with Fastex buckles for simplicity and ease of adjustability. When you cross the two belts through the chest dynamite pouch, it actually creates tension that then holds the chest pouch upright and in the middle.

361586811_10159172505441050_1657574523662679977_n.jpg

360167011_10159172504776050_9000167527001134667_n.jpg
20230812_134940.jpg


And here are the pouches with the larger and re-worked dynamite sticks.

20230827_210236.jpg
20230827_210241.jpg
 
Boneman this build ( like a bunch of others on this thread) is straight up epic. I love the weathering and the last battle version. The whole thing is great, have fun at the con.
 
Initial Test Fitting

As I'm making progress, I stopped to do a basic test fitting of what I have completed so far. Everything seems to fit well and is surprisingly comfortable (which is a very good thing!). The boots are like new and are comfortable. The helicopter trousers are very thin and lightweight. The harness/strapping system is easy to get on and off using the 2 Fastex buckles. These pics have the old/smaller 1" dia dynamite sticks which I've since changed out for the newer/larger ones. I'll post updated pics when everything is complete.

20230812_134925.jpg
20230812_134940.jpg

20230812_134936.jpg
20230812_134929_HDR.jpg

20230812_135342_HDR.jpg
20230812_135356_HDR.jpg


Working in growing my beard out as it's cheaper than commissioning a decent fake one of Etsy. I plan to workshop one with an Etsy seller in the near future.

Finishing up making the holster and a prop revolver as well as gloves. Stay tuned!
 
Last edited:
Gary's Hunter 1100 Holster

I decided to make a replica Hunter 1100 style holster out of 6mm EVA foam I had on hand. I started with making a rough construction paper template to get me to the basic shape. From there I folded, glued and finished up shaping with a belt sander and Dremel.

20230827_121048.jpg
20230827_132235.jpg
20230827_180718.jpg


I applied heat to then form the foam tighter around the revolver.

20230829_205344.jpg
20230829_213520.jpg


After heat sealing the foam I primed and then applied a light brown that turned out to very closely resemble the actual leather colour I was going for! I installed real snaps to the strapping.

20230831_161127_HDR.jpg
20230831_161137_HDR.jpg

20230831_161003_HDR.jpg

I made and applied a dark brown acrylic wash to weather the holster and then used a wooden sandwich stick and string to add the stitching. With the layers of paint and wash, it actually feels and has a texture like leather!! Very subtle cracking of the paint/foam add to this authentic look.

20230831_170800_HDR.jpg
20230831_193938_HDR.jpg

20230831_193952_HDR.jpg

20230831_195406.jpg
20230831_195413.jpg


For reference, here is a comparison of the Hunter 1100-12 vs my EVA foam holster.

Hunter1100.jpg
20230831_194620.jpg

And to finish it off, and the reason I made a foam one instead of purchasing an actual leather holster, I airbrushed on the white, frost detail.
20230831_201258.jpg
20230831_201304.jpg
20230831_202516.jpg

I currently don't have a 'gun belt' and will just be using it on my flight pants belt for now. Since this holster turned out so well, I may replicate a gun belt out of thinner EVA foam.

My next post will be about the revolver and why it is the way it is.
 
Last edited:
Nice work with the EVA foam! That holster (never mind the hat) really came together. Bet you're glad you were stitching foam and not leather :lol:
 
Nice work with the EVA foam! That holster (never mind the hat) really came together. Bet you're glad you were stitching foam and not leather :lol:
Thankyou. Yes very glad to be stitching foam!
I'm working on making a 2nd hat, along with a set of instructions and templates.
 
Gary's 'Pop Gun'

Sigh....prop firearms and Cons. Even if you follow their rules and guidelines, it can always be a crapshoot whether your 'firearm' is allowed into a convention. Keeping this firmly in mind, I didn't want to put a lot of time, money or effort into a prop firearm for this cosplay as it may end up sitting a security desk all day.

I enlisted the assistance of a friend with a 3D printer and he found a basic revolver file he could print off for me. No it's not the Colt Trooper MK3 like Gary uses in the film, but since this prop will live in it's holster and I have no plans of ever upholstering it at an event, I figured it will do. Also the pistol is not a large part or focus of this costume (or the movie).

The 3D file/model was actually quite impressive and could actually function like a real revolver if you put it together correctly using a massive list of required hardware. I didn't require all this function so I just glued it together and added some hardware for looks. My friend only printed enough barrel to give it some stability (again, will be in a holster so no bother printing a full barrel). I'm also hoping this will give it a 'check' in the 'OK' column for passing a weapons inspection at a Con.

I didn't put much effort into painting it - just basic colours, a little bit of dry brushing and that's it. I didn't even fill or sand the model prior to painting.

This is another item I can easily upgrade later and replace with an accurate model of a Colt Trooper MK3.

20230829_205357_HDR.jpg
20230829_210009_HDR.jpg
20230829_205420_HDR.jpg

This is how it will 'live' on the costume - in the holster.
20230831_202516.jpg
 
Last edited:
Gloves

Used a very basic pair of black, textile ski gloves. Again, not screen accurate but will do very nicely. I removed all the winter lining from the gloves in order to keep my hands from dripping in sweat!
20230827_212358_HDR.jpg

Some airbrushing along with applying some glitter and they are good to go.

20230831_201227.jpg
20230831_205032.jpg


Video of the glitter frost effect.

 
Last edited:
Makeup Test & 2nd Fitting

Wanted to do a makeup test and try applying a professional movie prop product I ordered called 'Snow Paste' for simulating frost/ice in my beard. It went on fairly well as long as your bread is wet. This was just a test so I'll be adding/using more when I'm going to a Comic Con. My daughter helped with some basic face makeup - lightening the skin tone and adding subtle red under and around my eyes. I think it turned out pretty good and only took about 20 minutes total. I'll keep playing around with it and will probably go a bit heavier with the makeup. I think I'll also add some "Just For Men" beard dye prior to applying the effects! Lol.

20230903_172239.jpg
20230903_173139.jpg
20230903_173143.jpg


The 2nd test fitting for what I consider a 'complete' V.1 costume went well. Easy to put on and relatively comfortable to wear (we'll see how I feel after several hours). I'm very happy with the results!

20230903_173544_HDR.jpg
20230903_173556_HDR.jpg
20230903_173644_HDR.jpg

20230903_173646.jpg
20230903_173654_HDR.jpg
20230903_174019.jpg
20230903_174023.jpg
20230903_174027.jpg


Attachments

  • 20230903_174039_HDR.jpg
    20230903_174039_HDR.jpg
    1.3 MB · Views: 48
  • 20230903_174032.jpg
    20230903_174032.jpg
    1.8 MB · Views: 54
Last edited:
Fan Expo Edmonton 2023

Went to the Fan Expo Edmonton event with the family and was the first time wearing my MacReady costume at an event. The event was a lot of fun and we had an absolute blast. This was my (and my wife's) first time ever doing a cosplay at a Con event and we both quite enjoyed it. It's a nice feeling when others recognize your character and rush over to ask for pictures with you! As my costume was a tad more 'obscure' and from the early 1980's, I can say that I wasn't recognized as much as other more mainstream/current characters were, but there were a few dozen who knew exactly who I was!! There were excited and would rush over to ask for a picture with me. Very flattering and enjoyable! I'd say those who got; got it.

I found this costume to be VERY comfortable and surprisingly I was not very hot in it. I wore it from 11am to 4:30pm and didn't even break a sweat (which is odd for me). Removing all the jacket and glove lining was a big part of keeping comfortable. By the end of the day I was starting to feel the onset of a blister on my big toe as these boots are a size 9 but probably should have been a 9.5. Might have to upgrade. Experimented more with my face makeup and using the 'Snow Paste' in the beard. I've since purchased some 'Ice Gel' makeup to add to the whole frozen look. I plan on wearing this costume again for Fan Expo Vancouver and Emerald City Comic Con in 2024, so I will continue to expand on it and make my face look even more frozen next time. Things I may also upgrade/change are:
  • purchase or make a proper gun belt
  • larger boots
  • more face/beard frost
  • maybe a pair of Varnet glacier glasses
  • make a replica road flare prop with bright LEDs

fanexpo01.jpg
fanexpo04.jpg

fanexpo03.jpg

Mac and "The Kingpin"
fanexpo05.jpg


Me and the family with the 501 Star Wars crew
fanexpo02.jpg
 
Last edited:

Your message may be considered spam for the following reasons:

If you wish to reply despite these issues, check the box below before replying.
Be aware that malicious compliance may result in more severe penalties.
Back
Top