-
Welcome to the Project Runs Forum!
This forum is intended for interest gauging and active runs. Due to the transient nature of this forum, please keep all research and ongoing discussion in one of our main forums so your information is not lost.
Only Premium Members can start a new run.
You are using an out of date browser. It may not display this or other websites correctly.
You should upgrade or use an alternative browser.
You should upgrade or use an alternative browser.
Limited Run Luke Shared stunt Version Lightsaber ( Run Full )
- Thread starter Spirit of ob1
- Start date


You guys are right. I've NEVER had so much trouble with a D Ring.
It's kind of ridiculous, and once I got it bent some, it wouldn't fit in the hole.
My pommel is now in pretty rough shape. Disappointing.
https://uploads.tapatalk-cdn.com/20170402/db7e1593cbaeb2b87c167c9dbe34ae5d.jpg
https://uploads.tapatalk-cdn.com/20170402/647e1b3850bf5c49e52e2a1eccef7211.jpg
https://uploads.tapatalk-cdn.com/20170402/8fa37a517774bdb5c7f17e73a5fe542c.jpg
https://uploads.tapatalk-cdn.com/20170402/ff826f5e782f5ff3a6c449c6586bb76f.jpg
That's a very nice build!
Did you try to squeeze the d-ring back together, once aligned in the pommel cube, by using a vice (and slowly cranking the jaws back together while checking the alignment)?
That's what I did and had no problems, overall; though, as some have pointed out, this D-ring is something of a tough little sucker to spread apart. I also used a Dremmel to remove about 1/4" of the middle of the D-ring so that I wouldn't have to spread the D-ring too far apart to get it into the pommel cube holes (these prevents deformation of the D-ring which can affect the alignment when you try to install it)
All is not lost. I suggest removing the D-ring, and using sandpaper followed by aluminum black to knock down some of the gouges and starting out fresh after straightinging the alignment of the center point of the D-ring. If you are going to "screen-accurate" hilt, the gouges will add character (in my opinion).
I've deformed the alignment on a Kenobi D-Ring, once before, and was able to straighten it out in a vice.
Last edited:
I didn't even let the d ring sit there at all. Once I decided it was a lost cause, I set the ring aside. I've got better ones at home that are much easier to bend.
I'm just a little miffed that it wouldn't even fit in the hole before I enlarged it by hand, and also sanded the ring itself.
I'll be able to make everything look much better when I'm able to go home to my shop, but I don't feel like I should've had to drill out the pommel cube more and still not have the D Ring fit properly. That's a real bummer.
Sixth Element
Active Member
Seems like we got a mixed lot of D-Ring sizes. Mine's slightly too large too. I've got plenty of extras to choose from in the stash luckily.
Don Mac.
Don Mac.
Spirit of ob1
Master Member
Hey guys so it seems some of the d rings are not fitting properly,
These rings were given as a freebie and i thought it would be nice to help everyone out so they would not have to buy one.
I got a message but not to go into "detail" apperently adding bonus items was a mistake on my part, I would check to see if yours has clearance before you try to install it.
Again, sorry for the freebie last time i do that! , the hole is 3mm
ZahcStarKiller
Active Member
This turned out to be a beautiful saber. Very sad I was unable to get on this run. I sincerely hope that you're able to do a second run of these. I'd be in for sure.
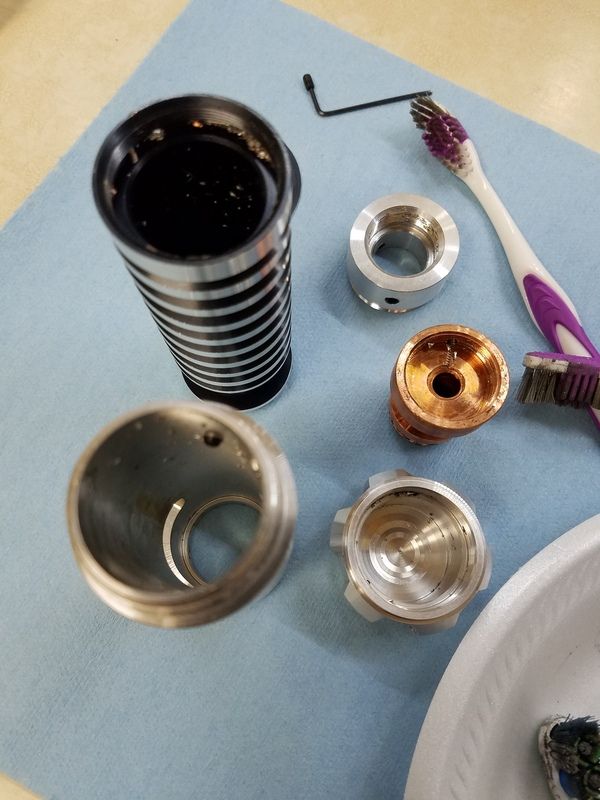
Here's where mine's at for the moment. Kind of a test run, if you will. Quick and dirty. I'm eventually going to paint the parts with brushes as they spin in the chuck on my little lathe. I'll also try to chemically darken the bare aluminum, rather than paint.
While the grenade section is chucked up, I may attempt to thin out a few of the grip rings. Don't get me wrong, they look great, I just see slightly thinner rings on the real prop.
I'm also going to redo all the foil tape, as I've got some better stuff at home, that's wide enough to cover the whole clamp. For now though, I'm liking the look of it!


There's a slight crease on the backside of the clamp, I'm guessing from the hole drilling operations. It runs the whole length of the clamp from top to bottom. It can be seen in the photo below. I'd like to work that out, as it would allow the clamp bars to come a bit closer together. I don't know about the rest of you, but the circuit card isn't held in tight enough by the clamp, I just simply can't tighten the clamp any more. I may have to shave a few thousandths off the body to correct that issue. Or maybe the problem is that crease in the clamp, and if I can smooth that out, everything will be fine. For now, I have a piece of paper card under the circuit card, to pressure fit it.

And I did a little bit of work trying to save that poor little pommel cube.

Anyway, thanks Rudy, for tackling this immense project. You've done a great job!
Can't wait to see what folks come up with regarding electronics/chassis design/crystal chamber stuff.
While the grenade section is chucked up, I may attempt to thin out a few of the grip rings. Don't get me wrong, they look great, I just see slightly thinner rings on the real prop.
I'm also going to redo all the foil tape, as I've got some better stuff at home, that's wide enough to cover the whole clamp. For now though, I'm liking the look of it!
There's a slight crease on the backside of the clamp, I'm guessing from the hole drilling operations. It runs the whole length of the clamp from top to bottom. It can be seen in the photo below. I'd like to work that out, as it would allow the clamp bars to come a bit closer together. I don't know about the rest of you, but the circuit card isn't held in tight enough by the clamp, I just simply can't tighten the clamp any more. I may have to shave a few thousandths off the body to correct that issue. Or maybe the problem is that crease in the clamp, and if I can smooth that out, everything will be fine. For now, I have a piece of paper card under the circuit card, to pressure fit it.
And I did a little bit of work trying to save that poor little pommel cube.
Anyway, thanks Rudy, for tackling this immense project. You've done a great job!
Can't wait to see what folks come up with regarding electronics/chassis design/crystal chamber stuff.
Last edited:
What did you use for the "thin neck"?Here's where mine's at for the moment. Kind of a test run, if you will. I'm eventually going to paint the parts with brushes as they spin in the chuck on my little lathe. I'll also try to chemically darken the bare aluminum, rather than paint.
While the grenade section is chucked up, I may attempt to thin out a few of the grip rings. Don't get me wrong, they look great, I just see slightly thinner rings on the real prop.
I'm also going to redo all the foil tape, as I've got some better stuff at home, that's wide enough to cover the whole clamp. For now though, I'm liking the look of it!
https://uploads.tapatalk-cdn.com/20170404/358cd3271e03b02cb585f3be15320bdc.jpg
https://uploads.tapatalk-cdn.com/20170404/cd217e44a4bdc2617a7699421fd0fd46.jpg
https://uploads.tapatalk-cdn.com/20170404/1f6c94622750451322b82b00e1879ccc.jpg
https://uploads.tapatalk-cdn.com/20170404/77818237aa3885354e7e613e4af39967.jpg
https://uploads.tapatalk-cdn.com/20170404/5e7a26deb1147c7d97175522de2c44d4.jpg
https://uploads.tapatalk-cdn.com/20170404/6acf1b59562a947724c745754e745440.jpg
There's a slight crease in the clamp, I'm guessing from the hole drilling operations. I'd like to work that out, as it would allow the clamp bars to come a bit closer together.
https://uploads.tapatalk-cdn.com/20170404/7625c4afd62fabedd3cdb2fcfda2cf33.jpg
And I did a little bit of work trying to save that poor little pommel cube.
https://uploads.tapatalk-cdn.com/20170404/1e6f51a404b9bea0d47cc61530267bc3.jpg
Anyway, thanks Rudy, for tackling this immense project. You've done a great job!
Can't wait to see what folks come up with regarding electronics/chassis design/crystal chamber stuff.
Sent from my Pixel XL using Tapatalk
I'm not sure what you mean. The paint color? The paint was just some old copper spray paint I found lying about. Nothing special. I think it's Krylon. I'm not a big fan, I prefer Rust-Oleum, but this stuff was just here.What did you use for the "thin neck"?
Sent from my Pixel XL using Tapatalk
On the copper piece. Did you paint over it or use another tape? Cause that saber is looking spot onI'm not sure what you mean. The paint color?
Sent from my Pixel XL using Tapatalk
russellsch
Master Member
YES!!! Mine will be here Thursday! & I'm off Thursday!!! WOO-HOO!!! :thumbsup
Spirit of ob1
Master Member
Glad Everyone likes them, After a 11 hr day working on sabers. i was able to get quite a few sent out!
I have just a few left of the regular ones to clean and pack up, then i will start on the polished sabers.
Again if you want to clean yours out let me know and ill send it asap, otherwise ill start cleaning again tomorrow!
Also if you who did not polish them, wash them in warm water except the copper piece!
Thanks
Spirit of ob1
Master Member
Someone pmd on what cleaning was i doing, Basically just take it all apart and sweep out most of the shavings inside.
Takes about 10 min. Be aware this is just a quick clean, you still need to make sure its fully cleaned by washing them if your gonna put electronics in
Takes about 10 min. Be aware this is just a quick clean, you still need to make sure its fully cleaned by washing them if your gonna put electronics in
Liquid Cobra
New Member
Received mine and it's great! Thanks again!
what do you use to polish them?
what do you use to polish them?
Spirit of ob1
Master Member
I had them sent to a Plating shop, but if you use mothers polish it shines them up nice as well
Similar threads
- Replies
- 15
- Views
- 3,851
- Replies
- 302
- Views
- 37,559