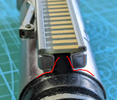
HEY I can see a peak of your wired cast paint job in the back - how did you get the random black pattern over the silver? spot. on.
-
Welcome to the Project Runs Forum!
This forum is intended for interest gauging and active runs. Due to the transient nature of this forum, please keep all research and ongoing discussion in one of our main forums so your information is not lost.
Only Premium Members can start a new run.
You are using an out of date browser. It may not display this or other websites correctly.
You should upgrade or use an alternative browser.
You should upgrade or use an alternative browser.
Done / Completed **LINEAGE** Foundry Cast ANH Kenobi Stunt Hilts (ANH/ROTJ - V2/V3)
- Thread starter PoopaPapaPalps
- Start date
HEY I can see a peak of your wired cast paint job in the back - how did you get the random black pattern over the silver? spot. on.
Stippling a dry brush of black on. Little thought and little effort to do it. Random pick-up texture with a paper towel. That's about it.
")
YES IM SO EXCITED!! I’ve been waiting awhile now and i’ve been excited the whole way. Super awesome to see all the work and updates tooRuns 8 and 9 are finished and I've messaged everyone on those respective runs. Run 10 and 11 are up! I'm still taking names for anyone still interested. As long as folks are wanting these, I'll still make them.
View attachment 1602054 View attachment 1602055
And I'm grateful for every one you've ordered! I hope you've enjoyed each piece. All of our back-and-forth on these things over the years have lead us this. The research these are built from, you certainly helped contribute to.
My package arrived a few minutes ago, and I am beyond pleased. PoopaPapaPalps this is excellent stuff. The weight is amazing. Unfortunately I have to leave for work now, but the thought of painting/finishing this is going to get me through the day!
That’s exactly how I am!! Mine is coming soon!My package arrived a few minutes ago, and I am beyond pleased. PoopaPapaPalps this is excellent stuff. The weight is amazing. Unfortunately I have to leave for work now, but the thought of painting/finishing this is going to get me through the day!
So excited to answer this - if you look at the V3 proper, you'll notice that amidst all the foil tape (even on the clamp bars) the lever hole has been bored out by a REALLY shallow angled countersink. This brings the lever closer to the nut and I believe it's only held on by a few threads.Okay weird question. Started work on my V3, and it’s too thick for the Graflex clamp to close. The threads of the lever aren’t actually even able to touch the other side. How did y’all solve this? Do Roman’s clamps not work for this?
A normal countersink will blow out the hole and you'll be riding the hinge pin as the brace (I did this with my motorized V3 by accident)
You can also file down the opposite (nut) bar but I haven't tried this, you'd need to take down a lot and that would alter the nut thread positioning a little.
Anyway, its a neat thing I didn't notice until someone pointed it out to me during this very same predicament
You got pictures of the spot in question or the tool you used? I’m afraid my brain isn’t quite comprehending what I need to do hahaSo excited to answer this - if you look at the V3 proper, you'll notice that amidst all the foil tape (even on the clamp bars) the lever hole has been bored out by a REALLY shallow angled countersink. This brings the lever closer to the nut and I believe it's only held on by a few threads.
A normal countersink will blow out the hole and you'll be riding the hinge pin as the brace (I did this with my motorized V3 by accident)
You can also file down the opposite (nut) bar but I haven't tried this, you'd need to take down a lot and that would alter the nut thread positioning a little.
Anyway, its a neat thing I didn't notice until someone pointed it out to me during this very same predicament
Some of Roman’s clamps have variance in the diameter through the stamping which is unfortunate. If you have another Graflex you can test to see if it’s an issue with the clamp by switching it out and see if it has a similar issue.Okay weird question. Started work on my V3, and it’s too thick for the Graflex clamp to close. The threads of the lever aren’t actually even able to touch the other side. How did y’all solve this? Do Roman’s clamps not work for this?
If you have a dial or digital caliper you can double check the diameter of the body under the clamp as well to see if it matches the approximate 1-1/2” of a typical Graflex clamp or if it is bigger… which it should be.
Another angle, the clamp bars have been bent in as well while what Tom has said explains the length of the lever bolt.
The original V3 clamp appears to have left the tabs on causing the clamp to be wider than the booster area because of the gap.
Lots of problems will compound if you don’t verify that the clamp matches a vintage first
Last edited:
What a great shot, thank you!
I don't know if I've ever seen the tabs still on the clamp, but yea, it's a mess. Actually you can see there the lever lies parallel with the clamp bar... usually its up at an angle... it sits that way when some of the hinge is buried in the bar!
I don't know if I've ever seen the tabs still on the clamp, but yea, it's a mess. Actually you can see there the lever lies parallel with the clamp bar... usually its up at an angle... it sits that way when some of the hinge is buried in the bar!


This is what I'm seeing as well - the foil is torn from tightening the lever and below is a rusty bar.I’m just not seeing what you guys are seeing. Isn’t the “enlarged hole” you’re seeing just where rotating the lever has worn away the foil tape?
View attachment 1604123
View attachment 1604124
The lever does not look to be more "inside" the bar compared to unmodified bar without the nut like on the ANH graflex
I used a real clamp and I had to bend it a little so I can close it over my v3.Okay weird question. Started work on my V3, and it’s too thick for the Graflex clamp to close. The threads of the lever aren’t actually even able to touch the other side. How did y’all solve this? Do Roman’s clamps not work for this?
Attachments
You got pictures of the spot in question or the tool you used? I’m afraid my brain isn’t quite comprehending what I need to do haha
You just need to open the bar with the lever hole up a bit to match the real thing and to get the clamp to fit. You want to enlarge it to a large enough hole that you can get full rotation from the lever. You'll also have to discard the square washer like the real thing, too. You can do this with a drill bit but I think it's a lot easier, although a bit more time consuming, to just use a round needle file.
The lever hole has been drilled out into a big cone shape. Normal countersinking bits are too steep, idk what they used, something more than a 90 degree bit.
the clamp really is quite wide, its almost completely open.
...The original V3 clamp appears to have left the tabs on causing the clamp to be wider than the booster area because of the gap.
Lots of problems will compound if you don’t verify that the clamp matches a vintage first
It may have some material left inside but the tabs would most definitely had to have been ground down to even fit on the V3, even with the machining done to the clamp section. There would just be no possible way to do it otherwise. From the casts, how they turn out oblong and in the V3's case, misaligned, to clean up the seam on the booster as well as clamp section means having one side of the cast with more material missing than the other and relatively "flatter." These things are not round. Putting a clamp around these means one "side" is going to hug a bit closer than another.
We must also remember that the clamp on the V3 previously belonged to something else, another stunt or maybe it was just old, but the bevel in the lever hole may not necessarily be from anything intentional but just wear from the lever being on the bar and grinding against it, removing material. The one I keep on hand to fit on the V3's I make to test fit clamps and align all the proper grub screws have this detail from constant turning to add and remove the clamp.
Similar threads
- Replies
- 13
- Views
- 2,986
- Replies
- 40
- Views
- 3,586
- Replies
- 3
- Views
- 1,248
- Replies
- 31
- Views
- 5,378