Thank youI've been printing for years at this point and I'm pretty much exclusively using elegoo PLA now, it works great and is very affordable. BTW I find UV curing superglue to be the way to go for whstever reason it sticks much better
You are using an out of date browser. It may not display this or other websites correctly.
You should upgrade or use an alternative browser.
You should upgrade or use an alternative browser.
Let's Talk All Things 3d for prop creation, Scan, Design, Sculpt (real and digital), Print and Finish
- Thread starter greenmachines
- Start date
this sounds precisely like laellee 's comment that sometimes a new tip is the best answerIve just encountered will not load filament /blocked for the first time last night.
At first I thought my tubes were twisted but after taking them all out and poking filament through I found no blockage so next step was the hot end and after using the maintenance cycle which I heated to 95° pulled out a piece of compressed dirty filament.
Ive since reheated as its still blocked and could feel a gooey blockage but cant clear it.
Looking on Bambu site there are some filaments which can cause blockages Sparkle is one such filament which is what I was foolishly using to use it up as it didnt work well before.
I removed a further iinch strand which also removed some black and green from previous prints.
I dont know if leaving ithe Bambu on for long periods helps or causes a build up over time?
I have checked everything else so a new nozzle it is..
Any one have a preference for an A1 Bambu?
I h
Once im back from Plymouth Ill hopefully be back in action..

This ANH isnt going to print itself..
I had to give it a go but indeed a quick search on Amazon and one day delivery with Prime!this sounds precisely like laellee 's comment that sometimes a new tip is the best answer
Once im back from Plymouth Ill hopefully be back in action..
This ANH isnt going to print itself..
I use superglue/Cynoacrylate for a lot of my prints and as long as i have prepped with a nice course sandpaper sticks pretty well.Although not professional guidance, this is simply a product review. I have had solid success with superglue when connecting 3d printed PLA filament parts. I often use baking soda as my filler if there is not a perfect match between two parts.
However, I have had NO SUCCESS using gel superglue as though it simply will not make adhesion with PLA. Given, I have little love for gel superglue in any project but for PLA, it simply does not bond. Like popping candy out of a candy mold after it cools, that level of non adhesion.
Here we have my Tomahawk of recent work. I had gelled the contact so I had some time to move it while lining up the parts and then taping. It held for several days while I painted several layers and today it came apart like an oreo cookie. Perfectly smooth release as though only the paint had held it together View attachment 1936684
But I like to go Belt and braces on larger sized prints, I have a ESB jetpack Ive had tapped to my Fett mannequin which needs making.
My plan is to both glue then weld and finally as I might wear it out Nut and bolt the four sections together..
I am also tempted to buy one of those heated staple guns.
I'd hate for it to fall apart... Embarrassing or what.
Im tinkering with adding connection pieces to future prints but its dependant on the print wall thickness.
I'd hate for it to fall apart... Embarrassing or what.
Im tinkering with adding connection pieces to future prints but its dependant on the print wall thickness.
I had what felt like YEARS of experiments with different adhesives, with mixed results. I use 2-part syringe plastic epoxy now, but I also don't build as much as I used to.
In regards to strength between parts/ etc, a habit I picked up a long long time ago was to run 5.4 mm channels between pieces to strengthen the joint and help with alignment.
So on the blade of a sword, I'd run at least 2 channels out towards the edges, and then use steel rod (cheap and available at hardware stores) to shish-kebob the parts on as I glued them together; the rod adds strength, and the multiple rods also make the parts align more properly. Just run adhesive down into those channels before assembly, and even smooth rod grips and works awesome. I have used threaded rod as well, but really I didn't notice enough of a difference to spend the extra money. Also, why 5.4mm? Because if you sell or distribute your files in europe/etc, 5mm rod will work great.... If you are stuck here in the USA, 3/16" rod is compatible in those same holes.
I also use those same channels between large parts just for alignment, so the rods only go into each piece maybe 2-3 inches. Cut a figure body in half, one channel in each of the four corners or the mating surface, and then it doesn't shift when you glue. I used to add slots and tabs, but I like those joining surfaces being flat so I can orient them like that with no supports when printing.
Anyways, I dunno maybe everybody else does this already, but it's my go-to for rodding parts. It won't save from damage when dropping a 5 foot sniper on the ground, but the rifle also won't explode into a pile of Legos either
")
I love using anything with a thread, I seem to have aquired a two meter threaded bar which is great and very satisfying watching it splurge into a hollowed out channel. I have also used metal plates and even rebar if ive wanted to add some weight or additional strength to a print, Ive got a webley flare gun print which is great but once ive added a wood stock and barrel is a tad whippy so that needs addressing at some point.I had what felt like YEARS of experiments with different adhesives, with mixed results. I use 2-part syringe plastic epoxy now, but I also don't build as much as I used to.
In regards to strength between parts/ etc, a habit I picked up a long long time ago was to run 5.4 mm channels between pieces to strengthen the joint and help with alignment.
So on the blade of a sword, I'd run at least 2 channels out towards the edges, and then use steel rod (cheap and available at hardware stores) to shish-kebob the parts on as I glued them together; the rod adds strength, and the multiple rods also make the parts align more properly. Just run adhesive down into those channels before assembly, and even smooth rod grips and works awesome. I have used threaded rod as well, but really I didn't notice enough of a difference to spend the extra money. Also, why 5.4mm? Because if you sell or distribute your files in europe/etc, 5mm rod will work great.... If you are stuck here in the USA, 3/16" rod is compatible in those same holes.
I also use those same channels between large parts just for alignment, so the rods only go into each piece maybe 2-3 inches. Cut a figure body in half, one channel in each of the four corners or the mating surface, and then it doesn't shift when you glue. I used to add slots and tabs, but I like those joining surfaces being flat so I can orient them like that with no supports when printing.
Anyways, I dunno maybe everybody else does this already, but it's my go-to for rodding parts. It won't save from damage when dropping a 5 foot sniper on the ground, but the rifle also won't explode into a pile of Legos either
Ive seen grown men cry when someones accidentally dislodged their prized print out of their hands in the wild.
Someone got snagged on a piece of my gauntlet last year but being metal their bag came off worse.. The perils of being not aware of ones surroundings or get your face out your phone but that's a rant for another thread
Do you add channels when designing a piece or after with tools?
Last edited:
Do you add channels when designing a piece or after with tools?
I am old school lol, I model in channels and do all my cutting for print beds manually. It's awesome that there's software that will cut and rod automatically, but I'd much rather do it myself to get cuts and rods exactly where I want them. I also round the channel ends inside the parts, otherwise slicers can try to add supports in there otherwise and it's annoying to clear them out.
I've been using PLA for over a decade and have never used cyanoacrylate (of any kind) with it because I find superglue to be too sensitive to shocks and breaks.......
However, I have had NO SUCCESS using gel superglue as though it simply will not make adhesion with PLA. ....
My go-to has always been acrylic cement (plexiglass glue). Not the moisture-cure type, but the solvent-based. It 'dissolves' a little of the PLA almost like acetone does for ABS (though not as much). That's for "raw" parts of course. If I'm gluing painted parts, I'll go for different 2-part epoxies. The best, I've found, for durability, is JB Weld Plastic Bonder. (IMPORTANT: NOT the one called WELDER... you want BONDER.)
Compared to most 2-part epoxies, JBWPB stays just a little bit flexible, which is generally great for props. It has a medium setting time, so you can mixup small batches and actually use it to reinforce the insides of parts, like you would with polyester and fiberglass. (I used it along with aluminum car body mesh on the inside of a Star Lord helmet that I printed in resin.) JBWPB is also the best glue for printed resin, when you can't use the resin+UV torch due to the thickness. It also sands very well.
This is all brilliant info. I haven't even stumbled into these areas yet and am so stoked to see answers already here. My superglue fail recently was my first big eye opener.
Bringing this over from the thread whereI had posted my tomahawk superglue incident and this suggestion was made, sorry should have posted this sooner as we have definitely gone this direction in the convo:
Post in thread 'Mel Gibson The Patriot impersonation cosplay costume' Mel Gibson The Patriot impersonation cosplay costume
Post in thread 'Mel Gibson The Patriot impersonation cosplay costume' Mel Gibson The Patriot impersonation cosplay costume
Yes manual I find is best, Ive worked with Acrylic resins and polymer most my working life on the most intricate of pieces and as much as you can plan there is always margins of error to consider. Ive found splitting prints doesnt always mean they will join perfectly but maybe its how I split the piece.I am old school lol, I model in channels and do all my cutting for print beds manually. It's awesome that there's software that will cut and rod automatically, but I'd much rather do it myself to get cuts and rods exactly where I want them. I also round the channel ends inside the parts, otherwise slicers can try to add supports in there otherwise and it's annoying to clear them out.
joberg
Legendary Member
For gluing parts that aren't subject to shock/stress, I've been successful with crazy glue. I buy the one from the Dollar Store (Canada) and it never failed me. As for load/stress bearing, I use a construction adhesive: PL Fast Grab Premium (Canada). It's a gray color adhesive and once it dries, it become like hard plastic. As a matter of fact, I've poured it in silicone moulds to make small greebliesThis is all brilliant info. I haven't even stumbled into these areas yet and am so stoked to see answers already here. My superglue fail recently was my first big eye opener.
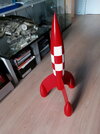
I've used it to affix the legs of my Tintin rocket.Attachments
Thats Awesome!For gluing parts that aren't subject to shock/stress, I've been successful with crazy glue. I buy the one from the Dollar Store (Canada) and it never failed me. As for load/stress bearing, I use a construction adhesive: PL Fast Grab Premium (Canada). It's a gray color adhesive and once it dries, it become like hard plastic. As a matter of fact, I've poured it in silicone moulds to make small greeblies
Destination Moon was the book that got me hooked on TinTin.
Yes, an amazing story, considering first publication was 1953. 16 years before we actually went to the moon.Thats Awesome!
Destination Moon was the book that got me hooked on TinTin.
Blimey was it that long ago..Yes, an amazing story, considering first publication was 1953. 16 years before we actually went to the moon.
I think I read it in my infant school library in 1971 which seems a lifetime ago..
Anyway... My new Hotends are hopefully arriving today, Ive bought two so hopefully everything will be sorted out later today.
Heres a question why do different filaments need different nozzles and is a 0.06 nozzle that much faster at printing.
Some people subscribe to hardened nozzles for filament that has additives (such as metal), they theoretically should be a lot more durable. I don't monkey with that at all, just use my brass .4mm nozzles and switch them regularly anyways.Blimey was it that long ago..
I think I read it in my infant school library in 1971 which seems a lifetime ago..
Anyway... My new Hotends are hopefully arriving today, Ive bought two so hopefully everything will be sorted out later today.
Heres a question why do different filaments need different nozzles and is a 0.06 nozzle that much faster at printing.
A .6mm nozzle can be a lot faster than a .4mm/etc, but it comes down to settings. The trade off is resolution. The nozzle is going to put down thicker lines and can print at layer heights taller than a smaller nozzle, but then won't be capturing the details that a smaller nozzle can. Using a taller layer height is also going to create more stepping on curved surfaces like the top of a dome.
I dont mind afterprint maintenance Its just part of the 3D process and if needed I use diluted window putty to smooth out my prints.Some people subscribe to hardened nozzles for filament that has additives (such as metal), they theoretically should be a lot more durable. I don't monkey with that at all, just use my brass .4mm nozzles and switch them regularly anyways.
A .6mm nozzle can be a lot faster than a .4mm/etc, but it comes down to settings. The trade off is resolution. The nozzle is going to put down thicker lines and can print at layer heights taller than a smaller nozzle, but then won't be capturing the details that a smaller nozzle can. Using a taller layer height is also going to create more stepping on curved surfaces like the top of a dome.
Here's what I pulled from my heated hotend.
It still didnt clear it though.
I wonder if there is anyway to purge the final gloop?
New hotend going in later!
joberg
Legendary Member
I had the original albums from the era of first publishing...being Belgian helps, of courseThats Awesome!
Destination Moon was the book that got me hooked on TinTin.
joberg
Legendary Member
It's proly a stupid question: I've used airbrushes all the time and I'm always making sure to clean it after a few sprays to avoid clogging. Is there some type of cleaner for your 3-D printing head?Some people subscribe to hardened nozzles for filament that has additives (such as metal), they theoretically should be a lot more durable. I don't monkey with that at all, just use my brass .4mm nozzles and switch them regularly anyways.
A .6mm nozzle can be a lot faster than a .4mm/etc, but it comes down to settings. The trade off is resolution. The nozzle is going to put down thicker lines and can print at layer heights taller than a smaller nozzle, but then won't be capturing the details that a smaller nozzle can. Using a taller layer height is also going to create more stepping on curved surfaces like the top of a dome.
No sure why I thought you were from Netherlands lol..I had the original albums from the era of first publishing...being Belgian helps, of course
A filament flusher!
Maybe Acetone but would it ruin the hotend?
Similar threads
- Replies
- 3
- Views
- 1,510
- Replies
- 3
- Views
- 838
- Replies
- 52
- Views
- 5,439
- Replies
- 16
- Views
- 535