Let's Talk All Things 3d for prop creation, Scan, Design, Sculpt (real and digital), Print and Finish

Just saw your posts and decided to take it for a spin. It does look to be good with props that are flat but once it goes from 2.5D to 3D it doesn't do well. Here are some I put together.

View attachment 1924764
"Salacious Crumb"

View attachment 1924767
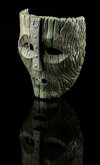
"Stormtrooper"

View attachment 1924768
"Nien Nunb"

Although good for trinkets, I don't expect this method to ever have the precision required for accurate replicas. There is too much guesswork involved; a bit like just getting some clay out and putting these together from memory.

There are a few current promising techniques for 3D generation that incorporate ML (NerV etc.) that look promising in the future for replicas of stuff that doesn't exist anymore, e.g. Jabba. however mesh generation still isn't quite there for those.

I think that is just the beta. It only allows one photo so it isn't even hitting full stride yet. I did one of a sculpted horse of the ringwraiths and it is beautiful. They have a second one that does video so I think I can string some photos in sequence and try that one for full wrap around view. For props, it currently needs touchup but for one sixth and gaming objects, it is pretty close to print and paint. I made quite a few more after, bows, shields, helmets, all passable under some paint. The elven helmet even had a head inside, pretty sure it proves they are grabbing existing photos supplied elsewhere.
 
I think that is just the beta. It only allows one photo so it isn't even hitting full stride yet. I did one of a sculpted horse of the ringwraiths and it is beautiful. They have a second one that does video so I think I can string some photos in sequence and try that one for full wrap around view. For props, it currently needs touchup but for one sixth and gaming objects, it is pretty close to print and paint. I made quite a few more after, bows, shields, helmets, all passable under some paint. The elven helmet even had a head inside, pretty sure it proves they are grabbing existing photos supplied elsewhere.
Yes, I'd say that you'd have a better time with objects that fit closer to the dataset of models it was trained on like the helmet etc.
 
Orc sword good enough to go straight to printing in about 45 seconds:

View attachment 1924762

and now that I am too confused to either be super excited or thoroughly depressed, I am going to bed.
From a legalities point of view this is going to be an interesting avenue, give it a few months and who knows where Some future props could be but for that illusive greeblie or an item lost to time like for instance a foam Gremlin/OG King Kong which is all but armiture these days this could be a game changer ..

The higher the resolution of the image the greater the details produced and as mentioned earlier a scan of the same image a week or so later is giving much better results.


On a side note I tried a cartoon and it generated a pretty good likeness.

This bad boys certainly going to be printed..

1000117488.jpg
 
Last edited:
I've been thinking about this image to 3D generation tool for the past few days and what I could possibly use it for since seeing it for the first time after greenmachines posted about it. Which led me to today sit down for the past hour or two and try to use it in my own modelling workflow. I decided to input a Propstore image from the last auction of a Mandrake from Harry Potter to see what it could give me and got the following.

51e28f05f74ebc5bf3a3b0a062e5c459.jpeg
1745667894591.png

Input image Model Output

I thought it was a pretty good blockout of the shape of the prop so went and detailed it myself, let me preface this by saying I'm not very experienced at digitally sculpting. I started by playing around with the proportions before rejigging the face entirely then going crazy with texture brushes to get the bark and plant like textures before painting it by sampling colours from the initial propstore image. (The leaves are just planes with an image texture).

Comp.png

Left is the original output, Right is my altered sculpt

FrontFar.png

textured.png
untextured.png

Finished Model

From this quasi test of it i've sort of warmed up to the idea of integrating image to 3D tools like this as a means to blockout organic parts. Big thanks to greenmachines for introducing this.​
 
I've been thinking about this image to 3D generation tool for the past few days and what I could possibly use it for since seeing it for the first time after greenmachines posted about it. Which led me to today sit down for the past hour or two and try to use it in my own modelling workflow. I decided to input a Propstore image from the last auction of a Mandrake from Harry Potter to see what it could give me and got the following.


I thought it was a pretty good blockout of the shape of the prop so went and detailed it myself, let me preface this by saying I'm not very experienced at digitally sculpting. I started by playing around with the proportions before rejigging the face entirely then going crazy with texture brushes to get the bark and plant like textures before painting it by sampling colours from the initial propstore image. (The leaves are just planes with an image texture).

View attachment 1927487
Left is the original output, Right is my altered sculpt

View attachment 1927497
View attachment 1927494View attachment 1927495
Finished Model

From this quasi test of it i've sort of warmed up to the idea of integrating image to 3D tools like this as a means to blockout organic parts. Big thanks to greenmachines for introducing this.​

Big thanks to Mottrex on this for bringing us round to the makerworld 2d3d tool in post 105.
 
I am finding that Jintosh 's original advice to me in his 3d stl thread, consisting of about 3 to 4 software applications in series , was the real trigger to using a group of utilities/apps rather than hoping for the holy Grail in one piece of software. If you have a utility that is just the best at one feature and you want to share, throw up some examples. I'll repeat my bambu slicer one for cutting planes. Had found a youtube post about hopping over to bambu for cutting the bottom off, completely flat and fully healed (no massive hole destroying printability) to support larger production with less cleanup. This turned into using it any time I wanted to cut a truly flat plane without healing the cut after by manually stringing points together.
 
I've been thinking about this image to 3D generation tool for the past few days and what I could possibly use it for since seeing it for the first time after greenmachines posted about it. Which led me to today sit down for the past hour or two and try to use it in my own modelling workflow. I decided to input a Propstore image from the last auction of a Mandrake from Harry Potter to see what it could give me and got the following.


I thought it was a pretty good blockout of the shape of the prop so went and detailed it myself, let me preface this by saying I'm not very experienced at digitally sculpting. I started by playing around with the proportions before rejigging the face entirely then going crazy with texture brushes to get the bark and plant like textures before painting it by sampling colours from the initial propstore image. (The leaves are just planes with an image texture).

View attachment 1927487
Left is the original output, Right is my altered sculpt

View attachment 1927497
View attachment 1927494View attachment 1927495
Finished Model

From this quasi test of it i've sort of warmed up to the idea of integrating image to 3D tools like this as a means to blockout organic parts. Big thanks to greenmachines for introducing this.​
This is the level of quality I really hope to get to. This is impressive work.
 
I needed a trigger guard and found the kit online,grabbed a screencap, tossed it in the 2d3d, kicked out a print:

20250427_205532.jpg


And now we scale this baby up to 7.75 inch. Now, the sketchy bit..... it placed the screw holes as well.
 
Another tip I got from my printer buddy:

Print for strength in the right direction

So, I have mentioned this one, briefly, in other posts but today it became very important. When using an FDM printer, the layers become the crystallization line that fractures under stress. It is why glass is "tougher" than crystal; why wood gun stocks have the grain running with the direction of the barrel (rifles); and why printing long parts should be done horizontally. If you print a part, that is supposed to spring or hold side pressure (to itself), you want the grain (layers) of your print to be 90 degrees to the pressure (perpendicular).

I printed some small shims today. They looked perfect. They slide in through the side of a rifle stock (muzzleloader) and through a loop in the barrel to hold the barrel to the wood stock. I gave it a little test bend and pop, another, snap, crack, layer after layer. I re-aligned the print to print along the length instead of across it. It made all the difference. My new shims, called wedge pins, were now easily bent without snapping. This is for cosplay, so will not be holding a firing barrel.

Here is an example, from a few days back. The trigger would have snapped off if not aligned to the print direction:

20250512_172527.jpg
 
Last edited:
Back
Top