You are using an out of date browser. It may not display this or other websites correctly.
You should upgrade or use an alternative browser.
You should upgrade or use an alternative browser.
HALO Master Chief Costume Progress Thread (helmet rebuild begins on p.19)
- Thread starter thorssoli
- Start date

Streetrocks
Active Member
Re: HALO Master Chief Costume Progress Thread
Wow, its coming along great!!!!! I have missed your updates on the 405th! Looks like the molds came out clean (although yours always do!). I look forward to seeing how you do the mold of the inside of areas of the chest and back, I haven't really seen it done before. I have learned more from your threads than any others that I have read. Keep up the most excellent work!!
Wow, its coming along great!!!!! I have missed your updates on the 405th! Looks like the molds came out clean (although yours always do!). I look forward to seeing how you do the mold of the inside of areas of the chest and back, I haven't really seen it done before. I have learned more from your threads than any others that I have read. Keep up the most excellent work!!
Re: HALO Master Chief Costume Progress Thread
Thanks for the kind words.
I just got an email telling me that my naval reserve unit wants me in Hawaii for the next couple of weeks. I'm scrambling to get a few things put together and shipped out before I ship out, so it'll be a while before I update again. Apologies for all those folks who are waiting on copies of these parts.
Wow, its coming along great!!!!! I have missed your updates on the 405th! Looks like the molds came out clean (although yours always do!). I look forward to seeing how you do the mold of the inside of areas of the chest and back, I haven't really seen it done before. I have learned more from your threads than any others that I have read. Keep up the most excellent work!!
Thanks for the kind words.
I just got an email telling me that my naval reserve unit wants me in Hawaii for the next couple of weeks. I'm scrambling to get a few things put together and shipped out before I ship out, so it'll be a while before I update again. Apologies for all those folks who are waiting on copies of these parts.
ROBOSTEVE 0671
Sr Member
Re: HALO Master Chief Costume Progress Thread
Brilliant work and thanks for the rockin updates!") cool
cool
Brilliant work and thanks for the rockin updates!
cool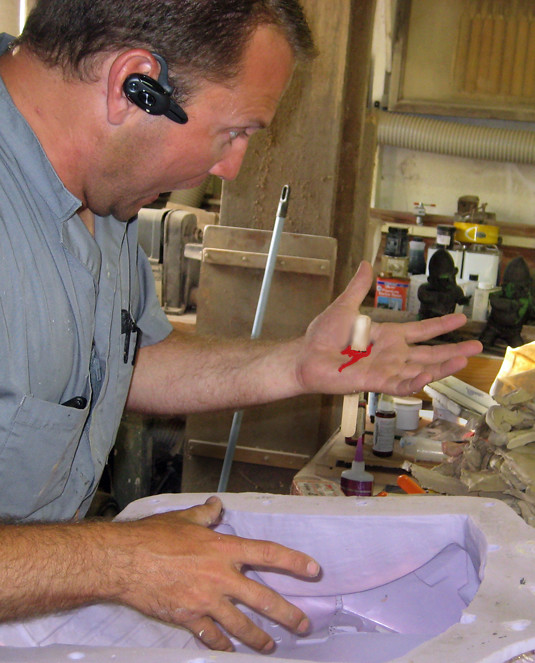
MjolnirArmor
Well-Known Member
Re: HALO Master Chief Costume Progress Thread
gunna get some massive muscles picking up those back molds!!

gunna get some massive muscles picking up those back molds!!
CB2001
Master Member
Re: HALO Master Chief Costume Progress Thread
The only thing wrong with this picture is that there's no rifle in his hands and that he's not pointing down.
The only thing wrong with this picture is that there's no rifle in his hands and that he's not pointing down.
Re: HALO Master Chief Costume Progress Thread
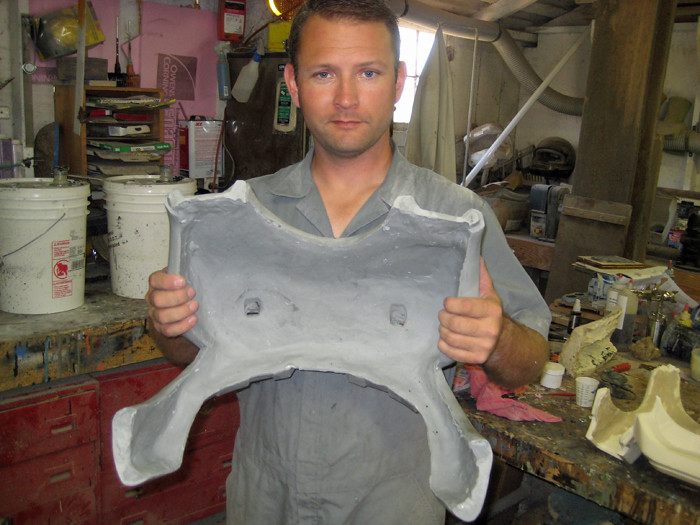
With the first pull out of the chest mold, I decided I built the prototype too thick for casting in solid resin (unless I want to make the wearers carry 50lbs worth of plastic around their chests) so I decided to make a thinner version before making the inside of the mold.
To achieve this, I started by taking the first pull, grinding out the thick spots, and beefing up the paper thin parts with some clay:
Then I wedged it back into the jacket mold and rebuilt the mother mold around the whole thing:

That done, it was time to apply some mold release and build the rubber jacket for the inside of the pieces:

The next step will be building the mothermold plug that will hold the inside rubber jacket in place when the mold is reassembled and ready for pouring.
Stay tuned for more on that.
In other news, I had a few friends over to cast all of their armor parts. Here's a shot of a couple of them rotocasting:

Here's our Simmons holding his helmet (one of the four we made that day):

Here's the stack of small parts we made as well:

Not bad for a long afternoon worth of work.
In other news, I've almost finished my fourth attempt at this paintjob for my sister:

It still needs one more shade of tan, some lights, and a proper faceshield.
Stay tuned for more updates...
With the first pull out of the chest mold, I decided I built the prototype too thick for casting in solid resin (unless I want to make the wearers carry 50lbs worth of plastic around their chests) so I decided to make a thinner version before making the inside of the mold.
To achieve this, I started by taking the first pull, grinding out the thick spots, and beefing up the paper thin parts with some clay:
Then I wedged it back into the jacket mold and rebuilt the mother mold around the whole thing:
That done, it was time to apply some mold release and build the rubber jacket for the inside of the pieces:
The next step will be building the mothermold plug that will hold the inside rubber jacket in place when the mold is reassembled and ready for pouring.
Stay tuned for more on that.
In other news, I had a few friends over to cast all of their armor parts. Here's a shot of a couple of them rotocasting:
Here's our Simmons holding his helmet (one of the four we made that day):
Here's the stack of small parts we made as well:
Not bad for a long afternoon worth of work.
In other news, I've almost finished my fourth attempt at this paintjob for my sister:
It still needs one more shade of tan, some lights, and a proper faceshield.
Stay tuned for more updates...
tubachris85x
Master Member
Re: HALO Master Chief Costume Progress Thread
Great idea for the chest mold, should serve to properly place resin evenly and where it needs to be, as well as hopefully save some $$ in some way.
Great idea for the chest mold, should serve to properly place resin evenly and where it needs to be, as well as hopefully save some $$ in some way.
Re: HALO Master Chief Costume Progress Thread
If you'd like to read a more fluid narrative about the making of the chest mold (without my pauses between updates) you can read about it in my blog.
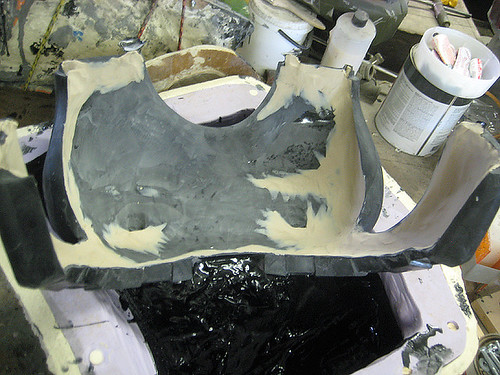
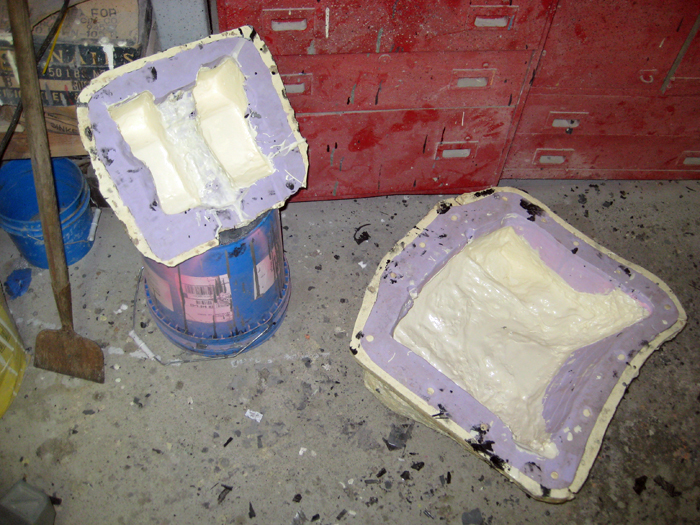
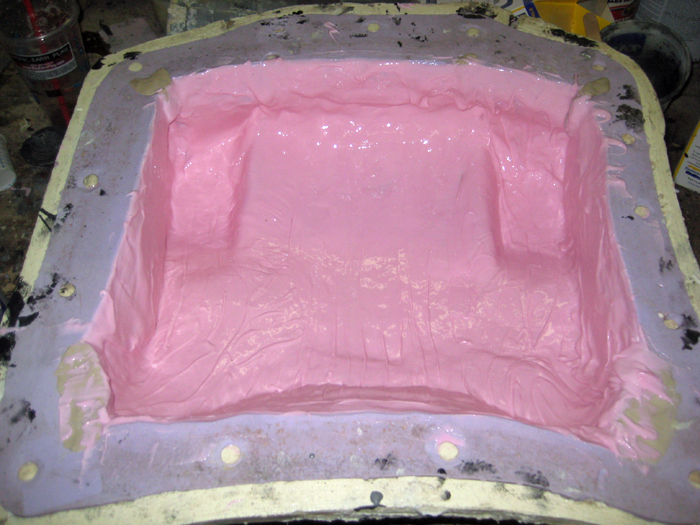
Picking up where I last updated, the next step was building a block of mothermold material to hold the inner rubber jacket in place. Here's what it looked like once it cured and I'd wrestled it back out:
Here's the rubber jacket mold without all of the rigid mothermold elements in place:
Once everything was bolted back together all that was left to do was to pour some resin into the mold and make sure it works. Here's the first pull coming out of the mold:

Here's what the inside looked like:
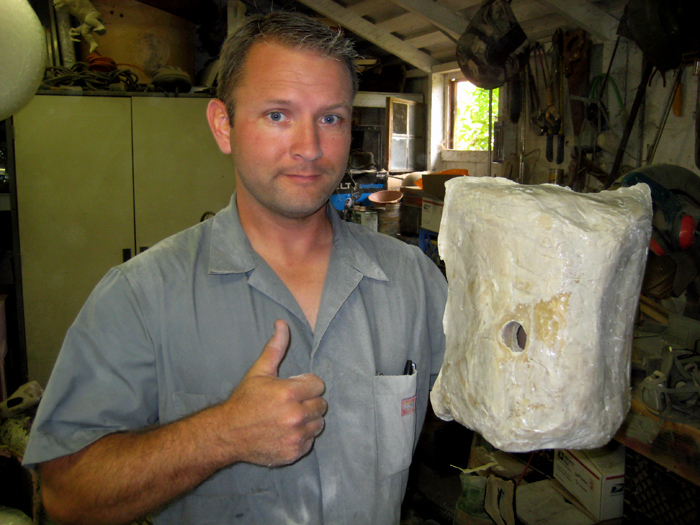
Here's my friend Matt (Griff) wearing it:
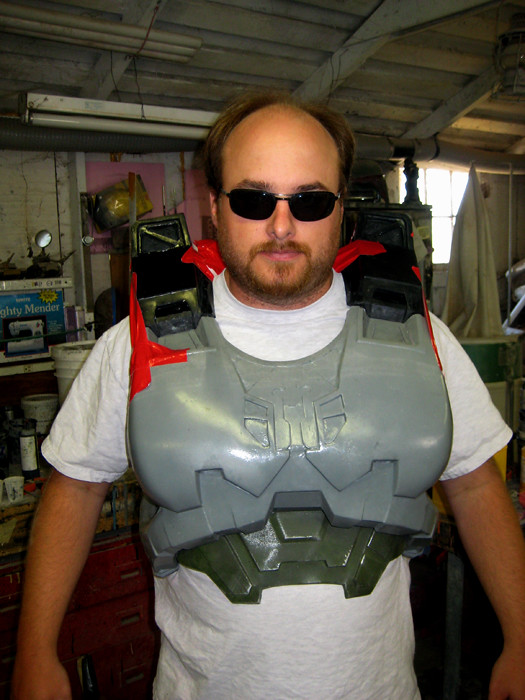
And finally, here's a picture of me testing it for strength:

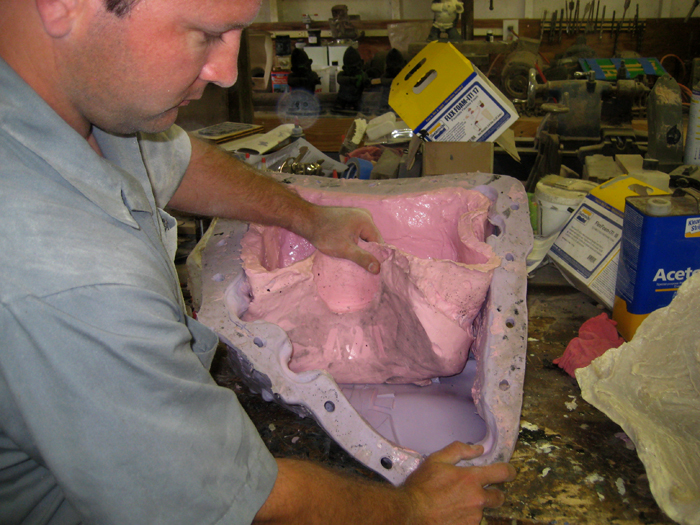
With the chest molds fully functional, the next step was to make a throwaway cast of the back and shoulder boxes and repeat all of the same steps. Here's the one-piece molds with the rotocast copies poured in:
Here's the back piece with clay molded in to fine-tune the inside:
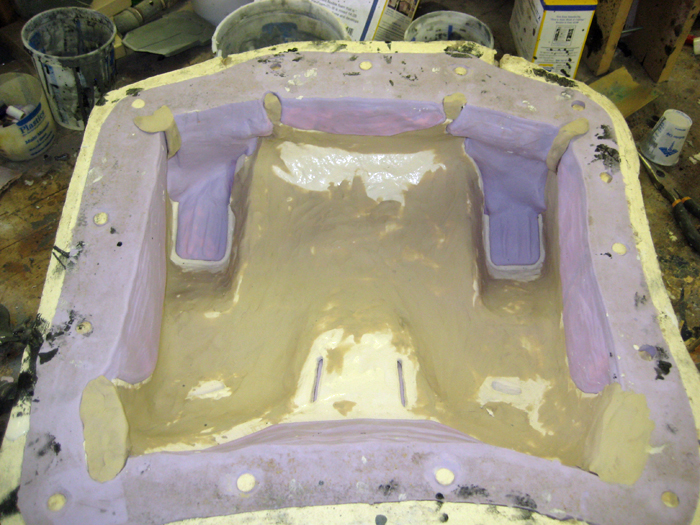
And here's the back mold with silicone brushed in:
I still have to make a mold plug to keep the inside of the mold in place, but the process for the back and the shoulder boxes will be exactly the same as the chest piece, so it's hardly worth writing about. Suffice it to say that I should have pulls coming out of the back mold tomorrow and then the shoulder boxes on Wednesday.
EDIT: I forgot to mention that the chest piece took 110 fl.oz. of material to cast. So it looks like it'll take around two gallons of resin to make one set of torso armor including back, chest, shoulder boxes, and ab plate. The chest piece pictured above had microballoons mixed in to save on weight, so it came in just over 5.5 pounds. Not too shabby.
Stay tuned...
If you'd like to read a more fluid narrative about the making of the chest mold (without my pauses between updates) you can read about it in my blog.
Picking up where I last updated, the next step was building a block of mothermold material to hold the inner rubber jacket in place. Here's what it looked like once it cured and I'd wrestled it back out:
Here's the rubber jacket mold without all of the rigid mothermold elements in place:
Once everything was bolted back together all that was left to do was to pour some resin into the mold and make sure it works. Here's the first pull coming out of the mold:
Here's what the inside looked like:
Here's my friend Matt (Griff) wearing it:
And finally, here's a picture of me testing it for strength:
With the chest molds fully functional, the next step was to make a throwaway cast of the back and shoulder boxes and repeat all of the same steps. Here's the one-piece molds with the rotocast copies poured in:
Here's the back piece with clay molded in to fine-tune the inside:
And here's the back mold with silicone brushed in:
I still have to make a mold plug to keep the inside of the mold in place, but the process for the back and the shoulder boxes will be exactly the same as the chest piece, so it's hardly worth writing about. Suffice it to say that I should have pulls coming out of the back mold tomorrow and then the shoulder boxes on Wednesday.
EDIT: I forgot to mention that the chest piece took 110 fl.oz. of material to cast. So it looks like it'll take around two gallons of resin to make one set of torso armor including back, chest, shoulder boxes, and ab plate. The chest piece pictured above had microballoons mixed in to save on weight, so it came in just over 5.5 pounds. Not too shabby.
Stay tuned...
Last edited:
Oni Warlord
Member
Re: HALO Master Chief Costume Progress Thread
Wow, great work. Thanks for the update.
Wow, great work. Thanks for the update.
Re: HALO Master Chief Costume Progress Thread
Back mold update, here I am gooping on the last layer of light red bubble gum flavored frosting:

Here's the finished mold fully assembled with the resin poured in for a casting:

It takes a full gallon of material to make this piece. This means that the entire set of torso armor will take about two gallons of resin to make once I add in some fillers to reduce the weight.
Here's a shot of the inside of one of the pulls:

Here I'm holding a rough casts of one of the shoulder boxes to show the fit:

It'll fit better once I finish the inside of the mold for the shoulder boxes.
Here's the last part I had to mold before calling the torso molds done:

This is the vent insert that goes in the shoulder blade area on the back armor.
In other news, I've made a new mold for the shoulder plate and the outer side of the upper arm armor. Here they are boxed up before I poured the rubber in:

Comments/critiques welcome. Stay tuned for further updates...
Back mold update, here I am gooping on the last layer of light red bubble gum flavored frosting:
Here's the finished mold fully assembled with the resin poured in for a casting:
It takes a full gallon of material to make this piece. This means that the entire set of torso armor will take about two gallons of resin to make once I add in some fillers to reduce the weight.
Here's a shot of the inside of one of the pulls:
Here I'm holding a rough casts of one of the shoulder boxes to show the fit:
It'll fit better once I finish the inside of the mold for the shoulder boxes.
Here's the last part I had to mold before calling the torso molds done:
This is the vent insert that goes in the shoulder blade area on the back armor.
In other news, I've made a new mold for the shoulder plate and the outer side of the upper arm armor. Here they are boxed up before I poured the rubber in:
Comments/critiques welcome. Stay tuned for further updates...
tubachris85x
Master Member
Re: HALO Master Chief Costume Progress Thread
Hmmm..Are you making modifications to the shoulder pieces themselves, or just making a new mold for easier casting?
Hmmm..Are you making modifications to the shoulder pieces themselves, or just making a new mold for easier casting?
Re: HALO Master Chief Costume Progress Thread
A little bit of both. Here's a shot of all of the pieces included with the torso armor:

With the new & improved mold, the shoulder boxes are hollow and the front-facing vent details are hollowed out and ready to fit with fans or speakers or whatever.
I'll be cranking out a few of these sets to fill my pre-orders and for anybody else who would like one. I've got a For Sale thread going in the Junkyard if anyone needs new torso armor for their Master Chief costume.
Hmmm..Are you making modifications to the shoulder pieces themselves, or just making a new mold for easier casting?
A little bit of both. Here's a shot of all of the pieces included with the torso armor:
With the new & improved mold, the shoulder boxes are hollow and the front-facing vent details are hollowed out and ready to fit with fans or speakers or whatever.
I'll be cranking out a few of these sets to fill my pre-orders and for anybody else who would like one. I've got a For Sale thread going in the Junkyard if anyone needs new torso armor for their Master Chief costume.
Gearsofhalo
Well-Known Member
Re: HALO Master Chief Costume Progress Thread
I love this build on the 405th, and i love it here! you are awesome! keep with the updates!! I cant wait to see more!
I love this build on the 405th, and i love it here! you are awesome! keep with the updates!! I cant wait to see more!
Re: HALO Master Chief Costume Progress Thread
LARGE CHEST UPDATE:
Another collaborator requested that I make him a set of torso armor with a flexible foam chest piece. I dusted the mold with gunmetal-colored metallic powder before making the pour and here's how it came out:

The main advantage to using flexible foam is that it will give a bit and make for greater freedom of movement while wearing the costume:

It is pretty flexible, but when it's velcroed to the rigid cast back piece it should stay in place pretty well:

VISOR UPDATE:
This afternoon I was procrastinating in lieu of fixing Lopez the Robot Workshop Helper and on a whim I started tinkering with the visor. Pictured below is one of two rough drafts I made for the details:

A few months back I was able to get the proper compound curve to the visor by using a negative vacforming process, but it doesn't have any of the ridges and recesses it needs. I'd been toying around with a few different ideas including the layered dual visor idea that a lot of other makers use. After a lot of staring and thinking, I decided I'd either need to make a better vacforming buck (and more involved vacforming machine) or come up with somethign better. I decided to set it on the backburner while awaiting some epiphany.
Sometimes the best solutions are actually the simplest. This visor was vac-formed just like the ones I've pictured previously. To get the ridges I just scored them into the surface with an X-acto knife. They're not much in the way of ridges, but they look the part right up until you run your finger across them.
At some point I decided to dye the lines thinking it would help to pop them out a bit. Here it is installed in my sister's desert digital camo helmet:

The dye didn't work out so well, so I decided to try another one with the lines scored on the inside before I added the metallic coat inside. I'm much happier with this version:

I photographed both of them from a number of angles and the dyed one didn't show up very well under any lighting. Here's a comparison shot:
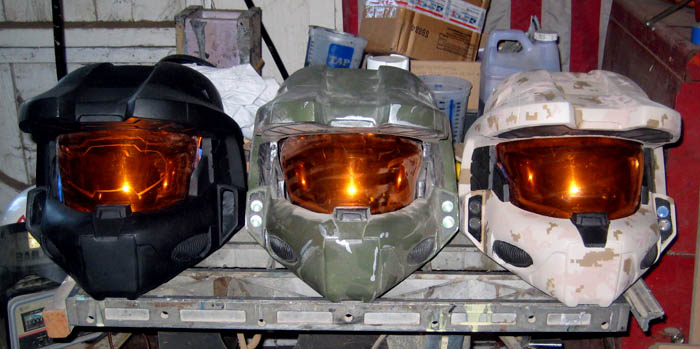
The left helmet has the lines etched on the inside of the visor, the middle helmet has no etching, and the right helmet has the lines etched on the outside and then dyed black. I'm thinking I'll stick with the left version. Again, these are rough drafts; so I didn't use any of my good pulls that actually fit the helmets properly.
In other news, I got bored while tinkering yesterday and decided to dust the inside of my helmet mold with copper-colored metallic powder. The results were intriguing if nothing else:

(must resist the sudden urge to make a cheesy steampunk master chief)
Finally, I should mention that I got a couple of boxes from Sean Bradley the other day and will probably start a build thread for my ODST armor pretty soon:
As always, comments welcome.
Stay tuned...
LARGE CHEST UPDATE:
Another collaborator requested that I make him a set of torso armor with a flexible foam chest piece. I dusted the mold with gunmetal-colored metallic powder before making the pour and here's how it came out:
The main advantage to using flexible foam is that it will give a bit and make for greater freedom of movement while wearing the costume:
It is pretty flexible, but when it's velcroed to the rigid cast back piece it should stay in place pretty well:
VISOR UPDATE:
This afternoon I was procrastinating in lieu of fixing Lopez the Robot Workshop Helper and on a whim I started tinkering with the visor. Pictured below is one of two rough drafts I made for the details:
A few months back I was able to get the proper compound curve to the visor by using a negative vacforming process, but it doesn't have any of the ridges and recesses it needs. I'd been toying around with a few different ideas including the layered dual visor idea that a lot of other makers use. After a lot of staring and thinking, I decided I'd either need to make a better vacforming buck (and more involved vacforming machine) or come up with somethign better. I decided to set it on the backburner while awaiting some epiphany.
Sometimes the best solutions are actually the simplest. This visor was vac-formed just like the ones I've pictured previously. To get the ridges I just scored them into the surface with an X-acto knife. They're not much in the way of ridges, but they look the part right up until you run your finger across them.
At some point I decided to dye the lines thinking it would help to pop them out a bit. Here it is installed in my sister's desert digital camo helmet:
The dye didn't work out so well, so I decided to try another one with the lines scored on the inside before I added the metallic coat inside. I'm much happier with this version:
I photographed both of them from a number of angles and the dyed one didn't show up very well under any lighting. Here's a comparison shot:
The left helmet has the lines etched on the inside of the visor, the middle helmet has no etching, and the right helmet has the lines etched on the outside and then dyed black. I'm thinking I'll stick with the left version. Again, these are rough drafts; so I didn't use any of my good pulls that actually fit the helmets properly.
In other news, I got bored while tinkering yesterday and decided to dust the inside of my helmet mold with copper-colored metallic powder. The results were intriguing if nothing else:
(must resist the sudden urge to make a cheesy steampunk master chief)
Finally, I should mention that I got a couple of boxes from Sean Bradley the other day and will probably start a build thread for my ODST armor pretty soon:
As always, comments welcome.
Stay tuned...
tubachris85x
Master Member
Re: HALO Master Chief Costume Progress Thread
Hmmm...I really like the flex-foam casting! The metal dust really looks good!
As for the visor, I see where you'd like to score or etch the details into the visor itself. Granted, you did it just to see how'd it look. Personally, I prefer the details to actually be physically raised versus drawn/etched. That's me though, but I'm anal about things :/
I'm not sure how your vac-forming buck is, but I imagine that if you added the details using really thin plastic, that it'd be good for forming and would solve the problem?
Similar threads
- Replies
- 0
- Views
- 285
- Replies
- 3
- Views
- 484
- Replies
- 8
- Views
- 786