IronRanger88
New Member
Every helmet will be different and custom. So, here is how I did mine.
Purchased from eBay a few years ago. Supposedly from the "original molds".
-CLEAN UP THE CASTING -
Lots of cutting, grinding, and sanding to even out the edges. Making sure the edging was even looking and had enough area to glue the shield in. There wasn't a lot of concern for fixing the imperfections, actually, its better off having them. Makes weathering easier.
- Paint -
-Purchase : Gloss black, gloss colonial red, metallic brass.
Paint the entire helmet Gloss Back.
I used a metallic silver Model paint to create the "metal" weathering look where I thought I might want it. Use tooth paste, mustard, or liquid latex to go Overtop of the silver (so the red paint won't stick and you can peel off later to revel the scratches/ scrapes)
Tape off and spray your red (Colonial Red)
Paint the badge a metallic bronze.
Scrub the entire helmet with a "Black wash" and wipe off to your hearts desire. Boom delicious.
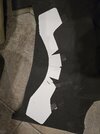
- Shield-
- Purchase a black cutting shield
Make a paper template of the area you need covered and cut out the shield as desired. I hot glued it in. Done.
- Padding -
- Purchase 10mm EVA foam
- A small amount of black striped headliner.
- 3m headliner spray glue aerosol can.
Youll first need to create a paper template. Cut out the Foam, shove it in the helmet and make sure it fits as desired. Good to leave a few mm for the foam to fit.
Line up the front edge of the fom with the stripes of the liner (so when you roll it, it has a straight line up the front)
Test pull the corner and cut tabs so you have clean corners when wrapping the liner over the foam.
Be careful when spraying the glue and touching everything. I had to do this twice, because I got glue all over my first attempt.
Purchased from eBay a few years ago. Supposedly from the "original molds".
-CLEAN UP THE CASTING -
Lots of cutting, grinding, and sanding to even out the edges. Making sure the edging was even looking and had enough area to glue the shield in. There wasn't a lot of concern for fixing the imperfections, actually, its better off having them. Makes weathering easier.
- Paint -
-Purchase : Gloss black, gloss colonial red, metallic brass.
Paint the entire helmet Gloss Back.
I used a metallic silver Model paint to create the "metal" weathering look where I thought I might want it. Use tooth paste, mustard, or liquid latex to go Overtop of the silver (so the red paint won't stick and you can peel off later to revel the scratches/ scrapes)
Tape off and spray your red (Colonial Red)
Paint the badge a metallic bronze.
Scrub the entire helmet with a "Black wash" and wipe off to your hearts desire. Boom delicious.
- Shield-
- Purchase a black cutting shield
Make a paper template of the area you need covered and cut out the shield as desired. I hot glued it in. Done.
- Padding -
- Purchase 10mm EVA foam
- A small amount of black striped headliner.
- 3m headliner spray glue aerosol can.
Youll first need to create a paper template. Cut out the Foam, shove it in the helmet and make sure it fits as desired. Good to leave a few mm for the foam to fit.
Line up the front edge of the fom with the stripes of the liner (so when you roll it, it has a straight line up the front)
Test pull the corner and cut tabs so you have clean corners when wrapping the liner over the foam.
Be careful when spraying the glue and touching everything. I had to do this twice, because I got glue all over my first attempt.
Attachments
-
 Screenshot_20250630_205125_eBay.jpg182.4 KB · Views: 19
 -
 20250629_155507.jpg1.7 MB · Views: 17
 -
 20250630_140945.jpg921.9 KB · Views: 12
 -
 20250630_184220.jpg1.6 MB · Views: 11
 -
 20250630_184336.jpg1.1 MB · Views: 10
 -
 20250630_184409.jpg1.8 MB · Views: 13
 -
 20250630_184505.jpg3.6 MB · Views: 11
 -
 20250630_184520.jpg1.7 MB · Views: 12
 -
 20250630_184606.jpg3.4 MB · Views: 11
 -
 20250630_184623.jpg2.7 MB · Views: 9
 -
 20250630_190943.jpg4.8 MB · Views: 8
 -
 20250630_191118.jpg2 MB · Views: 10
 -
 20250630_191145.jpg2.1 MB · Views: 10
 -
 20250630_193627.jpg2 MB · Views: 9
 -
 20250630_195302.jpg3.9 MB · Views: 10
 -
 20250630_195308.jpg4.5 MB · Views: 11
 -
 20250630_203019.jpg3.1 MB · Views: 13
 -
 20250630_204242.jpg1.9 MB · Views: 18