Deprecated GOTG: Star Lord's Map Gun (done)

Re: Star Lord's Map Gun

It's a tricky piece. That back end with its raised and recessed surfaces is a part that has been bugging me when I've been working on this myself on and off for the last 6 months since making my Orb last year.

Good luck finishing it off.
 
Re: Star Lord's Map Gun

The back end has actually been giving me the least trouble. The extreme curvature of the front, and the asymmetrical way it transitions to the rear made it especially hard to do the panel lines. For one, making them perfectly symmetrical physically, makes them look asymmetrical, depending on which angle you are viewing from. I've pretty much got it nailed now though. All panel lines are done and I began adding the grey buttons and things last night. The rest is pretty easy.

The plan is to have the first test print some time this week (after doing some tuning of the printer), then if it's successful to start taking orders and begin printing the first week of April.

One thing I've yet to decide is whether to have the front plate be smoke-trasparent, blue-transparent or frosted-trasparent. Since those are colors I don't usually have on hand I'll eventually need a dedicated signup list to know how much I need to order.
 
Re: Star Lord's Map Gun

Another update. Just started laying out the various buttons and details. A few of these might be printed separate to make painting easier.

attachment.php
 
Re: Star Lord's Map Gun

Just about done. On the home stretch now. Have started test-printing the main body while I tweak some other stuff. This is going to be a long print to do. (If I keep to the $200 for the first few that'll be about half of what I'd usually ask for a print like this...)

attachment.php


attachment.php


attachment.php


attachment.php


It also ended up being a very heavy model to work on. I'm at the stage where every tiny change or editing movement freezes my computer for 2-5 seconds!
 
Re: Star Lord's Map Gun

You've done a great job on this and I'll be down for one when you're finished.

I hope you don't mind a little creative input, just a minor tweak to the back end grille section.

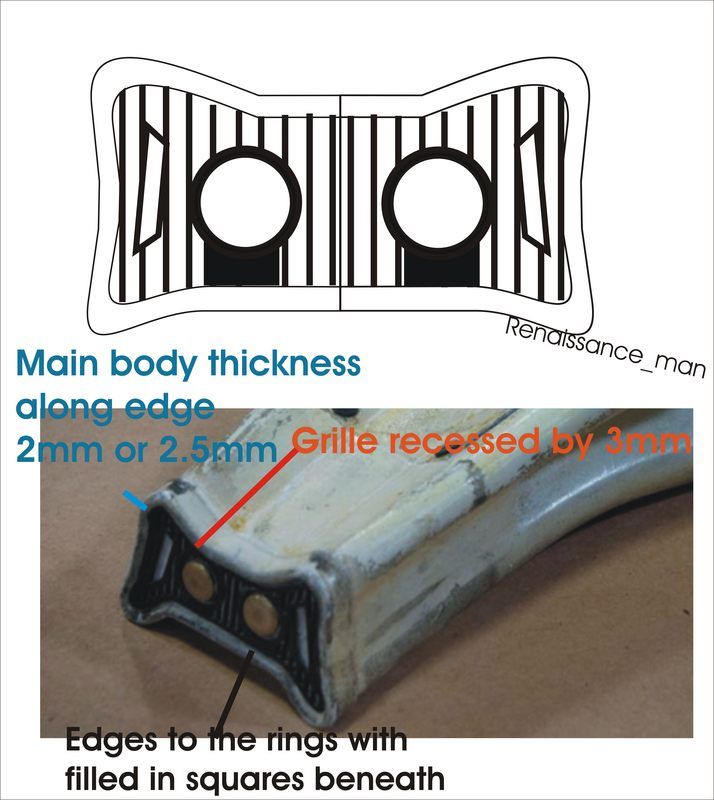
It looks like the wall thickness of the main body of the screenused prop is a little thicker around 2 to 2.5mm and the grille section recessed a bit more than in the model renders you've been working on.
There is also a filled in square section beneath the circle cut outs and they have their own edge.
I've tried to show that as best as I can in the diagram I just put together in Corel Draw.


I hope you don't see this as criticism, just constructive feedback. I really am impressed with the work you've done on this.
 
Re: Star Lord's Map Gun

You've done a great job on this and I'll be down for one when you're finished.

I hope you don't mind a little creative input, just a minor tweak to the back end grille section.

It looks like the wall thickness of the main body of the screenused prop is a little thicker around 2 to 2.5mm and the grille section recessed a bit more than in the model renders you've been working on....

I hope you don't see this as criticism, just constructive feedback. I really am impressed with the work you've done on this.

No offense taken, but f.y.i. those are the approximate dimensions I used with the grille section (except I don't believe the grille is recessed as much as 3mm- the beveled edge throws one off a bit). I noted above that there are shadows in the render making it look odd- something wrong with the face normals (for those of you that understand 3d tech). As for the grille, that's one of the things I'm still tweaking.
 
Re: Star Lord's Map Gun

Can't believe how good this is looking, so much detail! I can't wait to see how this is going to turn out and so pleased I've signed up :)
 
Re: Star Lord's Map Gun

Can't believe how good this is looking, so much detail! I can't wait to see how this is going to turn out and so pleased I've signed up :)

Thanks for the praise. : )

I'm off to LA for a week of work, but as promised, here is the first test print of the body in metallic silver plastic, basically raw off the printer:
attachment.php


As always happens, when you hold something in-hand you see details that you want to change. I've decided to lengthen the bottom end of the handle by about 1.5cm and widen the very end by about 2.5%. Final body will have to be split into 2-3 pieces. Overall I'm happy with the print quality and with this in-hand I can begin cranking them out as soon as I get back next weekend. I've decided that the Final price will stay at 200 for the first ten signups. (This will be a 30-40+ hour print.) I'm guesstmating no more than $20 extra for shipping. It's a lot of parts but they don't weigh much. Right now I'm leaning towards printing the translucent parts in dark blue/clear and not smoke. If someone really wants smoke I can probably accommodate them if they let me know before I order plastic. (I'm just afraid that the smoke might not let enough light through.)
 
Re: Star Lord's Map Gun

Thanks for the praise. : )

I'm off to LA for a week of work, but as promised, here is the first test print of the body in metallic silver plastic, basically raw off the printer:
http://www.therpf.com/attachment.php?attachmentid=454538&d=1427044174

As always happens, when you hold something in-hand you see details that you want to change. I've decided to lengthen the bottom end of the handle by about 1.5cm and widen the very end by about 2.5%. Final body will have to be split into 2-3 pieces. Overall I'm happy with the print quality and with this in-hand I can begin cranking them out as soon as I get back next weekend. I've decided that the Final price will stay at 200 for the first ten signups. (This will be a 30-40+ hour print.) I'm guesstmating no more than $20 extra for shipping. It's a lot of parts but they don't weigh much. Right now I'm leaning towards printing the translucent parts in dark blue/clear and not smoke. If someone really wants smoke I can probably accommodate them if they let me know before I order plastic. (I'm just afraid that the smoke might not let enough light through.)

Looks great, I'm curious what printer you use to get such a nice finish off the platen?
Will the main body be printed in white on the kits your sell?

Please add me to your list.
When would you like payment?

Jamie
 
Re: Star Lord's Map Gun

Looks great, I'm curious what printer you use to get such a nice finish off the platen?
Will the main body be printed in white on the kits your sell?
Please add me to your list.
When would you like payment?
Jamie


I'll be contacting everyone on the list about payment within the next week or so.You can achieve pretty good results with any of the high-end FDM printers (Makerbot, Ultimaker and so on) as long as you know how to set them up. I could print them in white but that might actually affect the surface quality a little. Not much mind you, but I would notice haha. (It might also drive up the cost a few dollars if I have to order more base plastic that I don't usually use. There is actually ONE white plastic that might be suitable for this... same stuff I used for my boot rockets in case you've seen those. Lemme look into it.)

Final images for a while. Renders of the longer body. Still ahve to do some last-minute tweaks though.
mapgunrender5.jpgmapgunrender2.jpgmapgunrender3.jpgmapgunrender4.jpgmapgunrender.jpg
 
Re: Star Lord's Map Gun

I'll be contacting everyone on the list about payment within the next week or so.You can achieve pretty good results with any of the high-end FDM printers (Makerbot, Ultimaker and so on) as long as you know how to set them up. I could print them in white but that might actually affect the surface quality a little. Not much mind you, but I would notice haha. (It might also drive up the cost a few dollars if I have to order more base plastic that I don't usually use. There is actually ONE white plastic that might be suitable for this... same stuff I used for my boot rockets in case you've seen those. Lemme look into it.)

Final images for a while. Renders of the longer body. Still ahve to do some last-minute tweaks though.


View attachment 454662View attachment 454659View attachment 454660View attachment 454661
View attachment 454658

Looks really nice and that silver plastic seems to give a really clean smooth finish to the surface, if using white will affect the print quality and make it lower than the silver, then keep the silver and I can easily paint it white.
I look forward to seeing the final grille with the border around the circles and squares beneath.

Thanks for taking the time to work on this for us, it is a prop I've been wanting since I first saw the film last year, and despite working on one myself, with the quality on show here I think I will save me time for something else.
Bring on the kit!
 
Re: Star Lord's Map Gun

Looks really nice and that silver plastic seems to give a really clean smooth finish to the surface, if using white will affect the print quality and make it lower than the silver, then keep the silver and I can easily paint it white.a
I look forward to seeing the final grille with the border around the circles and squares beneath.

Thanks for taking the time to work on this for us, it is a prop I've been wanting since I first saw the film last year, and despite working on one myself, with the quality on show here I think I will save me time for something else.
Bring on the kit!

WRiting this from 30k feet above the Atlantic so please excuse the sloppy writing. The silver is a tiny bit better. I've gotten good results from wite and grey before, so let me see what I can do. To be honest, you need to use spray filler-primer and sanding on the silver as well if you want a really smooth finish. You just have to sand a little less. ( on the other hand, the solid color sometimes sands easier, so...) The pearlescent white used on the rockets is basically the same as the silver so I might try to get some of that. We'll see.

You can see the almost final grille in the test print photo. The round bits are most likely just brass rivets,chicago screws or snap heads, about 8mm in diameter so they will not be printed. I did make the final grille about twice as thick though.
 
Re: Star Lord's Map Gun

WRiting this from 30k feet above the Atlantic so please excuse the sloppy writing. The silver is a tiny bit better. I've gotten good results from wite and grey before, so let me see what I can do. To be honest, you need to use spray filler-primer and sanding on the silver as well if you want a really smooth finish. You just have to sand a little less. ( on the other hand, the solid color sometimes sands easier, so...) The pearlescent white used on the rockets is basically the same as the silver so I might try to get some of that. We'll see.

You can see the almost final grille in the test print photo. The round bits are most likely just brass rivets,chicago screws or snap heads, about 8mm in diameter so they will not be printed. I did make the final grille about twice as thick though.

To get a smooth finish with 3D printed items I just a thin layer of superglue to soak into the textured surface and then give it a sanding over with a 400 grade, works every time!
 
Re: Star Lord's Map Gun

Hey guys,

I'm back from LA. Had an overfull schedule while there and only my ipad, sithonly so-so internet, so I didn't have time to hang around here much. I am however back on this. Test printed the new, longer body this weekend and it looks MUCH better:
newshell.jpg

New shell on left, with bottom "button" printed in grey plastic sitting loosely in the socket. (The bottom button has a loop underneath for adding an axel, enabling you to make it into a functional on/off button, kind of like a see-saw, for any lights you choose to incorporate, saving the hassle of an external on/off switch. Note that I don't guarantee this button-functionality, but it's there for anyone that wants to experiment!) New shell with bezel loose shown top-right. Old shell with test-fitting of the battery cover shown at lower-right.

I am just about ready to start accepting payments on these within the next day or two. Everyone on the list should expect a PM soon.


To get a smooth finish with 3D printed items I just a thin layer of superglue to soak into the textured surface and then give it a sanding over with a 400 grade, works every time!

Answered this on my iPad last week, but it crashed so here goes again. The superglue method will not be needed (or even work at all) with this kit. This is hard, non-porous PLA plastic and superglue does not "soak" into it. You can still use it to glue of course, but it would be useless as a smoothing agent. (Protip: nothing glues PLA better than solvent-based plexiglass cement such as "Acrifix 116". It works just like modeling glue does on styrene, by welding it together.) This plastic is readily sandable straight off, unlike the horrible white nylon stuff many commercial places use. That stuff will even turn away a buzz-saw! (The superglue makes the nylon brittle, thereby easier to sand, though I still prefer filler-primer for the nylon stuff.) I have sanded this plastic smooth without any filler at all... it just takes longer than using the filler-primer, which is why I usually use it.
 
Back
Top