You are using an out of date browser. It may not display this or other websites correctly.
You should upgrade or use an alternative browser.
You should upgrade or use an alternative browser.
Fullsize Alien Warrior Build (Xenomorph)
- Thread starter Metalalien
- Start date
Metalalien
Sr Member
joberg
Legendary Member
Exactly right; that's why, when selling to someone, people have no idea of the work/blood sweat and tears involvedI seriously doubt these pics illustrate the effort it took to get here....")
Metalalien
Sr Member
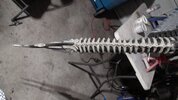
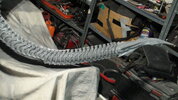
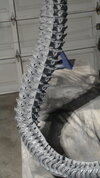
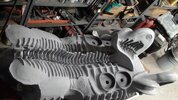
Well this is as good as I can make it with these materials. I found out the new foam clay I am using holds it's shape better but is EXTREMELY fragile when it is dry. It is basically like styrofoam... You can just break it off with very little effort. I discovered that when trying to sand it. The old foam clay is very tough... nearly like eva foam, but it sags badly when drying.
Anyway too late now the tail is already built, I damn sure am not building it again..lol. I will have to coat it in resin or something later to make it stronger.
Anyway too late now the tail is already built, I damn sure am not building it again..lol. I will have to coat it in resin or something later to make it stronger.
Attachments

Palantirion
Sr Member
Looks even better than I expected!
FYI, if you want a quality, but inexpensive, coating that will give the fragile parts more surface strength 2-3 brushed coats of Liquitex Gloss Medium will protect it, remain flexible (won't ever crack), and is a good primer layer as its is NOT actually a varnish - meaning it is open pore and will allow subsequent paint layers to grab onto it.
Unrelated, but I've used (undiluted) Gloss Medium as a primer on Stainless Steel (hub caps) and there's been no pealing after 7 years.
Metalalien
Sr Member
Thanks! Hey gotta link to that gloss coat?Looks even better than I expected!
FYI, if you want a quality, but inexpensive, coating that will give the fragile parts more surface strength 2-3 brushed coats of Liquitex Gloss Medium will protect it, remain flexible (won't ever crack), and is a good primer layer as its is NOT actually a varnish - meaning it is open pore and will allow subsequent paint layers to grab onto it.
Unrelated, but I've used (undiluted) Gloss Medium as a primer on Stainless Steel (hub caps) and there's been no pealing after 7 years.
Palantirion
Sr Member
Sorry, thought it was a commonly known product.
Let me know if that link doesn't work, forum code makes it look weird
Let me know if that link doesn't work, forum code makes it look weird
Metalalien
Sr Member
works.. I saved it thanks!Sorry, thought it was a commonly known product.
Let me know if that link doesn't work, forum code makes it look weird
Palantirion
Sr Member
Oh, also, Modpodge might also work in the similarly for your purposes. I just can't vouch for its long term durability. But if you have it on-hand then maybe it would be better. Gloss Medium is a little less viscous, but both can be painted by brush into crevices. Just thinking out loud.
Metalalien
Sr Member

Metalalien
Sr Member
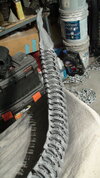
thank you sir.. the tail is about 15lbs as is.It's a thing of nightmare
Metalalien
Sr Member
short video
Metalalien
Sr Member
Oh yes.. the spine isn't done yet then I have to hang it from the ceiling to get the final position for the head so I could do the neck and make any adjustments so it fits up there right...I certainly wouldn't like to see that critter hanging from the ceiling
Are you planning a next step after this?
After it is done, I take it back down and do another round of sanding and filling to fix anything I am not happy with and maybe add in some detail here and there... I want to redo the mouth for example. I imagine by the first of the year though all that will be done and it will be time for paint.
The diorama that goes with it will be very big as well. Some of the colony, some of the hive, maybe a victum, egg, facehugger and so on.
Metalalien
Sr Member

Metalalien
Sr Member
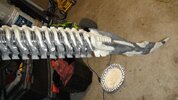
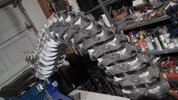
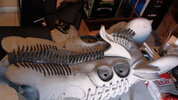
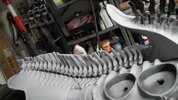
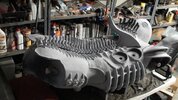
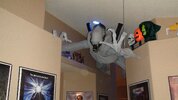
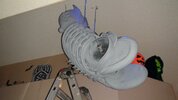
The back and spine are done.. the spine just lays on the back it's not attached. This is the side of the Alien you won't be able to see when it is hanging in place anyhow.
Next is to hang the Alien from the ceiling so I can see exactly how the head is going to sit... I need to do that before building the neck.
Next is to hang the Alien from the ceiling so I can see exactly how the head is going to sit... I need to do that before building the neck.
Attachments
The back and spine are done.. the spine just lays on the back it's not attached. This is the side of the Alien you won't be able to see when it is hanging in place anyhow.
Next is to hang the Alien from the ceiling so I can see exactly how the head is going to sit... I need to do that before building the neck.
That is looking GREAT! Very, very cool
Metalalien
Sr Member
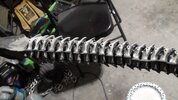
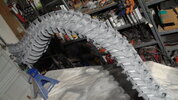
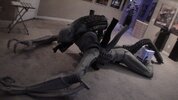
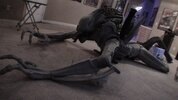
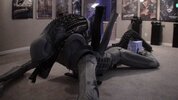
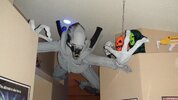
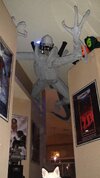
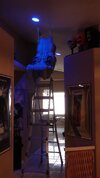
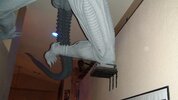
Man this was like wrestling a bear (I imagine).. the amount of work it took me to hang this I feel like I have been in a fight. Bruises and scraps on me and the Alien... one of the legs fell before I could secure it and it got damaged. No biggie I expected damage the first time I hung it up.. I built it I can repair it.
This is really a three man job, so doing this by myself sucked...lol Those chains may or may not be permanent. They need to be strong because this thing is so heavy but if I find something better I might change them out, I had to crawl up in the attic to make mounts strong enough for this.
Anyway it is hung up so now I can finish the neck... no rest for me.
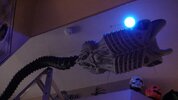
I knew there would be fitment issues because the PVC skeleton is so thin and easy to fit up there. I had to make a little shelf for the left knee. The Alien wouldn't sit right with the knee up on the edge. When I do the diorama I will make something for the knee to rest on that is my interesting.
This is really a three man job, so doing this by myself sucked...lol Those chains may or may not be permanent. They need to be strong because this thing is so heavy but if I find something better I might change them out, I had to crawl up in the attic to make mounts strong enough for this.
Anyway it is hung up so now I can finish the neck... no rest for me.
I knew there would be fitment issues because the PVC skeleton is so thin and easy to fit up there. I had to make a little shelf for the left knee. The Alien wouldn't sit right with the knee up on the edge. When I do the diorama I will make something for the knee to rest on that is my interesting.
Attachments

Similar threads
- Replies
- 56
- Views
- 4,689
- Replies
- 13
- Views
- 2,423
- Replies
- 13
- Views
- 4,526
- Replies
- 23
- Views
- 27,116
- Replies
- 17
- Views
- 25,149