Hello all,
A while back I got involved with a charity called Magic Wheelchair, they find builders like me to volunteer building cosplay projects for disabled kids going to comic conventions and other events. I'd done a build for them last year and they asked me if I'd be willing to do another one. The only problem was they didn't have anybody on their list that was located near me. What they did have was a detailed list of prospective recipients that included the kids' locations, the events they were planning to attend, and the thing they hoped they'd be able to dress up as. Most of them were various cartoon characters and things I didn't really recognize, but eventually I found the most awesome kid on the list. Her name was Jazmine and she wanted to dress up as Ripley in the Powerloader fighting a xenomorph.
That's the kid I wanted to build for.
Magic Wheelchair put me in touch with Jazmine's mom so we could talk through her needs for the costume. We agreed that we couldn't have the powerloader fighting a full-sized alien queen because it wouldn't be able to fit through a doorway. Instead, we'd have an alien warrior climbing on the top and back of the powerloader. Also, in order to avoid interfering with the wheels and mechanical components of the wheelchair, we'd avoid building the legs and just truncate the character at the waist section.
With all of that in mind, it was time to get started. Since the Powerloader parts were going to be relatively quick to put together, we started with the difficult part: the alien warrior. This started out as a duct tape dummy pulled off of a friend of mine. We filled it with rigid expanding foam, let it cure, then cut off the duct tape:


Now we had a lightweight, rigid mannequin, but it was a bit too beefy. My girlfriend Shawnon set about the task of shaving it down to make it a bit leaner:

With the body started, we also began making foam sculpting armatures for the other parts. Here's Lewis with the beginning of the tail being made out of a slab of insulation foam:

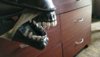
Vinny here is working on the foam base for one of the back spines:

Each of these parts was skinned over with clay so they could be detailed and textured:

We also pulled a lifecast off of my friend Freddy's hands (since his fingers were the longest of all of us working on this project) and Noelle got started sculpting out the xeno hands:

I had an old lifecast of my feet in storage, so we used them as a sculpting base for the creature's feet:

Each part got at least a bit of sculpting work from everyone who was involved in the project. Here's Shawnon wrapping up the feet and spine sculpts:

My friend Kate working on the sculpt for the first half of the tail:

Here's my assistant Rachel putting the finishing touches on the tail sculpt:

Each of these pieces was molded in Ultracal 30 and slipcast in black latex. I left most of the moldmaking to my friend Freddy. Here he is while I'm walking/talking him through the process on the first half of the tail:

The molds were typically two-part molds. Here's a shot of me and Freddy prepping the second side of the sculpt for molding:

After the molds had cured, the next step was to pry them open, remove the original sculpt, and pick out any remaining clay. Here's Shawnon and Kate cleaning out the molds for the first half of the tail:

Once the molds were cleaned and had plenty of time to dry out, they were strapped together and filled with liquid latex. The latex would be left in the mold for about half an hour of "dwell time." This allows the porous surface of the gypsum mold to wick moisture away from the latex wherever it contacts the inside of the mold, effectively drying a layer of latex skin for each part. Then the liquid latex is poured back into the bucket to be used on the next piece and the molds are set out where they can air dry until the latex on the inside of the parts is also dry:

With the latex dry, each piece was filled with low-density flexible expanding foam. Once that had cured, the parts could be de-molded:

Then it was just a matter of cleaning up the seams with a sanding drum on the Dremel:

The hands were cast around a wire armature in order to make the fingers pose-able:

Here's the first half of the tail once it was pulled from the mold:

When we cast the tip of the tail, we embedded a length of rope into the rubber before we poured in the foam. This rope was fed through the first half of the tail and they were glued together in order to make everything stronger when the two sections were glued together. The end result was a nice, strong single piece with a rope sticking out of it so you could securely attach it to the rest of the body:

A while back I got involved with a charity called Magic Wheelchair, they find builders like me to volunteer building cosplay projects for disabled kids going to comic conventions and other events. I'd done a build for them last year and they asked me if I'd be willing to do another one. The only problem was they didn't have anybody on their list that was located near me. What they did have was a detailed list of prospective recipients that included the kids' locations, the events they were planning to attend, and the thing they hoped they'd be able to dress up as. Most of them were various cartoon characters and things I didn't really recognize, but eventually I found the most awesome kid on the list. Her name was Jazmine and she wanted to dress up as Ripley in the Powerloader fighting a xenomorph.
That's the kid I wanted to build for.
Magic Wheelchair put me in touch with Jazmine's mom so we could talk through her needs for the costume. We agreed that we couldn't have the powerloader fighting a full-sized alien queen because it wouldn't be able to fit through a doorway. Instead, we'd have an alien warrior climbing on the top and back of the powerloader. Also, in order to avoid interfering with the wheels and mechanical components of the wheelchair, we'd avoid building the legs and just truncate the character at the waist section.
With all of that in mind, it was time to get started. Since the Powerloader parts were going to be relatively quick to put together, we started with the difficult part: the alien warrior. This started out as a duct tape dummy pulled off of a friend of mine. We filled it with rigid expanding foam, let it cure, then cut off the duct tape:
Now we had a lightweight, rigid mannequin, but it was a bit too beefy. My girlfriend Shawnon set about the task of shaving it down to make it a bit leaner:
With the body started, we also began making foam sculpting armatures for the other parts. Here's Lewis with the beginning of the tail being made out of a slab of insulation foam:
Vinny here is working on the foam base for one of the back spines:
Each of these parts was skinned over with clay so they could be detailed and textured:
We also pulled a lifecast off of my friend Freddy's hands (since his fingers were the longest of all of us working on this project) and Noelle got started sculpting out the xeno hands:
I had an old lifecast of my feet in storage, so we used them as a sculpting base for the creature's feet:
Each part got at least a bit of sculpting work from everyone who was involved in the project. Here's Shawnon wrapping up the feet and spine sculpts:
My friend Kate working on the sculpt for the first half of the tail:
Here's my assistant Rachel putting the finishing touches on the tail sculpt:
Each of these pieces was molded in Ultracal 30 and slipcast in black latex. I left most of the moldmaking to my friend Freddy. Here he is while I'm walking/talking him through the process on the first half of the tail:
The molds were typically two-part molds. Here's a shot of me and Freddy prepping the second side of the sculpt for molding:
After the molds had cured, the next step was to pry them open, remove the original sculpt, and pick out any remaining clay. Here's Shawnon and Kate cleaning out the molds for the first half of the tail:
Once the molds were cleaned and had plenty of time to dry out, they were strapped together and filled with liquid latex. The latex would be left in the mold for about half an hour of "dwell time." This allows the porous surface of the gypsum mold to wick moisture away from the latex wherever it contacts the inside of the mold, effectively drying a layer of latex skin for each part. Then the liquid latex is poured back into the bucket to be used on the next piece and the molds are set out where they can air dry until the latex on the inside of the parts is also dry:
With the latex dry, each piece was filled with low-density flexible expanding foam. Once that had cured, the parts could be de-molded:
Then it was just a matter of cleaning up the seams with a sanding drum on the Dremel:
The hands were cast around a wire armature in order to make the fingers pose-able:
Here's the first half of the tail once it was pulled from the mold:
When we cast the tip of the tail, we embedded a length of rope into the rubber before we poured in the foam. This rope was fed through the first half of the tail and they were glued together in order to make everything stronger when the two sections were glued together. The end result was a nice, strong single piece with a rope sticking out of it so you could securely attach it to the rest of the body:

")