You are using an out of date browser. It may not display this or other websites correctly.
You should upgrade or use an alternative browser.
You should upgrade or use an alternative browser.
Fullsize Alien Warrior Build (Xenomorph)
- Thread starter Metalalien
- Start date
Metalalien
Sr Member
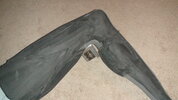
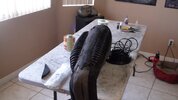
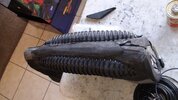
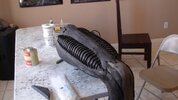
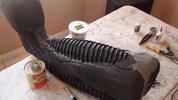
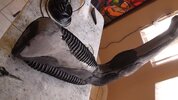
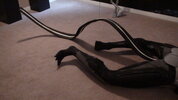
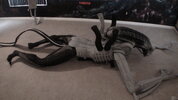
in case you are wondering about my method... I glue on pieces of foam, then grind them into shape and then repeat that over and over until the muscles and shape look right to me... then I start skinning it and adding detail..
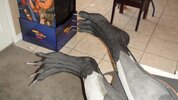
This is one of the legs you can see how I keep adding muscles... I will keep adding on and grinding to shape until I am happy with it.
This is one of the legs you can see how I keep adding muscles... I will keep adding on and grinding to shape until I am happy with it.
Attachments
Metalalien
Sr Member

Metalalien
Sr Member
Thank you sir. You know that Apoxie Clay stuff is crazy. It is chemical impervious to nearly everything yet it smooths with water sands easily and is very strong. Plus you can use it without gloves.. I started using it for other stuff like repairing a fuel tank... lolThanks for sharing your techniques with us. Learning a lot from you")
joberg
Legendary Member
Good to know the many usages of that clayThank you sir. You know that Apoxie Clay stuff is crazy. It is chemical impervious to nearly everything yet it smooths with water sands easily and is very strong. Plus you can use it without gloves.. I started using it for other stuff like repairing a fuel tank... lol
Metalalien
Sr Member
Palantirion
Sr Member
- Funny you should mention that. I recently used it to reinforce the impeller housings of two (different brands) Home Depot condensation pumps...their plastic is terrible and cracks very quickly making the pump(s) fail after about 3 months even though the rest of them is fine. Flexible CA around the O-ring to improve the seal, UV glue to tack the plastic parts back together (CA doesn't grip it well enough), then Apoxie around every screw boss, rib and seam. So far so good.Thank you sir. You know that Apoxie Clay stuff is crazy. It is chemical impervious to nearly everything yet it smooths with water sands easily and is very strong. Plus you can use it without gloves.. I started using it for other stuff like repairing a fuel tank... lol
*end of thread hijack*
Metalalien
Sr Member
lol it really is amazing. If you use JB weld first off you have to use gloves and you better hope you don't get it on anything you don't want it on. You can't really sculpt it. You have to wait for it to dry before you can do anything with it. Even then it turns to gum when it comes in contact with fuel.- Funny you should mention that. I recently used it to reinforce the impeller housings of two (different brands) Home Depot condensation pumps...their plastic is terrible and cracks very quickly making the pump(s) fail after about 3 months even though the rest of them is fine. Flexible CA around the O-ring to improve the seal, UV glue to tack the plastic parts back together (CA doesn't grip it well enough), then Apoxie around every screw boss, rib and seam. So far so good.
*end of thread hijack*
Apoxie Clay does everything JB weld does and 10 things it doesn't do. The people who make it don't realize what they created..
Palantirion
Sr Member
- Yeah, pretty much. I think JB Weld (original) is a little stronger and harder than Apoxie. But the difference is small. I also suspect that JB weld has slightly better bonding properties to metal and smooth ceramic, but I haven't tested them head-to-head yet. As you point out you can't sculpt or smooth wet JB Weld, but you can sculpt it in general ways at the 1-2 hour mark (use water as a tool barrier) and at 3-4 hours its hard enough to not move but still soft enough to cut it with a knife. I haven't tested Apoxie to know the range of it's cutting time, would guess 1-4 hours depending on the thickness (thicker cures a little quicker).lol it really is amazing. If you use JB weld first off you have to use gloves and you better hope you don't get it on anything you don't want it on. You can't really sculpt it. You have to wait for it to dry before you can do anything with it. Even then it turns to gum when it comes in contact with fuel.
Apoxie Clay does everything JB weld does and 10 things it doesn't do. The people who make it don't realize what they created..
Metalalien
Sr Member
Metalalien
Sr Member
Metalalien
Sr Member

Metalalien
Sr Member

Palantirion
Sr Member
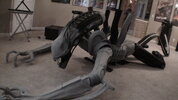
Is he going through boot camp? Seems to be crawling under the wires (j/k).
Which foam clay are you using?
Which foam clay are you using?
Metalalien
Sr Member
he is crawling actually... across the ceiling. when he is hung in place.Is he going through boot camp? Seems to be crawling under the wires (j/k).
Which foam clay are you using?
I am using Calpalmy clay..I know there are a bunch of different foam clays all with different properties, this one is cheap and it will stick even without adding water... that is because it is already very wet. Takes longer to dry through.
FORCE FLUIDE
New Member
Really impressive, I feel like the legs seem quite short, compared to the arms
Metalalien
Sr Member
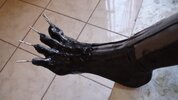
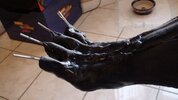
Thank you sir. It's partly based on the puppet alien from the movie so it's arms are the same length as the legs. 4ft long each.. the puppet was the same way basically.Really impressive, I feel like the legs seem quite short, compared to the arms
Palantirion
Sr Member
-HA, then I get partial credit, lol. Thanks for the link. I've used a different foam clay a little, was an interesting alternative to other processes. I'll pic up some calpalmy and mess around with it. Might be good for a sculpt I hope to start sometime in the next year.he is crawling actually... across the ceiling. when he is hung in place.
I am using Calpalmy clay..I know there are a bunch of different foam clays all with different properties, this one is cheap and it will stick even without adding water... that is because it is already very wet. Takes longer to dry through.
Metalalien
Sr Member
It's good for filling. That is what i use it for mostly. It doesn't hold it shape very well cause it has so much moisture.-HA, then I get partial credit, lol. Thanks for the link. I've used a different foam clay a little, was an interesting alternative to other processes. I'll pic up some calpalmy and mess around with it. Might be good for a sculpt I hope to start sometime in the next year.
Similar threads
- Replies
- 56
- Views
- 4,689
- Replies
- 13
- Views
- 2,423
- Replies
- 13
- Views
- 4,526
- Replies
- 23
- Views
- 27,116
- Replies
- 17
- Views
- 25,149