Custom Tennant Sonic Build

Status
Not open for further replies.
Phez, when machining or drilling acrylics, one needs to think about drill point geometry on various materials, and the fact that, acrylics have a very low melting point.

Now I will keep this very simple, Bull Dog can understand it, he then can go and do a decent job on that mess he made of his acrylics shafts, you would think that been a so called “ENGINEER” you would know this, oh well he must of missed that part in getting his Chinaman’s engineering degree, more than likely getting a Chinese lobotomy that day, as that would explain a very grate deal.

So here is what he would have learned, if you had actually attended an engineering university.

To drill acrylics you need to have a drill point angle of 118 Degrease, with a lathe speed of between 100 and 130 and no more, as any faster and you will prejudice to much drill tip friction heat, and it is no longer cutting at the cutting edge, but melting the acrylic. So, slow speed with the correct drill point angle.

And the second an very much 80% to getting a clean and clear drilled hole in acrylic, is the use of an oil with a viscosity of water, this must be constantly added to the drill cutting surface at the same point as you are removing the acrylic sworf from the drill flutes.

Don’t let the drill flutes fill up with acrylic sworf as this will lead to the acrylic sworf getting jammed in the flutes of the drill and will lead to heat & heat will intern melt the acrylic and you will get fine cracks on the drilled hole surface, heat is the enemy in any machining work.


Johnny5676
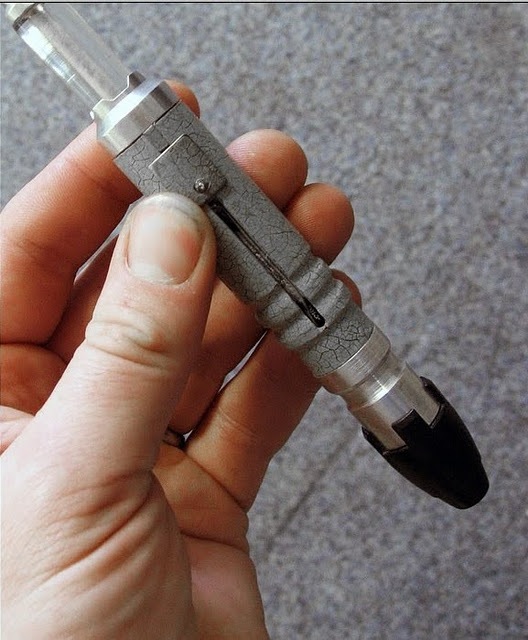
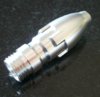
Yep have plenty more photos of the Rassilon1 custom Tennant sonic kit, to educate bull dog, on how to engineer a Rassilon1 Custom Tennant Sonic.

All the aluminium parts have been sent for hard anodizing, yep that’s rite, and all the aluminium parts will be clear hard anodized, why would I incorporate into my Rassilon1 custom Tennant sonic build kit, clear hard anodized parts.

This is so you the builder or the assembler of the Rassilon1 custom Tennant sonic kit, will have nice clean sonic build kit parts that won’t form Aluminium oxide on the surface due to constant daily use.

This will be covered latter in my Rassilon1 custom Tennant sonic build kit thread.
 
Last edited:
Yes very much so, but like anything you must have moderation and control.
You must keep your head, while everyone "eels" is loosing there’s

Aussie slang
 
Last edited:
Now I will keep this very simple, Bull Dog can understand it, he then can go and do a decent job on that mess he made of his acrylics shafts, you would think that been a so called “ENGINEER” you would know this, oh well he must of missed that part in getting his Chinaman’s engineering degree, more than likely getting a Chinese lobotomy that day, as that would explain a very grate deal.

So here is what he would have learned, if you had actually attended an engineering university.

I guess CT's engineering must be good enough for you to copy his design. :lol
 
Now I will keep this very simple, Bull Dog can understand it, he then can go and do a decent job on that mess he made of his acrylics shafts, you would think that been a so called “ENGINEER” you would know this, oh well he must of missed that part in getting his Chinaman’s engineering degree, more than likely getting a Chinese lobotomy that day, as that would explain a very grate deal.

Not only is this statement rife with offensive language that is at best culturally insensitive and possibly racist, but it's also totally inaccurate insofar as the info on the Acrylic shafts.
The shafts are not botch jobs, they are intentionally cloudy. They were actually changed from perfectly clear to cloudy in order to be screen accurate.
Here is a photo posted here to the RPF by Neill Gorton, of him holding a screen-used Season 3-4 Sonic Screwdriver. Notice anything about the channel in the acrylic rod?
6489417937_93946c8c8b_z.jpg


If anything, he didn't drill his cloudy enough... I can still see the wires in mine!
 
lathe speed of between 100 and 130 and no more

Worked perfect, thanks for the info. Mine was coming out looking exactly like the original one in that pic :lol. Unfortunately the Season 1 version (the one I am working on) was clear and not burned like that. I was turning it too fast.
 
Why have most of the early original posts by Rassilon been edited in the last three days after the recasting scenario came to light?
 
where do we sign up for a kit...this looks fantastic so far.

Well all the parts are being anodized at present, so I would think in about 7 to 10 days. I will let all know about that at the end of this build thread.

Thats right phez, it's all about speed, and plenty of thin oil. WD40 also can be used. I'm glad that I could help you out with your sonic build, as that's what this forum is all about, one member helping out another member with their sonic prop builds.

As mine is a "CUSTOM" Sonic, I have chosen to have the clear Acrylic rod center hole clear.

jedibugs:
Do you need some advice with correcting your manufactures workmanship on the acrylic rod to get that same improved frosted look for your sonic :confused
as you have indicated.

"If anything, he didn't drill his cloudy enough... I can still see the wires in mine!"

Yes, your so right to mention that, and can be an issue that other members may also be having with their screen accurate prop.

To achieve a frosted look on your Custom sonic build or to improve your screen accurate prop or if you are looking for the same effect, do one of two things.

First:
When drilling the Acrylic rod don't use oil or a lubricant, as this will give you a type of frosted look but, you will end up with what looks like rings running in a circular direction opposite to the direction you are drilling.
If this is the effect that you are looking for you need not proceed any further.

Secondly:
Drill the Acrylic rod as you would if you were looking for that clear acrylic rod look. Once you have completed that part of your build, next use a coarse wet and dry sandpaper.

If you use a to finer wet & dry sand paper it will only take you longer to get that frosted look. I used 100 grid wet and dry, and use a cordless drill with the wet & dry placed in the chuck as you will need to go in a circular motion to get that frosted look.
 
Why have most of the early original posts by Rassilon been edited in the last three days after the recasting scenario came to light?

Oh now that's is a very interesting question Asp9mm, one that I am very pleased you asked, without you been so observant, I could not answer it in full.

At the end of this build thread and when I'm ready, you will very much have your answer.
:lol :lol :lol
 
Last edited:
Things have been a little to quiet today so I have posted some more pic’s of the Custom built sonic that this thread is all about.
And by that I mean on both ends of the small housing that screws into the grip, have used M14x1.5 T.P.I now Bull Dog,….. be a good Apprentice and tell the good members what type of thread that is,…………. that’s right its a………. metric thread, any descent Engineer will tell you that. You don’t use fine threads in Aluminium, as they will strip out under load and not only that they will cross thread all so easily, so you would never use such a thread on a Aluminium sonic screwdriver of any season.

Now clean the wax out of your hairy ears this is very important Bull Dog, we are going to talk about threads.

In Unified threads that’s UNF that’s what is used in the aircraft industry (measured in inches), there are numbered diameters #0 through #10, with 0 the smallest and 10 the largest.
(Diameters #12 and #14 may also be found, but are usually on older equipment and needed for repairs or restorations. #14 is close to, but not exactly the same as, 1/4-inch.)
The major diameter in Unified threads = 0.060" + 0.013"*(numbered diameter). So #2 has a major diameter of 0.086". The odd numbers exist, but the even numbers are in far more common use.

For screws larger than a #10, the diameters are listed in fractional inches. For instance, a 1/4-20 screw has a 1/4-inch major diameter.
For metric threads, e.g. M3.5, the number following the M is the major diameter of the external thread in millimeters.
For Unified threads, the number given is threads per inch. For instance, a 1/4-20 screw has 20 threads per inch.
For metric threads, the thread pitch is given in millimeters per thread. Thus, an M14 x 1.5 screw has threads every 1.5mm. Although most metric fasteners have two or more standard pitches (fine & coarse threads),
There are two major metric "industrial standards": DIN Deutsches Institut für Normung (German) and the JIS Japanese Industrial Standards. Although these standards are closely related and often identical, there will be cases where say a JIS M8 bolt may not have the same pitch as a DIN M8 bolt. Now are you getting this down Bull Dog, if not just cut and past it and read it later ok.
 

Attachments

  • 1.jpg
    1.jpg
    72.3 KB · Views: 2,369
Last edited:
By doing that as one piece it'll make it more durable. Since this is to be a kit are going to pre-rough the end cap so it takes paint better or will you be doing it up black in the shop before shipping?
 
Now are you getting this down Bull Dog, if not just cut and past it and read it later ok.

Dude, how is it that you've magically turned this around and are now acting as if the guy who has already released two different models of Sonic Screwdrivers (not counting the variants) is somehow a poor engineer that needs your advice?
He has produced. He has shipped. And no one seems to have complained of any issues with his threads (mine are just fine). My advice would be to show your work to the people here, stop goading the Dragon, and you'll come across more like an upstanding, hardworking prop replicator. As it is, you're coming across like a line cook telling Gordon Ramsey how to cook.
 
Status
Not open for further replies.
Back
Top