I just started with 5mm for the bigger parts like the top of the helmet. But i could change easily. My Computer works again and I think I know how to scale, but im not sure if I will do it right . Im 170 cm tall. Thanks
This is a bit late, but that is indeed the templates that I based mine off of. I had to fix a lot of the parts like the arms because they weren't accurate to the tv show. I hope your issue got resolved and good luck with your build. :)
 
Hey ive started to build my own helmate and sholder pad that ive modified to look like the manolorian one. But is the poldren 1-5 the templates for the flat peice that goes over the left sholder, and if so what thickness of foam was used.
 
Hey ive started to build my own helmate and sholder pad that ive modified to look like the manolorian one. But is the poldren 1-5 the templates for the flat peice that goes over the left sholder, and if so what thickness of foam was used.
1612279455460.png

1-5 for the pauldron is for this part, and I wet with 6mm, but anything from 5-7mm can be used
 
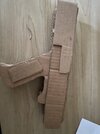
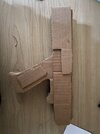
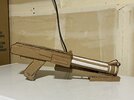
Hopefully I’m not taking over this thread but I wanted to show off my clone build so far. At the moment money is a bit tight so instead of using foam I chose cardboard to use with the templates. I used rjrproductions clone helmet template, ryzers armor template, and andrewdfts dc-15 template. I’ve been using gorilla hot glue which holds really well and doesn’t leave a lot of room for mistakes. I also used spackle to seal gaps although I’d prefer something that doesn’t have vocs.
I first started with the helmet and although I had a template there was a lot of improvising to make the helmet wearable for me and at times I had to rip it apart and glue it together differently.I don’t remember the order I went about putting it together but that’s why I took pictures throughout.
DD5AD40F-9632-429E-BFD4-9AACB466A3D7.jpeg
766BAAD8-F10F-4E5A-99C5-46C979331E16.jpeg
I had to add a extra couple of inches to the headband area to widen the helmet since it was too tight.
FB215122-EF38-4E59-B3A4-6F407E27458D.jpeg
DD9006EE-23FF-430C-A5D3-A1D17468DB33.jpeg
in this picture was trying to find the perfect height for the dome. I ended up cutting it off and making a shorter piece and got what I was looking for. I also had trouble figuring out a way to connect the side and back tubes without too much effort.
E3674FA9-B9BA-4F38-ACAB-1080E768AD21.jpeg
DD8975DA-0B22-4E15-9B2D-C715A6BF04D8.jpeg
only managed to fix the tubes on this side the other is a bit flat.
5C27AFAB-7F7D-42EA-9CDD-1D450AB17B11.jpeg
here’s the back it might look a bit off cause like I said earlier I had to resize the helmet to fit me.
9E24103F-6D92-44C6-8105-9165B7D7EFF4.jpeg
spackled and sanded
04B0BD3F-87F1-4D33-8438-C3FF787CC58B.jpeg
9DA3162C-45FA-4F7A-97FE-405A2514CC42.jpeg
painted but had to clean it off because of runs and smears.
AAC37C1E-A2EB-4C9C-AFF3-E6A1D44A1062.jpeg
here’s the final product, only thing I would change would be the mouth since it’s a bit too small but I don’t have xacto knives. Spackle is cracking too but it’s not too bad so I left it like this.
 
Here’s the dc-15 I made out of cardboard it’s mostly the thin flat pieces but I found some thick 1 in wide cardboard that I was able to use to reinforce the mains body and the entire grip/handle. For the details I just layered the same pieces until they were the depth. Template is from andrewdft.
 

Attachments

  • 5AF952C6-1F64-463D-A135-5B62797488BE.jpeg
    5AF952C6-1F64-463D-A135-5B62797488BE.jpeg
    1.5 MB · Views: 204
  • D49EEAD1-FCE2-455A-9AF9-FEF7567534C2.jpeg
    D49EEAD1-FCE2-455A-9AF9-FEF7567534C2.jpeg
    1.9 MB · Views: 258
  • 711DAFDC-4D08-43F9-A67F-233E8DD15F39.jpeg
    711DAFDC-4D08-43F9-A67F-233E8DD15F39.jpeg
    1.6 MB · Views: 248
  • 05E532F2-7CA8-47B9-A972-05A5A833F4E4.jpeg
    05E532F2-7CA8-47B9-A972-05A5A833F4E4.jpeg
    1.2 MB · Views: 176
  • B573BA83-8723-4B5F-9C38-0C0073261D8F.jpeg
    B573BA83-8723-4B5F-9C38-0C0073261D8F.jpeg
    3.2 MB · Views: 251
  • 84F08E54-B655-4742-B8E9-B3AB06118C3E.jpeg
    84F08E54-B655-4742-B8E9-B3AB06118C3E.jpeg
    2.3 MB · Views: 192
I’ve also been working on ryzers armor template and as of now have the arms, chest, and thighs at the very least built. Some things still need to be spackled/sanded/painted.

Here’s the arms as of now, I also have the hand plates cut out but it’s simple so I didn’t post it. I’m also planning on trimming the biceps a bit for more articulation
EDDC2C1A-DFD3-4422-A06B-6ABF7EED7BDC.jpeg
1EF36D40-8140-409E-B9E4-EECF2CDE81BA.jpeg
706213FC-E035-4403-B930-D708498815BC.jpeg
AF1DAC43-D8B3-444A-82C4-FEC4A9B6DF4B.jpeg
30BDA108-C0B9-4FA2-AAEA-52651A1FB968.jpeg
B952D358-75CE-4513-B8E0-DBB2D5C9D172.jpeg

Here’s the chest. It’s wearable I have Velcro on one side to open up and the other side is superglued so it’s shut. The shoulder straps are reinforced underneath to keep the front and back together while I put it on. With cardboard I cannot bevel at all but gorilla glue allowed me to pull off different angles while still holding together.
819F8F58-D4E5-407D-9324-9B52A8D00B81.jpeg
12697D78-E9B0-4112-9685-CFC1AD7A0F38.jpeg
D202F961-8C71-4040-83AC-00FABEE96572.jpeg
52C98596-8139-4373-B19E-EE80054AC7A8.jpeg
245C9779-D092-413B-8A62-16A90FA51BB2.jpeg
E937F78B-C20C-4931-BDC0-0CDA6DA352A9.jpeg
DB86E256-325D-4E4B-8731-493029B575A4.jpeg
The thighs are the most recent pieces I finished. I couldn’t really bend my legs so I cut off mm by mm at the back piece until I could walk reasonably. Other than that they’re pretty snug and just need to be held up a bit with elastic straps attached to a belt.
D0287572-8CB2-43C8-8090-B8A845440D00.jpeg
56408A7E-2609-4B8C-BE08-952F28387BE6.jpeg
CD47DAC0-C809-4E34-8D4F-330D9ED0265E.jpeg
F663344E-5B47-4C50-8A4D-4839CA20D393.jpeg

That’s all I have for now but I’m currently working on both shins and I’ll update when those are done or when I finish other pieces.
 
on the helmate build you put moddeling putty around certain parts of the helmate in that a necessary step in the build.
 
on the helmate build you put moddeling putty around certain parts of the helmate in that a necessary step in the build.
If you want a smooth surface, it in many cases is, although I´d recommend something different due to the flexible cardboard. A regular modeling putty usually is to stiff and will crack when the helmet is e.g. squished during trooping. You can harden any cardboard parts with resin or reinforce it with a coating of resin and fibreglass mat. There are tons of tutorials available on Youtube that guide you through the process of covering and or hardening various types of armour materials.

To achieve a smoother surface you could also cover those straight and flat areas with another cardboard or go the paper maché route. Tons of options.

Love this build, I like working with card board due to its availability and price.
 
So i no this is like the third comment ive posted but just wondering anyone who has made the helmet, do you find it slightly tight and snug on the cheak peices of the helmet on the top of you head or have i just got a big head.
 
Hey has anyone made the helmet with his templates and found the cheak peices are a bit tight and snug on the top of your head or have i just got a large head?.
 
Anyone having sizing problems: yes,the helmet's design doesn't allow you to have the "perfect fit" and be able to fit your head through the bottom just like that. It took me 2 helmets to realize that. Although if you make a larger bucket then you might solve the spacing problem with some leftover foam or cardboard. However some builders state that you could carve out some pieces from the bottom without destroying the overall form of it. It's hard to make it with phase 2 clone helmets...but yeah. Oh, if you're patient enough you could separate the front and the back panels of the helmet and stick them together with some magnets. I hope I could help something.
Cheers!
 
So my first helmate cracked on the back when I dropped it so on round 2 i was thinking about pouring the liquid plastic over the outside so i can get a full covering and not have any obvious runs. would it work if i put it on the outside?
 
Hello everyone. I just wanted to share the Armor that I made and the foam files that I used to make my armor below. The files were heavily modified from the BSD Rex files that I found online. I would say the armor is 95% screen accurate to the TCW version of the clone trooper, so it is not perfect but it's pretty close. I did not make the Pepakura files for the helmet, just fyi. Feel free to change it however you want. I would love to see a picture if you do make anything from the files. :)


View attachment 1017443 View attachment 1017445 View attachment 1017444 View attachment 1017449

Here's a video I made explaining each piece:
Dude this was amazing and it inspired me to get into the craft for the first time! Of course like a classic hobbyist I changed lots of it around but in the end it ended up looking sick! I had a glue gun already and most of the supplies so my average cost for my whole project was around 250-300 bucks. I wanted mine to be unique and I loved the clone wars series so I made mine 501st CW style. Here are the pics and thank you so much for the helpful forum and vids they really helped and without them I wouldn't have gotten into the craft myself. I don't have any pics of me wearing it i have some of it on an armor stand i made for it but it fit nicely and correctly when worn on the body. Of course mine isn't perfect either and i did rush a few parts of it, my only wish is that this inspires someone else to make their own! Clone Armor Album
 
The templates are great, however I do have one question. Bevels can be cut in multiple ways, so which way do the bevels in your templates follow?
 

Your message may be considered spam for the following reasons:

If you wish to reply despite these issues, check the box below before replying.
Be aware that malicious compliance may result in more severe penalties.
Back
Top