Build Thread - Fallout 4 Laser Musket

RockIt

Active Member
I'm super stoked to be starting up my newest build project - the laser musket from Fallout 4!

59634-0-1436302265.pngFallout-Shelter-Preston.jpgIirHm87.pngLaser_musket_promo_image.png

Obviously the game hasn't been released (c'mon, Nov 10, get here faster!) so I'll be working off a handful of reference photos from their promo material and trailers. Just from that, it's super obvious that customization is going to be super prevalent in the newest Fallout - so I'm pretty stoked that my Laser Musket will (likely) be different from the next guys....who'll be different from the next guys!

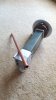
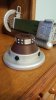
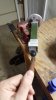
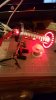
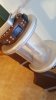
The build is going to be a mix of 3D printing (currently starting the CAD models as we speak), sintra, and misc other materials (like fasteners, piping, or tape). I'm also making it to generate a red charged plasma effect in the clear chamber. Sadly, crackle tubes have become scarce (would've been perfect!), so I'm going to jury rig the effect from some LEDs and Arduino-based micro-controller.

I'll be starting w/initial CAD modeling and the preliminary prints first, then work from there.

Question: if anybody knows of some good tutorials on triggering the circuit using the actual gun trigger, could you link me to them? I've built LED blaster props previously, but they're always on/off and not active trigger. Thanks!
 
Slow progress is slow. Knocked out a couple comissions plus, the bigger time sink, < 1 month til the wedding. So all time/energy/money going into last minute wedding planning, coordination, logistics, etc. BUT! I've done some modelings, started printing a couple of the pieces. So here's a couple CAD in-progress shots for kicks 'n giggles!

20150916_202007.jpg20150917_222451.jpg
 
Slow progress is slow. Then again, 3 weeks til the wedding. So any progress is nothing short of a miracle! But for this build I'm quickly realizing that since it has so many subsections and its being made out of more than just CAD models, I'm going to start sub-assembling it as I go along. So - have a progress pic showing part of the grip being put together. Still super raw. Prop is maybe 5% complete....

20151004_135913.jpg
 
hey a couple of us are making one as well. here is a link there area couple .stl files I've prepared that you may find useful and a bunch of other stuff. It would be awesome if we could all help each other out
http://www.therpf.com/showthread.php?t=244785&page=3&highlight=fallout

Right on, those are some great models you've got so far. I'm definitely onboard to help where I can, thanks for the link!

What I think is cool is Fallout 4 looks to be super customizable, including the weapons. The laser musket is slightly different in every single decent reference photo I've found so far. For example, I'm not installing the crank onto mine but instead, I'll be making and attaching 3-4 large batteries. I'm curious to see how the different builds turn out, different versions of the same core build.
 
Ok, after a few month delay (hooray life - but considering I now officially have multiple life events behind me, it should get better from here). Expect a photo dump with significant progress coming soon...
 
Currently at the assembly stage. I've finished modeling, printing, filling, sanding, priming, and painting. I bought some lenses and sanded them down to fit into the lens holders. The neopixel LEDs are controlled using a flora arduino board, installed inside the back half of the musket, and accessed through a magnetic back panel. I'm putting the main sections together now, then will test the structural integrity of the full build (should be fine), touch up, add details, then weather and seal. Should finally be done soon! Also to note: I opted out of the crank because it was getting way too in the way for usage at a con or whatever.
 

Attachments

  • 20151212_110319.jpg
    20151212_110319.jpg
    3.4 MB · Views: 239
  • 20151224_143250.jpg
    20151224_143250.jpg
    2.9 MB · Views: 189
  • 20151229_165642.jpg
    20151229_165642.jpg
    2.9 MB · Views: 250
  • 20160122_184529.jpg
    20160122_184529.jpg
    2.2 MB · Views: 264
  • 20160125_172436.jpg
    20160125_172436.jpg
    2 MB · Views: 202
If you have any in detail assistance you can share with the gears and lighting you added in that would be awesome, currently gathering materials right now and hoping this doesnt cost me a fortune. I hope the wedding was nice!
 
Looking good. I hope to build one of these some day.
Thanks! And go for it - ever since I starting building props a couple years ago, I've never found a hobby more rewarding. And when you get into fully scratch built and do EVERY aspect of it, it's just awesome. Plus you're left with something cool from one of your fandoms! Prop makers - we're professional hoarders ;-)

If you have any in detail assistance you can share with the gears and lighting you added in that would be awesome, currently gathering materials right now and hoping this doesnt cost me a fortune. I hope the wedding was nice!
Thanks! So I made a couple mods on my build, the most prominent one being no crank. I started to make one based off some gears I was 3D scanning for a base mesh model, but I quickly realized that since my end goal is to cosplay w/this prop (and not only have it for display), the gear was going to interfere waaaay too much. Between poking me constantly and worrying about its potential to break, I ditched the gears. If you've got a 3D printer tho, there's some good gear discussion at this thread: http://www.therpf.com/showthread.php?t=244785 by Aces

As for the lightning, I (among others) have done extensive research into figuring out how to replicate that. Ideal choice: crackle tubes. Unfortunately, a few years ago tho became a) scarce and b) EXPENSIVE (if you can even find them). Cost prohibitive. So after looking into multiple options, I settled on programming an arduino microprocessor to randomize the LEDs in my crackle chamber (I'm using 1 ring of 24 neopixels and 3 cut/spliced strips of neopixels). I found that if you do this and then give that section of the musket a semi-reflective finish (interior), coupled with a matte finish on the outer section to diffuse the light, it actually works out pretty damn good. Hope that helps!
 
Last edited by a moderator:
Weathered, sealed and done! So flippin happy w/the final product. I realize I took some liberties w/the design (specifically leaving the crank off due to it continuously getting in the way, meaning it'd be crap to use at a con) but I'm totally pleased w/it. Plus, now I can turn and focus my attention on the costumes this will go with (a Boomer Vault 34 dweller and some T-60 Atom Cats power armor).
PhotoGrid_1454967985523.jpgPhotoGrid_1454889016409.jpg

- - - Updated - - -

Here's a link to a video showing the LED crackle effort in action: https://www.instagram.com/p/BBkJPs4Ni5x/

The LEDs are controlled using an adafruit neopixel microprocessor and powered with a 3x AAA battery pack.
 
Also, day = made! My laser musket was featured on the official bethesda fallout account this week. So thrilled!

Screenshot_2016-02-14-06-12-04.pngbethesdahighfive.png
 
This thread is more than 8 years old.

Your message may be considered spam for the following reasons:

  1. This thread hasn't been active in some time. A new post in this thread might not contribute constructively to this discussion after so long.
If you wish to reply despite these issues, check the box below before replying.
Be aware that malicious compliance may result in more severe penalties.
Back
Top