Limited Run [BRRogers/Verity Cosplay/7 Chambers] "Mom of All Heroes" ORDERING

You never know... mine went from being in Ohio on Tuesday to delivered Wednesday without saying anything other than "Handed off to courier" on Wednesday morning.

I would keep an eye out for it!

If you have a DHL account you can subscribe to receive text messages and/or emails. In my experience the "Delivered" message usually arrives within minutes of the actual delivery. You can also request that they leave the packages without signature rather than leaving a notice.

...welp, this is officially the weirdest delivery I've gotten yet, because apparently DHL stateside consists of either magical fae or time-traveling Trekkies who teleported my box from Denver to here in a couple of hours (???!!1!), but the important thing is, I was gladly wrong and it's finally here.

*slaps box*

This bad boy can hold so many questionable coping mechanisms:

DSC00352_sm.jpg


DSC00351_sm.jpg


(Yes, I had to be Extra™ and don my black glove for this, let me have my moment.) :lol::lol::lol:

I don't think I'm missing anything, everything looks good, to say the very very least!
 
Received mine today in Ireland but think I may have some finishing issues. I’d like to get some second opinions on as this, as it is my first saber and I’m not sure what to do. It came oily all over which I assume is just threading lube so I gently wiped it clean around the none threaded areas with soft microfibre cloth and noticed some flaws as I picked up each piece.

first off I’m not sure if I’m missing any pieces?
9A4757D5-8616-4432-8E92-9BC3B82A443F.jpeg


secondly a number of pieces have what seems to be some tarnishing that a microfibre can’t take off and I’m worried it’s permanent?

7AAE4951-37C9-47C1-8499-E59BC0207767.jpeg

44BA92DF-7BC4-41BE-8031-2E36EECF7710.jpeg

CE222B43-E237-4291-8901-A9A6C2BCFEB2.jpeg

68429081-B0F4-4387-8BF5-AA58F1353C62.jpeg

2D3D88E9-C346-4251-B7B1-7208C0F70601.jpeg

FF445558-430D-40BE-A005-C0954C676A46.jpeg

FBB85346-8A07-46DA-88EC-1CB1D53E3998.jpeg

31B84D57-0A50-48C6-B73D-7FAC89874DBE.jpeg

12F9B186-BED7-40A1-BA4B-A3A8B5648F78.jpeg
 
John it looks like you actually got all of the parts.

For the clamp card itself, and the bronze/ copper windvanes those should be able to be cleaned easily with a product akin to brasso.
When preparing to install the clampcard I would note that both sides will probably need to be shaved down a bit for insertion and that the bottom-side of your choosing will likely need to be addressed to loosed friction in between the card slot.

Regarding the other dark spots on the aluminum, it may actually be oxide resulting from the factory, so my first recommendation would be to try using a very fine steel wool to burnish those areas. If it is an oxide it is likely just in the surface metal and *should* be able to polished out (as opposed to simply wiped out)

Sometimes bi-metal interaction of metal powders, machining fluid, or anything else on an assemblers gloves can get into the surface like that.

If you're able to try those first feel free to PM one of us and we'll walk through it together
Hi B

thanks for the prompt reply, wasn’t so worried about the brass portions as like you said I should be able to polish them out with the right product. I have no appropriate materials for the aluminium sections and the lockdown may make it tricky to get them any time soon.

Just a question on the steel wool approach though, won’t that dull portions of the finish or leave swirl marks and make it different from the rest of the finish?
 
Received mine today in Ireland but think I may have some finishing issues. I’d like to get some second opinions on as this, as it is my first saber and I’m not sure what to do. It came oily all over which I assume is just threading lube so I gently wiped it clean around the none threaded areas with soft microfibre cloth and noticed some flaws as I picked up each piece.

first off I’m not sure if I’m missing any pieces?
View attachment 1412077

secondly a number of pieces have what seems to be some tarnishing that a microfibre can’t take off and I’m worried it’s permanent?

View attachment 1412078
View attachment 1412080
View attachment 1412081
View attachment 1412082
View attachment 1412083
View attachment 1412084
View attachment 1412085
View attachment 1412086
View attachment 1412087
Looks like you got two plates, though, I think they're the same one.
 
Hi B

thanks for the prompt reply, wasn’t so worried about the brass portions as like you said I should be able to polish them out with the right product. I have no appropriate materials for the aluminium sections and the lockdown may make it tricky to get them any time soon.

Just a question on the steel wool approach though, won’t that dull portions of the finish or leave swirl marks and make it different from the rest of the finish?
a high grit ( very fine) abrasive shouldn't dull it,

If you rotate it radially in your hands typically you'll keep the directional finish similar to working it on a lathe. Hope that makes sense. If the finish needs to be made uniform the technique can be applied to the rest of the aluminum portions.
 
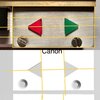
This might be helpful too, since the plates are quite nuanced....
137527658_256487409525832_8030438083734192750_n-1.jpg
Screen Shot 2021-01-15 at 11.45.00 AM.png


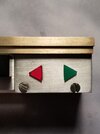
You'll be tilting the hilt slightly if you're looking down the bullseye of the two arrow points so to speak, if it is the canon plate. So that's the easiest way to identify when one is on there,
 
This might be helpful too, since the plates are quite nuanced....
View attachment 1412101View attachment 1412102


You'll be tilting the hilt slightly if you're looking down the bullseye of the two arrow points so to speak, if it is the canon plate. So that's the easiest way to identify when one is on there,
I am tripping myself out. This is the canon one right? My eyes are playing tricks on me! Hahahahaha. For some reason I thought the idealized would have one of the screw hole moved to match the other as well as straight arrows, but I understand if that is a stretch for this already wonderful design, so I’m not griping. When I look at it next to the Anakin Starkiller I REALLY can’t tell because they seem less crooked on my MoM(lol).
24784BB7-41E3-4B33-BC8D-E6A743221430.jpeg
80ED3E8A-36CB-4A5B-95B2-40801721FD48.jpeg
 
Yeah there’s just not a good way to have two various screw holes in the ideal positions without risking blowing out the holes during machining or putting them in an odd spot to match each other.

as far as Anakin Starkiller, not sure ! Maybe he has them a bit more off kilter? We never really compared our control boxes early on just the hilt geometry
 
I am tripping myself out. This is the canon one right? My eyes are playing tricks on me! Hahahahaha. For some reason I thought the idealized would have one of the screw hole moved to match the other as well as straight arrows, but I understand if that is a stretch for this already wonderful design, so I’m not griping. When I look at it next to the Anakin Starkiller I REALLY can’t tell because they seem less crooked on my MoM(lol).
You're not the only one, I was going cross-eyed trying to figure out which I have. Should have the canon but this looks idealized to me.
 

Attachments

  • 139378360_3647588955330256_8450419524569339832_o.jpg
    139378360_3647588955330256_8450419524569339832_o.jpg
    286.7 KB · Views: 83
What are people thinking in terms of finishing on the grenade? Should the black anodizing the final finish or just a nice thing to have but meant to be painted over anyway?

I like the finish but wondering if satin black paint would look even closer to the actual prop? Was the real prop painted? Would be curious to hear people's thoughts.
 
You're not the only one, I was going cross-eyed trying to figure out which I have. Should have the canon but this looks idealized to me.
A9E80321-7C7F-49CA-8BD9-95BF2AA05AE8.jpeg

Canon, very subtle tilt ;)
These lines might help see it


*edit*. There should also be a teensy tiny bit of play between the arrows and the opening itself, you might try unscrewing the plate a little bit and then tilting the arrows over a bit more or making sure they’re sitting into the corners to achieve a bit more asymmetry to push the look.
 

Attachments

  • 50582A08-3AA8-4AB5-B0BD-E927FFA1391C.jpeg
    50582A08-3AA8-4AB5-B0BD-E927FFA1391C.jpeg
    401.6 KB · Views: 86
Last edited:
What are people thinking in terms of finishing on the grenade? Should the black anodizing the final finish or just a nice thing to have but meant to be painted over anyway?

I like the finish but wondering if satin black paint would look even closer to the actual prop? Was the real prop painted? Would be curious to hear people's thoughts.
Loneken
The real prop is definitely spray painted... though I believe it is probably more matte. The quickest solution (what I did) is spray several quick light layers of matte clear which tones down the satin and gives it a ‘spray painted’ texture
 
Loneken
The real prop is definitely spray painted... though I believe it is probably more matte. The quickest solution (what I did) is spray several quick light layers of matte clear which tones down the satin and gives it a ‘spray painted’ texture
Oh smart I like that. Any recommendations on a good matte clear?
 
Oh smart I like that. Any recommendations on a good matte clear?
Usually when I’m at ace grabbing the Antique Gold I’ll pick up the krylon brand clear. I’ve used it on architectural railing for years and the finish holds up nicely. Of course Halliwax might have a different recommendation in his thread if you like the way his technique looks :)
 
Edited above too but:
“*edit*. There should also be a teensy tiny bit of play between the arrows and the opening itself, you might try unscrewing the plate a little bit and then tilting the arrows over a bit more or making sure they’re sitting into the corners to achieve a bit more asymmetry to push the look.”
 

Your message may be considered spam for the following reasons:

If you wish to reply despite these issues, check the box below before replying.
Be aware that malicious compliance may result in more severe penalties.
Back
Top