Blade Runner PKD blaster / That Gun

BeardySi

Active Member
This came as a nice surprise birthday present from my wife. She knew Blade Runner is a favourite of mine, but she'd no idea that this gun also appears in Fallout which is a big obsession of mine.

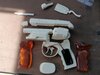
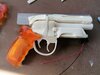
The kit came from etsy and a bit of research reveals it to be a recast of the Doppelganger productions/Rick Ross PKD-2. Actually more likey it's a recast of a recast...

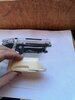
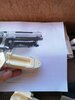
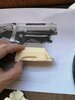
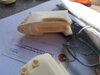
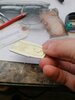
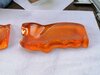
The kit is cast in a decent resin, but all the parts feature lots of pinholes, some are more like an aero bar that a kit part. Many parts are warped, with the barrel and the grip frame being particularly bad. The grips are cast in Amber coloured resin. They look a little orange compared to the original, but are bubble free - though there are some flecks of poorly mixed pigment.

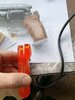
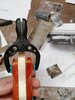
Part quality isn't great, most of the parts have a rough surface and generally show signs of being shot from very well used moulds. Detail is generally fuzzy and there are lots of air bubbles in evidence. The cast screw heads all look poor with lots of bubbles and will need to be replaced. There's lots of fine text that's mostly good, but some areas will need attention.

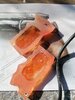
Part fit isn't great, the two grips aree different sizes, the main parts are very loose and nothing really locates positively.

Overall its a fair garage kit of a hard to find subject. Going by what I've seen of the quality of the original kit I'd say this probably is a cast of a cast - most of the crisp definition is gone. It'll take a bit of work to get the best from it, but I think it'll turn out pretty well in the end.

There are also some inaccuracies which I'm hoping to address as the PKD-2 kit was originally produced before the original hero prop was shown to the public.
 

Attachments

  • IMG_20200414_230041.jpg
    IMG_20200414_230041.jpg
    2.6 MB · Views: 623
  • IMG_20200414_155117.jpg
    IMG_20200414_155117.jpg
    2.7 MB · Views: 603
... And so we begin!

The barrel is hollow for about 50% of its length and there was a significant bend at the point the hollow section ended. I heated it locally with a hot air gun and taped it into a V block to harden up straight. Similarly the grip frame was bent to one side, so I heated that and clamped it between two boards to straighten it. Luckily the upper reciver seems straight - I've read that can be a problem with this particular kit.

On to the Steyr magwell. The PKD kit has the baseplate sitting proud of the gun where it should be flush. I carved out a recess and cut back the side walls to allow the base plate to sit in the correct position. I also sanded the plate to a more even thickness and gave the side lips a new profile.

The positions for the four LEDs (2 per side) are slightly off - they should be further apart and there should be a switch between them on one side. I'll fill them and re-drill once some isopon arrives (thanks corona for closing the hardware shops!). I'll also add a styrene tube bezel around each led to reflect the original better.

The Steyr logo on the bottom plate looks rubbish and it's really annoying me - it'll have to go. I've got an airsoft AUG with the correct logo of a similar size, so if I can come up with a straightforward way of copying it I will - I won't be buying a tub of rubber just to mould a small logo though ;)
 

Attachments

  • IMG_20200415_123432.jpg
    IMG_20200415_123432.jpg
    3.1 MB · Views: 313
  • IMG_20200415_123438.jpg
    IMG_20200415_123438.jpg
    3.1 MB · Views: 315
  • IMG_20200415_142439.jpg
    IMG_20200415_142439.jpg
    3.2 MB · Views: 309
  • IMG_20200415_164411.jpg
    IMG_20200415_164411.jpg
    2.8 MB · Views: 312
  • IMG_20200417_201142.jpg
    IMG_20200417_201142.jpg
    2.2 MB · Views: 304
PKD kits are not "particularly hard to find", I would return this and get a quality kit. But all the more power to you for building it!
 
PKD kits are not "particularly hard to find", I would return this and get a quality kit. But all the more power to you for building it!

They are at the prices I can afford

Besides, even if I hadn't started it I wouldnt be shipping it from Ireland back to Australia!

It's a long way from beyond salvage, I'm looking forward to the build and I'll leave an appropriate review. Can we park that side of the discussion now please?
 
So, some progress. Still waiting for various things to arrive as I'm not at work at the moment and don't have access to the workshop and all the goodies it contains...

First thing to tackle is the grips. They're both different lengths and slightly bowed, so the first thing I did was straighten them a bit and flat sand the inside faces.
IMG_20200415_191542.jpg


IMG_20200416_172026.jpg


Once they were nice and flat I began to look at the alignment. The back profile was a good fit for the grip frame, but the front was overhanging and didn't quite line up. I clamped them into position and reprofiled them with a dremel. At the same time I deepened some of the finger grooves to give it a better profile.

IMG_20200416_205351.jpg


IMG_20200416_205417.jpg


IMG_20200422_175231.jpg


Once all this was done I worked both grips back to a good 800grit finish for polishing later. This also eliminated the slight orange peel finish of the castings too. I'll polish them on a wheel when I get back to the workshop. At this stage I didn't trim the ends to fit - I'll do that once they've been screwed on to the frames later on.

IMG_20200422_165330.jpg
 

Attachments

  • IMG_20200415_191542.jpg
    IMG_20200415_191542.jpg
    3 MB · Views: 192
  • IMG_20200416_172026.jpg
    IMG_20200416_172026.jpg
    4.4 MB · Views: 196
  • IMG_20200416_205359.jpg
    IMG_20200416_205359.jpg
    2.8 MB · Views: 203
That looks like it was a lot of work. Don't feel too bad about it though, the grips on my Tomenosuke don't fit quite right either.
 
I highly recommend replacing the trigger guard with metal. I took some half inch wide aluminum cut it to length, put the heat gun on it and then bent it to shape, and worked on it with some sand paper to give it some character. Other than triggers, which you may want to upgrade as well, the trigger guards like to get broken if they are resin. Particularly cheap resin. ;)

Looking forward to your build though. My wife gifted me with one of these many, many years ago as well, not knowing what recasting was at the time, I happily built it. It was also a poorly made cheapo kit.
 
I highly recommend replacing the trigger guard with metal. I took some half inch wide aluminum cut it to length, put the heat gun on it and then bent it to shape, and worked on it with some sand paper to give it some character.

Great idea, think I'll do that. Probably will do the triggers too...
 
Great work so far!

The Bladerunner Blaster is on my bucket list, because it isn't a big priority my thoughts are to do so from a kit or 3D print, so I'll be having to do a lot of refinishing of pieces. Posts like this will serve as invaluable reference for order of operations, thank you so much for sharing.
 
A big job and it looks like you are making great progress. The Ross PKD's are a favorite of mine because they are romanticised blasters that are incredibly well conceived. I agree with Noeland and suggest you replace the trigger guard with an Alu one. Also remember that these blasters have a very weak construction point at the place where the grip frame meets the body. The body is heavy so the risk of snapping the resin there is very high so, work carefully because if the resin quality is as bad as the cast is, it might be troublesome.

If you are wanting to emulate the Worldcon blaster, the reference you are using is not the original blaster. Not sure if that matters but just thought I would let you know..

Best of luck.
MARK
 
You got a great wife there! My asks what I want for my birthday or Christmas and when I show her or tell her I get I'm not buying you that! I put together a 3d kit that a freind printed for me. Lots of work finishing but was happy with the results. Keep working at it and it will come out great!
 
I'm working on converting one of the waterpistol PKDs at the moment, looking forward to following your build. Great work so far!
 
This is a great looking build. Gotta tell you, seeing the fixes for the challenges with the parts is great - I’m taking notes.

On another note - my wife and I should have been in Dublin this morning. :-( Corona be damned. Heavy sigh. Well, we’ll be back there soon enough. Drink a Guinness for me.
 
If you are wanting to emulate the Worldcon blaster, the reference you are using is not the original blaster. Not sure if that matters but just thought I would let you know..

Best of luck.
MARK

Thanks for the tips Mark. I did realise after a while that those pics weren't of the original but I'll live! I'm using an album of the prop from Worldcon for detail references so I've got it covered. That said, all I'm really trying to do is correct some of the more glaring (to me) inaccuracies of the PKD-2 design and come up with a happy medium between the two - don't plan on going too mad with it!

Got the grips polished. Some pitting came up on one which was annoying - will deal with it later. The polish really showed up the unmixed pigment which I'm really unhappy with. Against a white background it stands out quite a bit.

IMG_20200425_144533.jpg


IMG_20200425_144541.jpg


They do look better against a brushed steel finish, so hopefully they'll be OK. If not I'll mould them and vacuum cast a better set - don't particularly want to go to that bother, but we'll see how it looks at the end...

IMG_20200425_144508.jpg
IMG_20200425_144504.jpg
 

Attachments

  • IMG_20200425_144533.jpg
    IMG_20200425_144533.jpg
    3.5 MB · Views: 180
  • IMG_20200425_144533.jpg
    IMG_20200425_144533.jpg
    3.5 MB · Views: 177
Well, despite the small flaws, I'm quite surprise with the result you got! they look quite nice and I actually like the color a lot from your photos. Nice work! (y)
 

Your message may be considered spam for the following reasons:

If you wish to reply despite these issues, check the box below before replying.
Be aware that malicious compliance may result in more severe penalties.
Back
Top