You are using an out of date browser. It may not display this or other websites correctly.
You should upgrade or use an alternative browser.
You should upgrade or use an alternative browser.
Anakin Starkiller’s Darth Maul Assembly Tutorial Thread
- Thread starter Halliwax
- Start date
BobasBounty
Sr Member
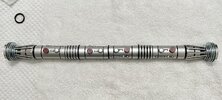
I got my two Darth Maul lightsaber kits from Anakin Starkiller earlier this week and decided to make the shorter unused version of Darth Maul's lightsaber first. I had to use a hacksaw to cut down the main body halves. Below is a pic of my test fit. I will need to weather the emitters and do some touch up painting where I made the cuts but here it is so far. I may also paint the red knobs with a brighter red. Let me know what you think.

Below is a pic of the original prop (from Parts of Star Wars) for comparison.

- Andrew
Below is a pic of the original prop (from Parts of Star Wars) for comparison.
- Andrew
OMG!!! This is genius!!! Freakn love this idea!!!I got my two Darth Maul lightsaber kits from Anakin Starkiller earlier this week and decided to make the shorter unused version of Darth Maul's lightsaber first. I had to use a hacksaw to cut down the main body halves. Below is a pic of my test fit. I will need to weather the emitters and do some touch up painting where I made the cuts but here it is so far. I may also paint the red knobs with a brighter red. Let me know what you think.View attachment 1600912
Below is a pic of the original prop (from Parts of Star Wars) for comparison.
View attachment 1600914
- Andrew
BobasBounty
Sr Member
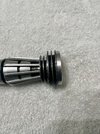
Thanks. It was a fairly simple conversation. Cutting down the main body parts was the most nerve-racking. I had to be very careful to keep the cuts straight. I used masking tape (a lot of it) as a guide while cutting and so I wouldn’t scratch up the paint. I used a rubber washer where the two main parts join. I may go look for a slightly thinner washer though. The one I used is a bit too thick. I also noticed that the two main body parts are weathered differently so I will need to address that. Other than that I am pretty happy with the outcome.
BobasBounty
Sr Member
Off topic, but love the vintage figures.
7-11 Jedi
Sr Member
Thanks! ‘Tis but a smidgen of my actual collection.Off topic, but love the vintage figures.
BobasBounty
Sr Member
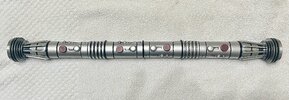
I got the other Maul lightsaber together. Decided I couldn't wait. This one went together very easily. I went with a larger diameter o-ring to hopefully minimize the stress on the rubber. Below are the two versions next to each other.


I used the larger o-ring. They went on smoothly and stay on pretty tight. Can't remember where I got them. I found them in my tool bin.

I used the larger o-ring. They went on smoothly and stay on pretty tight. Can't remember where I got them. I found them in my tool bin.
Last edited:
el toro
Sr Member
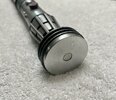
Hope this threads not too old to consider this a necro post. I picked up one of these kits on sale a few weeks ago, man I’m glad I did. Thanks to this tutorial it took about 15 minutes to put it together. Im planning do the paint mod on the knobs, and to recreate the emitter ends as seen on the hero prop that was auctioned in December on PropStore, including the inscribed cataloging numbers. Problem is the Prop Store photos don’t clearly show the entire thing. Does anyone happen to know or have photos of the complete line of numbers?
View attachment 1596359View attachment 1596360
I posed this same question in the thread here. But some of the others dismissed the numbers as being either a master replicas copy or just regular scratches. To be fair, it wasn’t easy to see the numbers there, but I knew someone else had to see what I was seeing or have a clearer photo. Nice to see a clearer picture to confirm my original thoughts.
Sa1yan5pirit
Active Member
Hey guys, I just jumped on this run (Srz kept you waiting, huh  ) Didn't even know this was a thing.
Since I'm from europe I wanted to ask if these parts are the right? I'm quite lost with inches, coming from the metric system.

) Didn't even know this was a thing.Since I'm from europe I wanted to ask if these parts are the right? I'm quite lost with inches, coming from the metric system.
Last edited:
You should be able to get away with just ordering the rod. For the washer, you can use a metric equivalent from your local hardware store
Sa1yan5pirit
Active Member
Thanks. I ordered the rod for now. 16 bucks shipped to AT is ok.You should be able to get away with just ordering the rod. For the washer, you can use a metric equivalent from your local hardware store
Sa1yan5pirit
Active Member
I ordered this one as backup. It's stainless steel and 36". Gonna take that with me maybe I find something similar locally.Hi guys, I’m late to the party on this one!! Just ordered one but I’m having trouble getting hold of the 3/8-16 threaded rod here in the U.K. Please can anyone here in England guide me to where the managed to obtain one?
Many thanks.
Similar threads
- Replies
- 18
- Views
- 1,185
- Replies
- 9
- Views
- 1,937
- Replies
- 54
- Views
- 5,270