Yes, cheers muchly dude...i've finished the 'chin strap' etching. It's so time consuming to model these parts...all the shapes have to be created to perform boolean operations to subtract them from the parent model...bit of a melon twister. Here's the pic;

You are using an out of date browser. It may not display this or other websites correctly.
You should upgrade or use an alternative browser.
You should upgrade or use an alternative browser.
ALIEN HELMET 3D PRINTED
- Thread starter GEEK1138
- Start date
OBIROYKENOBI
New Member
Holy detail!
Looks amazing

Looks amazing
Too Much Garlic
Master Member
Oh WOW... so WOW.
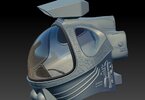
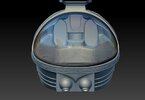
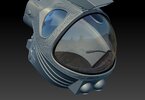
This modelling lark takes longer than actual work, but I think I'm on the home stretch,,,
All the etchings are done...I think I will print them separate from the helmet so I can apply the correct pieces for whichever helmet I make.
The front fascia is done and I re-did the chin section and the piping;


I do love these separate exploded views of the greeblies...


Just the inner rear panels and vent pipes to do and then figure out how to slice it for printing
All the etchings are done...I think I will print them separate from the helmet so I can apply the correct pieces for whichever helmet I make.
The front fascia is done and I re-did the chin section and the piping;
I do love these separate exploded views of the greeblies...
Just the inner rear panels and vent pipes to do and then figure out how to slice it for printing
Dang! The exploded views are really cool!
Isaac Buckley
New Member
i don't envy having to slice this!
A quick question please...anyone know how the rear panels are attached? there seem to be 4 options; 1, panels fixed to inside of helmet and glass inside them. 2, panel fixed onto inside of helmet and glass cut out for front screen and rear windows only. 3, separate inner wall, inside glass, with greeblies attached and a slot for screen. 4, greeblies panels fixed to inside of glass...thanks
I am not absolutely sure about this, but I believe that the clear dome is one piece that gets sandwiched between the inner panels and the outer shell. That is how I was planning to do it.A quick question please...anyone know how the rear panels are attached? there seem to be 4 options; 1, panels fixed to inside of helmet and glass inside them. 2, panel fixed onto inside of helmet and glass cut out for front screen and rear windows only. 3, separate inner wall, inside glass, with greeblies attached and a slot for screen. 4, greeblies panels fixed to inside of glass...thanks
If anyone else knows for certain, please speak up.
division 6
Master Member
Just found these in my files.
I also have a couple pix of Jason Eaton wearing the white one at Bob Burns, so you might want to ask him if he remembers.


I also have a couple pix of Jason Eaton wearing the white one at Bob Burns, so you might want to ask him if he remembers.
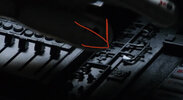
Haha they used sprue parts all over the place ( I’m sure you’ve seen this ) .. you can see one on this pic... granted... it does look like micro piping but still .. it’s sprue lolllThose thin long stretches, are those tank treads or fabric strips?
And those big x rectangles look like plastic model kit sprue excess parts?
Attachments
Amazing!!!!This modelling lark takes longer than actual work, but I think I'm on the home stretch,,,
All the etchings are done...I think I will print them separate from the helmet so I can apply the correct pieces for whichever helmet I make.
The front fascia is done and I re-did the chin section and the piping;
View attachment 1489156
View attachment 1489157View attachment 1489158
I do love these separate exploded views of the greeblies...
View attachment 1489159View attachment 1489160
Just the inner rear panels and vent pipes to do and then figure out how to slice it for printing
Thanks guys. So I have a quick question, probably aimed at Duncanator...the inner back panels; are they faceted to fit the separate sections inside with the greeblies on and feathered out to form into the dome shape. The inner panels seem to be mostly flat but then how to do they fit into the dome without curving as much?
I'm pretty sure they are curved. I'll be able to check a bit later.Thanks guys. So I have a quick question, probably aimed at Duncanator...the inner back panels; are they faceted to fit the separate sections inside with the greeblies on and feathered out to form into the dome shape. The inner panels seem to be mostly flat but then how to do they fit into the dome without curving as much?
The two back panels are definitely curved. The bottoms follow the curve of the neckline; and then as they go up, they become compound curves that follow the visor dome. It looks to me like they tried to bend the greebly panels to conform to the curve of the back panels. Some conformed better than others  .
.
I am curious what went into or through the rectangular opening above the two semi-circles. I haven't found a pic that shows that area finished - there's usually someone's head in the way.


.I am curious what went into or through the rectangular opening above the two semi-circles. I haven't found a pic that shows that area finished - there's usually someone's head in the way.
Awesome dude...yeah I assume there was a pipe looking thing that came thru, maybe to look like venting??
Can u take a pic of the back of the panels please...I'm trying to figure out the surface that fixes to the perspex dome and see if they are uniformly thin
Can u take a pic of the back of the panels please...I'm trying to figure out the surface that fixes to the perspex dome and see if they are uniformly thin
Stumbled upon this and i know the exact pain of modeling all the etchings because I've been kicking this model around for a few years.... not trying to hijack your thread but if you're interested in any of the parts i have modeled let me know and i'll send them. I did the etchings flat in fusion 360 and then imported them into zbrush. the only etching i have left is the big one and its halfway done in fusion. i didn't spend much time on any of the greeblies (you killed it!) because i planned on buying the model kits
Attachments
Similar threads
- Replies
- 12
- Views
- 1,358
- Replies
- 51
- Views
- 6,875
- Replies
- 10
- Views
- 672