Request for info on painting a 3D printed helmet

Jimmer

Well-Known Member
I received a 3D printed Burned Vader Helmet as a gift and was hoping to get some insight regarding proper prep and painting procedures.

A buddy picked one up for me and one for himself. His was painted but he knows I enjoy building models and painting so he got mine unpainted.
I didn't want to ask him what material was used to print the helmet as I'm certain he wouldn't have found out and I didn't want to make him feel bad.

I don't mind doing the research, if someone can possibly tell from the photos what info I need to properly search. (Is this a particular filament that I need to query, or just go by generic 3d painting guidelines).

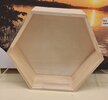
Photo number 2 shows the back of the helmet where I think one would be able to tell the most.

It looks as if it may be primed, but I'm honestly not certain.

My chief concerns are the areas that have visible "rings"... should I continue sanding, use Mr Surface Filler, both?

An odd note, photos 4 and 5 show where the silver "tusks" would be, I'm going to try to make metal substitutes and attach them, so glue info would be a plus.

Any tips would be greatly appreciated, or just knowing exactly what material the print is so I can search the correct info.

Thanks in advance.

1000028681.jpg
1000028678.jpg
1000028682.jpg
1000028680.jpg
1000028679.jpg
 
Looks like PLA to me, although it could be ABS. First things first, can you tell us how well it responds to sanding? Does it powder off like wood, or are you getting less progress and it kind of gets gummy?
 
On a hidden part, put a drop of acetone on the print. If it softens the material, it's ABS, if not, its PLA.

If you intend to try and fill in the layer lines an easy way, you may want to strip the paint, if there is any. I use expire UV resin and paint it all over with an old brush, but not one losing bristles. You can also use a foam brush. Start with light coats and then see how well the resin fills in the layer lines. Put on subsequent layers until the layers are hidden. The resin will be transparent, so use light and reflection to see how well the resin is filling.

You may not have to sand at all, and the drips and runs could actually improve the look of the melted helmet.

Expired resin is basically useless for printing, so you may be able to get a bottle from someone for free.

TazMan2000

What he said.
 
Looks like PLA to me, although it could be ABS. First things first, can you tell us how well it responds to sanding? Does it powder off like wood, or are you getting less progress and it kind of gets gummy?

Sorry for slow reply, been out of town a few days.
I will try sanding tonight. I was hesitant to do anything without doing a bit of research.
It looks as though it has been sanded somewhat by the seller, but I'll hit myself tonight (starting in an inconspicuous spot) and see how it does.
Thanks.
 
On a hidden part, put a drop of acetone on the print. If it softens the material, it's ABS, if not, its PLA.

If you intend to try and fill in the layer lines an easy way, you may want to strip the paint, if there is any. I use expire UV resin and paint it all over with an old brush, but not one losing bristles. You can also use a foam brush. Start with light coats and then see how well the resin fills in the layer lines. Put on subsequent layers until the layers are hidden. The resin will be transparent, so use light and reflection to see how well the resin is filling.

You may not have to sand at all, and the drips and runs could actually improve the look of the melted helmet.

Expired resin is basically useless for printing, so you may be able to get a bottle from someone for free.

TazMan2000
Thanks, Taz.
Sorry for slow reply, been away a couple of days.

I'll hit a spot on back with a drop of acetone tonight. It looks as though it's been sanded a bit, and them primed (is what I think).
I have some of the 2 part resin, but it's not expired.. at least to my knowledge.. lol. I honestly did not know that resin expired, but it makes sense.
What I have is about a year old. If it's not expired can the resin still be used? Dumb question I know, but I'd rather ask than try to revert a mistake.

Also, good call on the "drips and runs" giving it a melted look. I'm planning on trying to improve the details a bit.
In the 4th and 5th pics it looks like the print has a "peg" for the left "tusk", so I'm planning on scratch building the tusks, "burning" them and attaching.

Thanks for the info.
 
I second what Tazman said on resin-coating, that will save a ton of labor. Really any epoxy resin should work, you can also tint it with a couple of drops of acrylic paint to help with judging coverage and the finish that you're approaching. I would also alternate with some high-fill aerosol primer coats to see your progress, and just keep going until you're satisfied.
 
Thanks, Taz.
Sorry for slow reply, been away a couple of days.

I'll hit a spot on back with a drop of acetone tonight. It looks as though it's been sanded a bit, and them primed (is what I think).
I have some of the 2 part resin, but it's not expired.. at least to my knowledge.. lol. I honestly did not know that resin expired, but it makes sense.
What I have is about a year old. If it's not expired can the resin still be used? Dumb question I know, but I'd rather ask than try to revert a mistake.

Also, good call on the "drips and runs" giving it a melted look. I'm planning on trying to improve the details a bit.
In the 4th and 5th pics it looks like the print has a "peg" for the left "tusk", so I'm planning on scratch building the tusks, "burning" them and attaching.

Thanks for the info.

It doesn't have to be expired resin, you can use the brand new stuff. Resin has a shelf life of anywhere between 6 months to a year, depending on the resin brand and when you purchase it. Just because you buy it at the store on January of 2025 does not mean that it will last to January 2027. It depends how long it's been sitting on the shelf and the conditions of storage.

Expired resin will begin to gel and solidify on its own, and while you can still print with it, if it just hit the expiration mark, you may get undesirable results, but after expired, it still can be used as a tool to fill in layer lines by using a paintbrush. Most, will just throw the expired resin away, although it should be treated as hazardous waste while in it's liquid form. Once solidified, it is safe, but expired resin does have uses, such as filling in gouges, and deep crevasses. UV light is free, if the sun is shining.

So, if you're like me, use or give away expired photopolymer resin rather than throwing it into a landfill, where as the uncured resin would eventually leak into ground water and poison it with cancerous materials.

TazMan2000
 
Here's what I did with mine. Not the only way, but it worked for me.

1. Sand down the big stuff with 80 grit then hit it with 220.
2. I cover the whole thing with Bondo. It allows a lot of control.
3. Sand with 220
4. Replace Bondo as needed
5. Hit it with filler primer.
6. Wet sand with 220
7. Spray again
8. Wet sand again with 800
9. Spray again and touch up any spots
10. Paint.
11. Wet sand with at least 800
12. Seal with acrylic sealer.
IMG_5979.JPGIMG_5980.JPGIMG_6004.JPGIMG_6005.JPGIMG_6019.JPGIMG_6050.JPGIMG_6072.JPGIMG_6073.JPGIMG_6089.JPGIMG_6095.JPGIMG_6104.JPGIMG_6106.JPGIMG_6107.JPG
 
Looks like PLA to me, although it could be ABS. First things first, can you tell us how well it responds to sanding? Does it powder off like wood, or are you getting less progress and it kind of gets gummy?

On a hidden part, put a drop of acetone on the print. If it softens the material, it's ABS, if not, its PLA.

If you intend to try and fill in the layer lines an easy way, you may want to strip the paint, if there is any. I use expire UV resin and paint it all over with an old brush, but not one losing bristles. You can also use a foam brush. Start with light coats and then see how well the resin fills in the layer lines. Put on subsequent layers until the layers are hidden. The resin will be transparent, so use light and reflection to see how well the resin is filling.

You may not have to sand at all, and the drips and runs could actually improve the look of the melted helmet.

Expired resin is basically useless for printing, so you may be able to get a bottle from someone for free.

TazMan2000

I placed a couple of drops of acetone on the back of the helmet (in an area that had not been sanded) and it didn't soften at all.

Also, tried sanding and it was sort of what I imagine sanding a brick would be like.

I believe it's safe to assume it's PLA... lol.

I've been doing some research and have come up with a few filler options:
1) Sandable primer
2) Bondo (spot putty)
3) UPOL Expert Sandable Primer
4) UV resin
5) I have some Mr Surfacer 1000 spray,
but not certain it would be thick enough

TAZMAN2000, if you happen to read this I believe I mispoke in my previous comment.
The resin I have is epoxy resin. (I've worked with it before). I could be wrong, but I can't imagine it would work as finicky as it is, but I may be 100 percent incorrect.
I only used it a couple of times making tables.

Anything dealing with 3D prints is brand new to me, this is the first small dive I've taken, other than admiring objects online.
However, the small amount of research I've done is really interesting and I can see this rabbit hole being a very tempting endeavor.

Anyway, as I said earlier this helmet isn't 1/1 scale (probably around 1/3) so I'm not going to go overboard with the project.

I found the frame in Pic below that I'm going to display it in... will basically build a pedestal type base under it, apply a few styrene greebles, paint it black and fill it with a decorative rock or sand similar to the base Kylo Ren placed his helmet on in the Rey interrogation scene in Force Awakens.

I'm currently leaning toward resin or sandable primer.
Found a YouTube video about the UPOL Expert Sandable Primer and it looks like it did a good job.

As hard as PLA is to sand, I'm thinking a filler then sanding is best choice. It does appear that it's been primed so if it would be best to try and remove that primer first is something I'm going to have to figure out.
The old "test the new product in an inconspicuous spot" will be a must here I suppose in making that call.

Thanks again for the info guys, if you have tips or recommendations as always it's greatly appreciated.
 

Attachments

  • Screenshot_20250310_225427_Messages.jpg
    Screenshot_20250310_225427_Messages.jpg
    146.7 KB · Views: 21
  • Screenshot_20250310_223647_Chrome.jpg
    Screenshot_20250310_223647_Chrome.jpg
    131 KB · Views: 24
  • Screenshot_20250310_223607_Chrome.jpg
    Screenshot_20250310_223607_Chrome.jpg
    96.3 KB · Views: 21
Thanks for all the info!

If it were me, I would leave the primer on, as it will give your other materials something more effective to hold on to. Then, I would mix the Bondo Glazing/Spot Putty with some acetone, just enough to make it spread more like ketchup.

And then I would use any kind of filler primer from the hardware store, and start sanding at that point. IMO, that will save a lot of work spraying and re-sanding repeatedly.
 
Last edited:
Thanks for all the info!

If it were me, I would leave the primer on, as it will give your other materials something more effective to hold on to. Then, I would mix the Bondo Glazing/Spot Putty with some acetone, just enough to make it spread more like ketchup.

And then I would use any kind of filler primer from the hardware store, and start sanding at that point. IMO, that will save a lot of work spraying and re-sanding repeatedly.
Thanks. I watched a few video tutorials on different techniques and bondo/acetone seemed to be used often, with good results.
I will go that route, working on the underside and rear of the helmet first to familiarize myself with the proper consistency.

Thanks again
 
Back
Top