5' Falcon base hull building

Would someone that is in the know mind validating my work here? These are my guesstimates for the exhaust port locations on the rear deck from the centre of the hull to the centre point of each hole. I would have thought ILM would have gone with nice rounded numbers like 14.0" and 9.5" but I'm not sure. I believe the hole diameter should be 3.5" but I'm not 100% sure on that either. These values were taken by eyeballing objects in Blender lined up with a top down image of the filming model, so there's a lot of room for error, hence my question.

If someone could validate this, or provide corrected dimensions, that would be helpful as I've not found this documented anywhere.

thanks
exhaustports.png
 
Last edited:
Dave,
Your use of 3.5“ for the hole I.D. is good, but later changes will be necessary. Try as I might, my engine deck intake vents as-built penetration locations shifted considerably.

Andre’s dimensions are what I used, but the 1/72 scale Bandai Falcon is a good check for any errors you may make. My advice is to begin with a very careful validation of the engine deck trapezoid. That perimeter is laid out on your particular curved dome.

Dense layout of kit parts dictate actual space needed. The greeblie puzzle is “grid locked.” The string of top vents have their O.D. rims compressed. That is compounded by your construction, placement of engine exhaust trailing edge flaps on the bottom, turret diameter on top and most importantly the sloped sides width that extends past the disc diameter. No easy way on this portion of the build. Part of the fun.
 
Last edited:
As I'm zeroing in on having the internal frame complete, I've uploaded all my files to Cults3D. Feel free to grab them if you think they'll be of use.
5' Millennium Falcon Internal Frame

Those two long poles pointing forward into what would be the mandibles are excluded as in real life they're just 1.5" DIA wooden dowels you can get from any home improvement store for about $10. There's no point in 3D Printing those.

There is a hole in the bottom of the central hub to accept a wooden or metal post, it's just obviously not visible here.

This is a work in progress and I may change things as I go, but this might get someone started. You'll need a very large printer. I'm using an Anycubic Kobra 2 Max, which I think at the moment is the largest hobby grade print bed on the market.

frame_02.png
 
Yes Dave, very cool, slick approach. I like it!

Not sure what your plans are with regard to the gun ports. Just make sure you leave enough room there, top and bottom for what ever you come up with under the window frames.

I hear some builders are going with what is on the 5' miniature and others are planning to simulate the full size set pieces for these areas.
 
Thanks. I'm building it as per the studio model, so it'll only have the small "pit" under the window. There's plenty of room to fit those parts. I do need to add a tunnel for the gun light wires though.
 
I'm considering this to be done now. I've updated the files on my Cults3D site here: 5' Millennium Falcon Internal Frame

The mandible supports have been updated to allow for tubes correct to the filming model. They should be 36" 1.25" OD aluminum tubes available at any hardware store. I've also added tunnels into the central hub to allow for wires up to the quad guns for lighting. The two main mandible supports are tagged port and starboard as they are different sizes and go in different locations to accommodate the different positions of the mandible pits.

Once I have the dimensions for the muffin fans, and the final location for the rear deck vent holes, I'll update the rear fan mounting platform.
 

Attachments

  • 01.png
    01.png
    616.2 KB · Views: 74
  • 02.png
    02.png
    882.2 KB · Views: 64
  • 03.png
    03.png
    752.6 KB · Views: 76
  • 04.png
    04.png
    718.5 KB · Views: 74
As the build frame and major assemblies are starting to be brought together, I thought it was time to figure out where to put it when it's done. I have a good spot in the rec room for it, just have to build wrap around shelves for all my other models... I also need to figure out how to put a spot light in that corner for the Falcon. The ceiling doesn't really lend itself to renovations so may end up with some sort of really tall lamp.
recroom.png
 
I'm considering this to be done now. I've updated the files on my Cults3D site here: 5' Millennium Falcon Internal Frame

The mandible supports have been updated to allow for tubes correct to the filming model. They should be 36" 1.25" OD aluminum tubes available at any hardware store. I've also added tunnels into the central hub to allow for wires up to the quad guns for lighting. The two main mandible supports are tagged port and starboard as they are different sizes and go in different locations to accommodate the different positions of the mandible pits.

Once I have the dimensions for the muffin fans, and the final location for the rear deck vent holes, I'll update the rear fan mounting platform.


Thank you so much for offering these for free.

Not wanting to get into 3D printing as I think it would open up an insane Pandora's box for me, have you or anyone here been able to get an idea of what this would cost to get made?

Thanks again.
 
It would be expensive. But it seems all things related to this build are so...

I was quoted $2000 for just the central hub. I wound up buying a Kobra 2 Max for $750, and a $300 in filament I've printed every part myself at no other cost. And if I made a mistake with some part of the design, I can just reprint it with no additional costs.

A 3D printer (either FDM or Resin or both) strikes me as standard kit for a modeler today. I don't look at them any differently than an airbrush, they're just a tool a modeller should have.


Holy goodness. That is not bad at all. When I told Geek I did not want to get into 3D printing as I would never stop he suggested I get the Printers, print everything for the Falcon and then sell the printers. Not a bad idea.

Like you said, a great tool for any modeler.

Looks like I am getting into 3D printing.

Do you have any pics of the printed result?

Thanks again for everything.

Tom
 
Not a huge amount of progress on this, but some I thought I'd share.

Back in October-ish, the first part I made for this project were the gun platform windows. I 3D Printed them from stl's I purchased online. After printing I realized there were quite a few issues with the model, not the least of which being the 'spokes' of the window frame are not straight across from their opposite number and they're too thick.

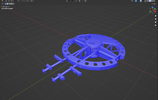
This is the purchased model shown in Blender. After printing it, I decided I could do better.
1705514479040.png


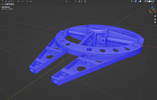
I decided to remodel the window myself in Blender with the printed result in the photo below on the left. But after printing it, I still wasn't happy. So I took my 3D model, with the correct dimensions, and exported it out to as a flat template to print on a paper. That template was then cut from Styrene resulting in two scratch built windows using traditional model techniques. The T beams are also correct to what ILM used so I can also say it's "a more accurate replica". I should also mention that the single window on the left took 17 hours to 3D print. I made both windows by hand in under 3 hours.
1705514764896.png


Both windows are now complete and are waiting to be installed into the Gun Platforms. Which are also finished.
1705515500517.png


All the 'greeblies' are correct parts from the correct kits. You'll notice that the top most, what I call the, 'gun cap' is 3D Printed. I do have the correct Entex kit part for the top, and I'd considered building the part from scratch and casting it. But instead, I decided to just print two. That Entex part is 3D Modeled to the exact dimensions (inside and out) of the real part, to about 0.01mm, which is the resolution of my printer.

I see a few people using the Fujimi kit's Tank sides for this area, but they should be from the Airfix kit, so that's what I used here. ILM sort of frustrates me because they seemed to like to use 1 part, from 1 kit, in 1 location, and no other parts from that kit are used, where as they could have used a 90% identical piece from a kit they were already using. I had to buy a Sherman Tank, for one part, and I can't find any other location where other parts from that kit are used. Whereas another Sherman kit they used in multiple places has an almost identical piece in it.

I'm trying to walk a fine line between super accurate vs what's practical to build. I could easily have built one and cast the other cap, but I look at 3D Printing as just a branch of casting. If ILM cast a part, I don't feel too bad 3D Printing it if it makes sense to do it that way. Still, I'm trying to keep the 3D Printing of visible components to as close to zero as I can.

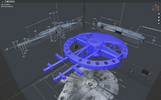
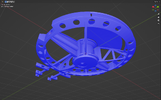
That all said, a lot of the internal frame structure is 3D Printed. I know ILM used wood, but I no longer have an appropriate shop for working with wood and as it's hidden, I'm fine with a 3D Printed framework. It just takes a whole lot longer is all. Those ribs would have taken me a couple of hours to build out of spruce, but they took 2 days to 3D print. The lower half of the central hub (in white) took 81 hours to print. The upper half is currently being printed and when complete, will be another 81 hours. I still have the outer waist to print yet.
1705518076679.png


And finally for this update, scored a Mint in Box Aurora Sealab kit off of eBay the other night. All parts still in their plastic bags and no assembly. So that made me happy. I've sort of given up waiting for the "re-issue" version. I've lost confidence of that ever seeing the light of day.

Anyway, that's the update for this build.
 
Last edited:
Kudos for all your hard work, Dave. I’ve said building an R2 costs as much as a used car. Now I’ve learned that building a 5 foot Falcon costs as much as a new car. I look forward to following your journey.
 

Your message may be considered spam for the following reasons:

If you wish to reply despite these issues, check the box below before replying.
Be aware that malicious compliance may result in more severe penalties.
Back
Top