Studio Kitbash Sr Member RPF PREMIUM MEMBER Sep 8, 2024 #21 B. E. A. U. TIFUL! Wow does that look good! Very impressive work.
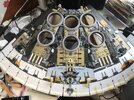
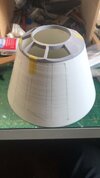
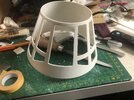
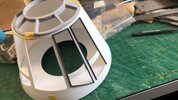
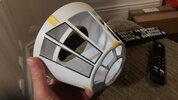
G GTMill Member RPF PREMIUM MEMBER May 4, 2025 #24 Here is my progress on the engine deck section, it’s not too far away from completion but i took a little break to build the cockpit cone. Attachments 4B6B7920-E30C-4507-A529-5D41AF8AAD91.jpeg 2.9 MB · Views: 95 0390D233-737F-4C43-9310-E915BB62C785.jpeg 2 MB · Views: 89 FED44F8B-AAAE-4FDD-8820-A312AC331B7F.jpeg 298.7 KB · Views: 84 4C79E87A-C33E-4EAC-B934-27D96E10E859.jpeg 2.3 MB · Views: 73 B816282F-11D0-4D1E-BC45-ECCAB538467C.jpeg 381 KB · Views: 78 FADC2AD9-7483-44F3-9C7D-39CFEE299096.jpeg 406.5 KB · Views: 98
Here is my progress on the engine deck section, it’s not too far away from completion but i took a little break to build the cockpit cone.
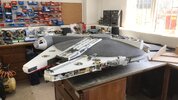
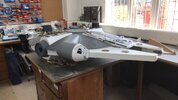
G GTMill Member RPF PREMIUM MEMBER May 10, 2025 #26 I had a visitor today who came to see my Falcon so I re-assembled it and got a few photos. Attachments 11BE70E2-B8B9-4FC4-AB1E-462383FDAC86.jpeg 479.7 KB · Views: 75 82A9BF97-DAA1-4230-B7D5-6003EF506B1A.jpeg 500.9 KB · Views: 66 9464DB39-CC67-442F-82D7-5A29310858B4.jpeg 519.2 KB · Views: 73
RealDaveWinter Sr Member RPF PREMIUM MEMBER May 10, 2025 #27 That's looking really amazing. I guess I should get busy getting my hull domes in place. I don't remember if you said, but what are you using for your domes?
That's looking really amazing. I guess I should get busy getting my hull domes in place. I don't remember if you said, but what are you using for your domes?