1/72 Hoth Echo Base Hangar diorama

For obvious reasons we skipped the section on the lower ANH style maintenance pits...although there will be a lot of good greeblies in the unused Bandai parts. Exhaust grilles went pretty quick. left the inner sections darker with a rough burnt look and dry brushed silver on the nicks in between.
Also set the translucent pieces where they're going to go and it was clearly time to start some lighting. had to cut down the landing light cans I made from evergreen tube and bend the LED leads to 90 so they'll fit underneath the translucent pieces. So far, so good...I think.
 

Attachments

  • exhgrill1.jpeg
    exhgrill1.jpeg
    126.8 KB · Views: 116
  • exhgrill2.jpeg
    exhgrill2.jpeg
    125.7 KB · Views: 110
  • exhgril3.jpeg
    exhgril3.jpeg
    118.1 KB · Views: 122
  • exhgrill4.jpeg
    exhgrill4.jpeg
    65.2 KB · Views: 114
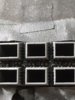
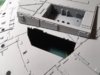
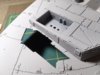
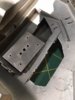
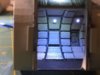
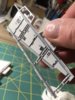
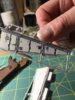
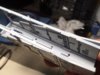
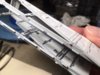
The ESB pit openings turned out really well, although the port side shifted a tiny bit when I clamped it, you can see to the rear where my panel separation line doesn't quite line up now, but it's stuck down now. The starboard side filler panel at the thinnest part looks to me to be a bit too thin, but I was eye-balling it off of Jaitea's illustrations. It'll do. Otherwise I'm happy with it. I also made short joint tabs on the inside so the filler panels would sit flush to the rest of the hull panel. Again, this was a good example of how handy laserbond is. Regular glue for attaching, push the piece into place and then a dab of laserbond in a few places to hold it till it dries. If you're not using this stuff, I highly recommend it.
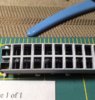
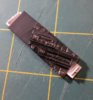
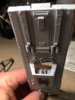
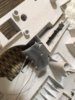
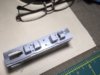
The lower jaw piece I screwed up drilling the hole for the red clearance lamps, too low. I noticed it while watching ESB (again)over the weekend. So, I stuffed .30 evergreen rod in the mistake holes and snipped it off flush. No harm done, just looks like more detail to the panel.
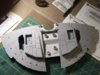
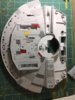
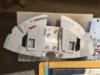
From here, more landing light install and probably will start the off color panel work on the lower hull sections. I used two of the supplied decals on the cockpit tube already, still iffy on whether or not to use more, or airbrush them with the water/salt method...I reckon on the bottom it won't matter too much so I may just use the decals there.
 

Attachments

  • pits1.jpeg
    pits1.jpeg
    83.9 KB · Views: 132
  • pits2.jpeg
    pits2.jpeg
    89.6 KB · Views: 130
  • pits3.jpeg
    pits3.jpeg
    121.6 KB · Views: 146
  • pits4.jpeg
    pits4.jpeg
    136.3 KB · Views: 130
  • pits5.jpeg
    pits5.jpeg
    58.6 KB · Views: 130
  • pits6.jpeg
    pits6.jpeg
    57.7 KB · Views: 130
  • pits7.jpeg
    pits7.jpeg
    38.9 KB · Views: 135
heads up about the entry corridor piece...Nkg figured it out. i was trying to install the thing without the interior wall pieces for the ramp hallway...duh on me. Shapeways is in no way at fault, I am. :(
 
heads up about the entry corridor piece...Nkg figured it out. i was trying to install the thing without the interior wall pieces for the ramp hallway...duh on me. Shapeways is in no way at fault, I am. :(

Good catch on his part... Saves you money, too... But no worries, brother! We all make mistakes and that's why we have each other here...
 
Well it’s an easy enough mistake to make! The ramp interior piece isn’t that obvious in the photo from the top. I could update the description.
 
Ok, over the weekend I was able to spend some quality time at the table getting back on track. I believe I've got all the off color panels on the lower shot and hopefully the correct ones. The colors may be a bit off to some, but when the weathering comes about it'll blend fine. I did some work with the entry corridor piece from Age of Plastic, now that I've been enlightened as to how it fits and in conjunction with what pieces. Lots of help from Korban who is ahead of me on the build, giving me info on how to go about certain aspects and the procedures. The entry walls are done and joined and the plastic cut away to allow for the proper lighting, again Korban showed me the way(y) So tonight it's break out the soldering iron, LED's and resistors for the entry lighting which will probably take up the entire hour or so I get on a week night. Tomorrow will be the install of the corridor piece and entry way and tying all the electrics for that together. gotta say, this build isn't exactly easy, but it's a load of fun so I'm taking it slow and enjoying every bit of it.
 

Attachments

  • falcon121718a.jpeg
    falcon121718a.jpeg
    64 KB · Views: 168
  • falcon121718b.jpeg
    falcon121718b.jpeg
    51.8 KB · Views: 169
  • falcon121718c.jpeg
    falcon121718c.jpeg
    89.9 KB · Views: 157
  • falcon121718d.jpeg
    falcon121718d.jpeg
    57 KB · Views: 160
  • falcon121718e.jpeg
    falcon121718e.jpeg
    56.4 KB · Views: 159
  • falcon121718f.jpeg
    falcon121718f.jpeg
    61.9 KB · Views: 164
  • falcon121718g.jpeg
    falcon121718g.jpeg
    43.2 KB · Views: 161
  • falcon121718h.jpeg
    falcon121718h.jpeg
    48.3 KB · Views: 158
  • falcon121718i.jpeg
    falcon121718i.jpeg
    51.7 KB · Views: 159
Back
Top