You are using an out of date browser. It may not display this or other websites correctly.
You should upgrade or use an alternative browser.
You should upgrade or use an alternative browser.
1/72 Hoth Echo Base Hangar diorama
- Thread starter gt350pony66
- Start date
gt350pony66
Master Member
I will be doing the reflective stuff as well... My thinking is I can install an smd led on the inside of the outer shell of the upper tube... Maybe two of them. I'll experiment with it and let you know how I make out...
I was thinking of applying the reflective on the inside of the outer tube, then placing chips in strategic locations on the top of the inner ceiling and the sides...might just get the light bars lit too if i do it right lol
I can easily see where SofaKing's method could work wonders
")
gt350pony66
Master Member
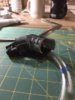
additional material had to be removed from the support rings of the Shapeways cockpit, the corridor floor and the corridor tube itself. Not sure if I ganked it up in assembly attempts or if I tried to stuff way too much in there...probably the latter. but here is what had to come off the Bandai parts to make room for the cockpit/corridor assembly. this was after my fist run at it last night. I'll post those pics next.
Attachments
gt350pony66
Master Member
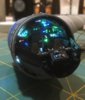
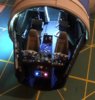
this is my first run at cockpit/tube assembly with the lighting I had planned. Didn't illuminate good enough and there was some light blocking required.
Attachments
gt350pony66
Master Member
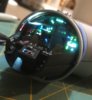
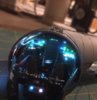
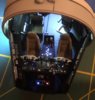
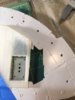
after further and more extensive removal of plastic in quite a few areas, I managed to get the upper and lower tubes to mate sufficiently without having to mash/ force it together. I added another chip LED to the ceiling of the corridor just to the rear of the door opening which obviously lit the corridor much better but also lit up the light upper light bars more. Unfortunately it's no where as even as I would like, BUT...I've messed with it all I'm going to. It's good enough for who its for
Attachments

gt350pony66
Master Member
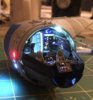
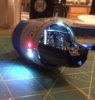
Let me also give a big shout out to SofaKing for the suggestion of the reflective tape. I didn't get quite where I wanted to go with this, but I got WAY closer without having to install twice as many LED's for which there is NO room for. At this scale I think I stuffed as much as I could in there.
I can hardly wait to do this op on the Deago...it's going to be fantastic!!
I can hardly wait to do this op on the Deago...it's going to be fantastic!!
Let me also give a big shout out to SofaKing for the suggestion of the reflective tape. I didn't get quite where I wanted to go with this, but I got WAY closer without having to install twice as many LED's for which there is NO room for. At this scale I think I stuffed as much as I could in there.
I can hardly wait to do this op on the Deago...it's going to be fantastic!!
Hey GT,
The cockpit looks great! Glad the tape worked out. It is amazing how well it works.
gt350pony66
Master Member
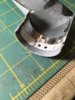
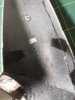
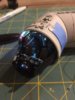
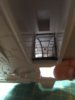
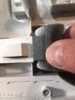
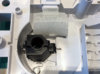
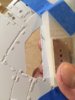
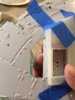
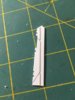
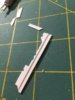
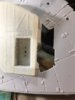
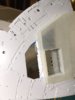
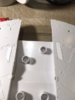
Well I hit a little snag...The entryway piece brilliantly designed by Age of Plastic...printed by Shapeways was evidently printed at the wrong scale. it's too small. Normally Shapeways is awesome about replacing goofy stuff, sometimes insistent...but that's as long as it was a RECENT purchase. I got this piece back in Feb. right after I bought the PG. I sent them these pics, clearly it's printed wrong...but they, politely told me to pound sand this time. The first 2 pics are my part and the 3rd is the image on their website. So...lesson learned. Shapeways parts...check 'em when you get 'em.
Attachments
gt350pony66
Master Member
Thanks brother, I still wasn't able to get the lighting the way I really wanted it...there's just not enough space given the components I'm working with. but...the casual observer will be wowed. LOLVery impressive!
It really does make a big difference between the stock kit parts and the upgrades as well as being able to see through the door and down into the hall.
gt350pony66
Master Member
Well thanks my friend, that means a lot because I'm not near as good as some of these other builders LOLWell count me in the casual observer crowd. I am suitable wowed already!
gt350pony66
Master Member
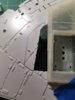
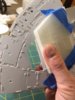
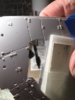
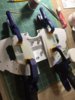
Ok, well not moving at light speed like brother Korban...the hyperdrive motivator is clanky so I'm stuck in sub-light... but this evening I got something done. Got the hull cut for the ESB gear bays and got the pit filler panel done on one side. took me a few to figure out the best way to go about it. After the pit hole was cut I positioned the bay in place and taped it down, cut a rough shape of thick evergreen and did some caliper work. made templates out of paper and trimmed the sheet so it would go out th where it needed to be, but also have it lap over the inner side to be able to attach to the gear well. Once that piece was right, I took some thinner evergreen and did the templates again for the 3 smaller panels, cut the little notches and glued those to the thicker piece leaving the panel separation gaps. This was the easy one, the port side is going to be a bit more work, but the process seems to have worked out pretty good.
Attachments

gt350pony66
Master Member
on another note, the entry corridor dimensions are being analyzed by ourbenevolent benefactor Age of Plastic for the apparent size issue. Results of those findings are pending. But I gather from an observers perspective that it's very likely that the part was just printed at the wrong scale so further work on that part of the project is on temporary hold. BUT, there's plenty to do on this one. Really fun build this one!
gt350pony66
Master Member
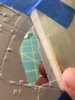
second pit cut and filler panel completed. It's slightly off but it represents Jaitea's illustration good. I noticed in fitting the gear bays to the hull there were these two areas where the hull plating was lower than most of the contact surface so I cut some thinner yet evergreen to fill it. Though it will never be seen and there will be no light in that area to leak, it di give more area for glue to contact and hold the bays in place...not that they're going anywhere with the C A glue anyway.
Attachments

gt350pony66
Master Member
Some exacting and sharp work on display there Ross , really impressive !
Well hey there Ged! Thanks brother! I appreciate the props, but I gotta say, again...it's the work on display that these other guys are doing that's making strive to do better. But, there again that's the best part about this site, sharing, learning and doing great things! My builds would still be in the crapper if not for our friends here
Haven't checked in here in a while. Looking fantastic. Way more work than I'd sure be willing to try.
gt350pony66
Master Member
Haven't checked in here in a while. Looking fantastic. Way more work than I'd sure be willing to try.
Thanks JM, It's mostly due to the influence of Korban's work...we confer on stuff quite a bit so I feel like I have to keep up
but he's a lot faster than I am...it's as if he doesn't have a day jobI know the feeling. Trying to get in an hour or so a day at times can be hard.
Similar threads
- Replies
- 1
- Views
- 172
- Replies
- 36
- Views
- 3,582
- Replies
- 55
- Views
- 8,527