1/72 Hoth Echo Base Hangar diorama

Hey GT / Korben,

The diffusion is something we fought from time to time lighting the cockpit. I'm now dealing with the same thing lighting the 1/4 scale console and nav computer. I hope you don't take my comments as negative. Just tossing out ideas.

Is there enough space directly centered under the floor? That might diffuse enough? :)

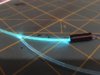
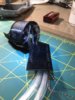
Well in all my wisdom (sarcasm) i decided to FO the back wall and the ceiling as well as the dash and console. I think i barely have enough space under the floor for all that spaghetti. however, I do have room on the edges where the chips are, to re-position and add one more to each section. making six all together. I'm going to have to cut the corridor floor just behind the back wall on either side for the wall FO to get under the floor. The console FO is cool and I hope i can weave to ceiling panel FO in the same manner I did the corridor wall lighting FO. This is going to be a tricky deal for sure...but i can do it LOL (y)
and no, not taken negatively at all, in fact you've encouraged me to go ahead and improve on the floor lighting because I had resigned myself to leaving it as is. Thanks for the nudge!
 
Any information and help are greatly appreciated! I know I'll be needing to work out my cockpit issues here soon, too. I'll definitely by trying the piece of paper trick. The Bandai PG Falcon just has super tight corridors to work with.

i'm not sure how tight the MPC corridor fits in the PG tube, but I've still got one and remember it fitting super tight in the MPC and I didn't use it. The PG corridor though is structured pretty cleverly to allow space for FO. I can't recall if the PG corridor is Tony's or Nkg's?
 
i'm not sure how tight the MPC corridor fits in the PG tube, but I've still got one and remember it fitting super tight in the MPC and I didn't use it. The PG corridor though is structured pretty cleverly to allow space for FO. I can't recall if the PG corridor is Tony's or Nkg's?

That would be 308 bits corridor. Well, once I get the bottom hull lighting finished, I'll be retackling the cockpit and corridor... No floor lighting for me unless I cut out some spots for it...
 
Any information and help are greatly appreciated! I know I'll be needing to work out my cockpit issues here soon, too. I'll definitely by trying the piece of paper trick. The Bandai PG Falcon just has super tight corridors to work with.

Hey K/GT,

Sanding the acrylic or using a white piece of paper DEF helps with the diffusion. Check this out... A buddy of mine is helping illuminate the 1/4 scale Nav Computer. After we lined the interior with reflective tape, he placed the LEDs around the interior edge. There are no LEDs directly behind the panel. The white paper not only shows how reflective tape works but you can see how the paper diffuses the light :)

1:1 Millennium Falcon Cockpit Replica - Group Build

Again, just tossing ideas out and seeing what sticks
 
That would be 308 bits corridor. Well, once I get the bottom hull lighting finished, I'll be retackling the cockpit and corridor... No floor lighting for me unless I cut out some spots for it...

Well, those chips work great and take up nearly zero space. i think i'm going to add some and see how it looks before I button it up for good
 
Hey K/GT,

Sanding the acrylic or using a white piece of paper DEF helps with the diffusion. Check this out... A buddy of mine is helping illuminate the 1/4 scale Nav Computer. After we lined the interior with reflective tape, he placed the LEDs around the interior edge. There are no LEDs directly behind the panel. The white paper not only shows how reflective tape works but you can see how the paper diffuses the light :)

1:1 Millennium Falcon Cockpit Replica - Group Build

Again, just tossing ideas out and seeing what sticks

Well, this acrylic is smooth one side and opaque on the other. I put the smooth shiny side down. i guess since I'm going to peel those chips off, I could sand it and see if it helps diffusion. or just flip the pieces over...
I've been using Laserbond extensively, if you done like something you can pry up a corner with a fine pointy something and peel it off without damaging anything. I love the stuff(y)

If possible, try with a practice piece of acrylic. The more sanding you do the more diffusion you should get. :)

Fingers crossed!
 
Hey K/GT,

Sanding the acrylic or using a white piece of paper DEF helps with the diffusion. Check this out... A buddy of mine is helping illuminate the 1/4 scale Nav Computer. After we lined the interior with reflective tape, he placed the LEDs around the interior edge. There are no LEDs directly behind the panel. The white paper not only shows how reflective tape works but you can see how the paper diffuses the light :)

1:1 Millennium Falcon Cockpit Replica - Group Build

Again, just tossing ideas out and seeing what sticks

That is brilliant! Looks like I have some work ahead of me... Need to disassemble the corridor and work on adding some reflective material in there. In lieu of reflective tape, I may try some aluminum foil and see if that has the same effect. I will need to work on bleed through. I can also follow with what I did to the back wall and add a thin piece of clear plastic or use superglue and then throw some color on top of that. That will allow me to light the upper ceiling, too... Exciting stuff!

BTW, you're 1/4 Falcon Cockpit is amazing, as well as the 1:1, too.
 
If possible, try with a practice piece of acrylic. The more sanding you do the more diffusion you should get. :)

Fingers crossed!
Absolutely! Thanks for the tip, awesome(y) All this talk has me thinking about the Deago again, LOL, that dude is going to get the full tilt boogie on steroids lighting!:lol:
 
That is brilliant! Looks like I have some work ahead of me... Need to disassemble the corridor and work on adding some reflective material in there. In lieu of reflective tape, I may try some aluminum foil and see if that has the same effect. I will need to work on bleed through. I can also follow with what I did to the back wall and add a thin piece of clear plastic or use superglue and then throw some color on top of that. That will allow me to light the upper ceiling, too... Exciting stuff!

BTW, you're 1/4 Falcon Cockpit is amazing, as well as the 1:1, too.


Thanks so much, K! I appreciate the kind words. :)

The reflective is nothing more than aluminum HVAC tape found in most home improvement stores. It comes in several sized rolls and has a sticky back. It's really good stuff for LEDs / illumination. Once applied you can smooth it out to a mirror like surface. The tape, because of the sticky back, might also take care of all the bleed through issues you're having. The tape is thick enough to block most of the LED depending on how bright.
 
Hey K/GT,

Sanding the acrylic or using a white piece of paper DEF helps with the diffusion. Check this out... A buddy of mine is helping illuminate the 1/4 scale Nav Computer. After we lined the interior with reflective tape, he placed the LEDs around the interior edge. There are no LEDs directly behind the panel. The white paper not only shows how reflective tape works but you can see how the paper diffuses the light :)

1:1 Millennium Falcon Cockpit Replica - Group Build

Again, just tossing ideas out and seeing what sticks

I just clicked over for a look at that myself...that is absolutely SOFAKING AWESOME(y)(y)(y)(y)(y)
 
Thanks so much, K! I appreciate the kind words. :)

The reflective is nothing more than aluminum HVAC tape found in most home improvement stores. It comes in several sized rolls and has a sticky back. It's really good stuff for LEDs / illumination. Once applied you can smooth it out to a mirror like surface. The tape, because of the sticky back, might also take care of all the bleed through issues you're having. The tape is thick enough to block most of the LED depending on how bright.

Ok, great! Then I can kill two birds with one stone... I'll pick some up and get to work!
 
i'm not sure how tight the MPC corridor fits in the PG tube, but I've still got one and remember it fitting super tight in the MPC and I didn't use it. The PG corridor though is structured pretty cleverly to allow space for FO. I can't recall if the PG corridor is Tony's or Nkg's?

The PG corridor currently available on Shapeways is Tony's. Mine isn't finished yet.
 
Speaking of side-lit fibre optics, a guy on a Facebook forum I'm on - forget which one - said he used a stick of hot glue as side lighting. That might be interesting to investigate, since it's cheap and easily carved down.
 
Speaking of side-lit fibre optics, a guy on a Facebook forum I'm on - forget which one - said he used a stick of hot glue as side lighting. That might be interesting to investigate, since it's cheap and easily carved down.

Interesting...I got my 2 ft piece of 2mm yesterday. Only a couple maybe 3 inches from the light source looked any good.
 
Ok, well the side glow FO is nominal. I think I'm going to fan that idea and go with SofaKing's suggestion of the reflective tape. Turns out I had some in the garage. Though positioning the tape and a likely a nano or pico LED just right to be effective is another challenge given the tight space available. but there's always a way. I figured out when it comes to assembling the cockpit and tube, it was necessary to split the small side panel where i installed a red and white chip LED for the exterior lights that the PE grill will cover. i figure it will be fine.
i fed all the FO from the back wall and the dash/console through the floor last night. Thankfully the use of the laserbond made it much easier to set everything in place. I cut slots in the front of the corridor floor panel right behind the back wall, just to the right and left of the door opening to feed the wall FO under the floor. for the most part it will be unseen, still need a little tucking away on the one side. but at this point it appears that it will all fit, just barely.
 

Attachments

  • pgcockpit1.jpeg
    pgcockpit1.jpeg
    88 KB · Views: 151
  • pgcockpit2.jpeg
    pgcockpit2.jpeg
    73.8 KB · Views: 145
  • pgcockpit3.jpeg
    pgcockpit3.jpeg
    47.1 KB · Views: 152
  • pgcockpit4.jpeg
    pgcockpit4.jpeg
    61.4 KB · Views: 156
Back
Top