You are using an out of date browser. It may not display this or other websites correctly.
You should upgrade or use an alternative browser.
You should upgrade or use an alternative browser.
Thorssoli's Ironman MkIII Build - Finished Suit Pics Page 26!!
- Thread starter thorssoli
- Start date
Re: Just What This Forum Needs: Another Ironman Build
I might do just that. The only problem is that it takes a full three days of cure time to make a pair of them. It's possible I just need to come up with a better rubber to make them out of.
I don't have any finished suits.
I'm going to be starting a Pepakura MKVII at the end of this week and I'm totally jealous of your Rubber Sleeves, I think you should do a run for the masses.
I might do just that. The only problem is that it takes a full three days of cure time to make a pair of them. It's possible I just need to come up with a better rubber to make them out of.
Are you selling finished suits?
I don't have any finished suits.

IAmGhostFace
Active Member
Re: Just What This Forum Needs: Another Ironman Build
i just went through all the pictures in this thread, and read the descriptions accompanying the pictures. Your work is wonderful.
i just went through all the pictures in this thread, and read the descriptions accompanying the pictures. Your work is wonderful.
JPH
Sr Member
Re: Just What This Forum Needs: Another Ironman Build
Day 57, still lost at sea. While some have resorted to eating soccer players, I am being kept alive by the mere inspiration of someone recreating ironman armor on rpf. Faith in a higher power too, but the ironman thread was clearly "Just What this Forum Needs." Meticulous attention to detail along with personalization is like a sunbeam warming me from the chill of this heartless ocean. Seeking to carve out more freetime and summon the patience to create something close to this forum's Ubah-grawesomeness. Lotsa pep litter the floor -- different parts, different scales. Keep the bilges running!
It is with a heavy heart that I have not launched forward with my own project, but not until I find the proper scale...proper scale...scale
Re: Just What This Forum Needs: Another Ironman Build
Stay strong. The greatest threat to your own survival is an idle mind.
Day 57, still lost at sea...
Stay strong. The greatest threat to your own survival is an idle mind.
Re: Just What This Forum Needs: Another Ironman Build
I haven't been posting enough pictures lately. For this I am ashamed.
The past couple of days have been very productive. In the midst of actually making real progress on a couple of paid projects I was also able to do a bit of work on this thing. For starters, I installed some straps on the iron corset. Here's the closure at the front:

This will get covered by the ab plate so it won't be visible, but it has to have a fairly low profile. The resulting closure works great.
The back has even less room to hide things under the spine plates, so I came up with this:

Here's a shot on the inside:
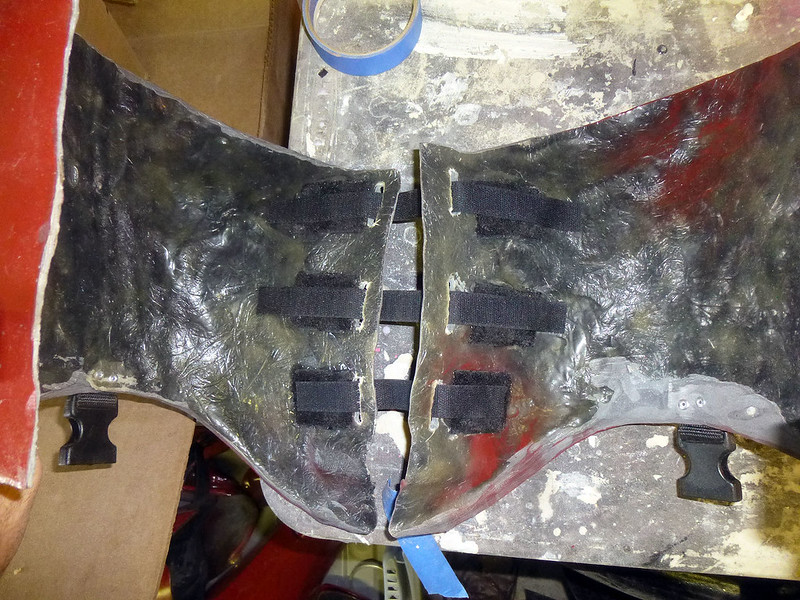
This turned out to be a horrible idea. In hindsight, I'll be better off drilling holes on either side of the spine opening and installing grommets and laces so it can cinch up like a proper corset. I'm also finally toying with the idea of making a couple of castings of this in a semi-rigid resin with a shore hardness of 45D (about the same as the rubber eraser on a #2 pencil) so it won't dig quite so hard into my hip bones when I walk around. I still won't be able to tie my shoes, but at least it'll be a bit more forgiving when I'm walking around.
On the subject of rubber parts, the Vytaflex 50 that I used to cast the neck piece is starting to seem like a bad idea. It was nice and soft and stretchy and the only thing that looked wrong was the size of the neck piece I'd made. Yesterday I set it flat on the corner of the workbench for a few minutes and when I picked it back up I noticed cracks had started everywhere that it was folded:

There was also a noticeable tear at the top edge:
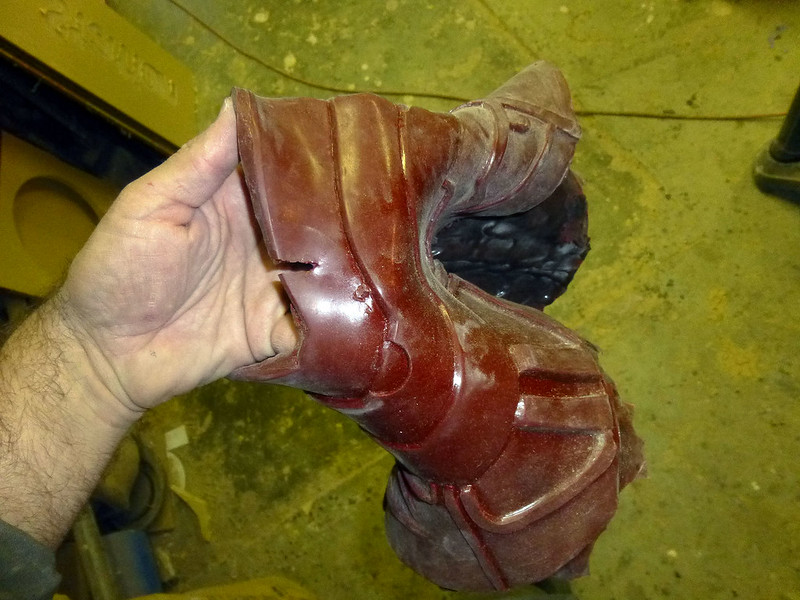
Since the rubber itself was about the same firmness as a gummy bear, I'll admit that I was skeptical about how much wear and tear it would take. I will admit that I'm disappointed that it has already failed. I'll make another pull with less pigment (in case that's what caused the problem) but I'm not very optimistic. I'm probably going to end up having to make a stone mold and slipcasting the neck piece in latex like I did with the knees and elbows. The main benefit to this plan is that I'll get another chance to re-size the neck piece and make it a bit more snug.
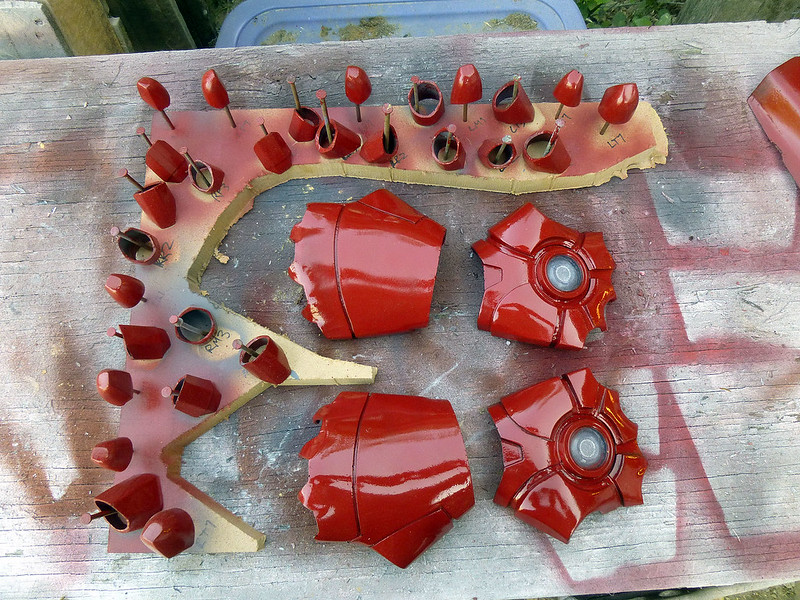
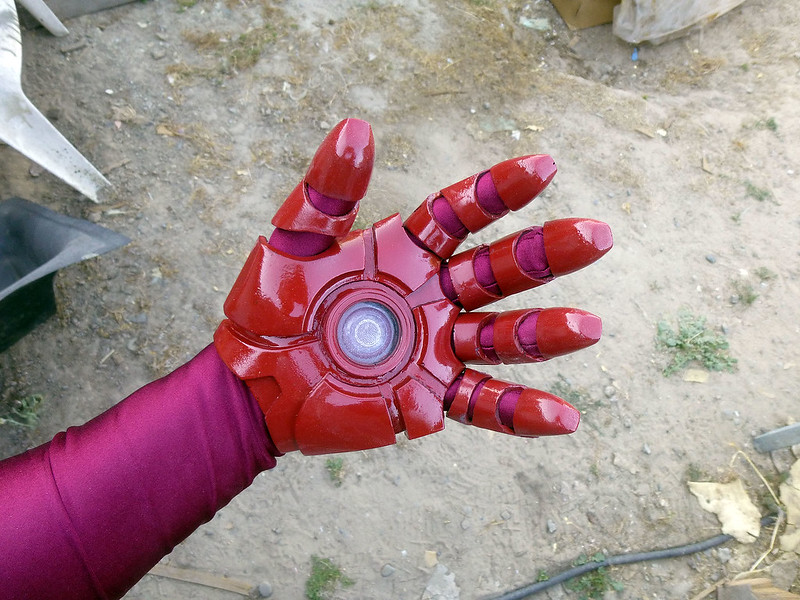
On the plus side, I finally got around to painting up a set of hand parts:
Then I pulled on a burgundy elbow-length opera glove and started adding pieces:
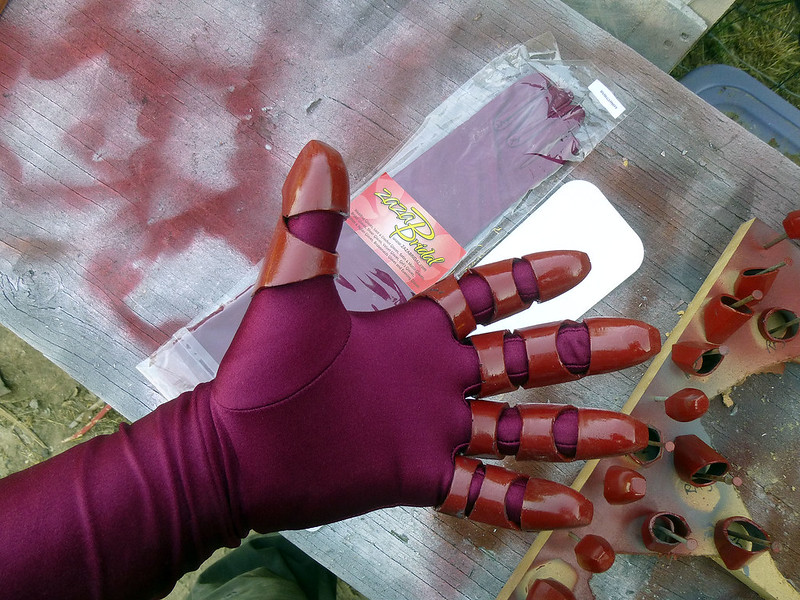
The burgundy glove is a bit of the wrong color, but I don't think it'll be all that noticeable:
Finally, I did a bit more work reshaping the new upper arm prototype:

There's not much about it that's changed. Mostly I just added about 1/4" of thickness to the area directly above the elbow on either side:

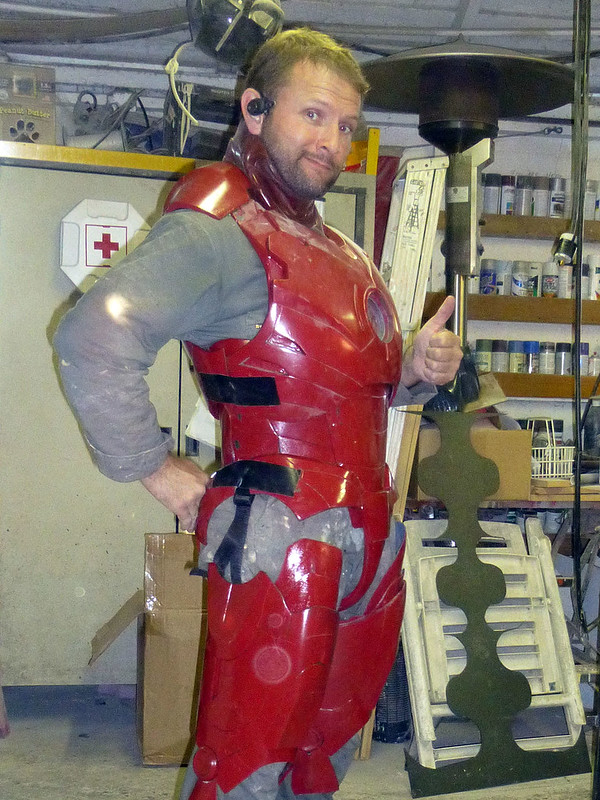
As long as I was testing for fit and functionality, I couldn't end the day without trying on more of the pieces:

It looks a bit silly from behind without the buttplates and the hip pods, but it's a lot more presentable from the front:

I think it'll work:
More progress today. Stay tuned...
I haven't been posting enough pictures lately. For this I am ashamed.
The past couple of days have been very productive. In the midst of actually making real progress on a couple of paid projects I was also able to do a bit of work on this thing. For starters, I installed some straps on the iron corset. Here's the closure at the front:
This will get covered by the ab plate so it won't be visible, but it has to have a fairly low profile. The resulting closure works great.
The back has even less room to hide things under the spine plates, so I came up with this:
Here's a shot on the inside:
This turned out to be a horrible idea. In hindsight, I'll be better off drilling holes on either side of the spine opening and installing grommets and laces so it can cinch up like a proper corset. I'm also finally toying with the idea of making a couple of castings of this in a semi-rigid resin with a shore hardness of 45D (about the same as the rubber eraser on a #2 pencil) so it won't dig quite so hard into my hip bones when I walk around. I still won't be able to tie my shoes, but at least it'll be a bit more forgiving when I'm walking around.
On the subject of rubber parts, the Vytaflex 50 that I used to cast the neck piece is starting to seem like a bad idea. It was nice and soft and stretchy and the only thing that looked wrong was the size of the neck piece I'd made. Yesterday I set it flat on the corner of the workbench for a few minutes and when I picked it back up I noticed cracks had started everywhere that it was folded:
There was also a noticeable tear at the top edge:
Since the rubber itself was about the same firmness as a gummy bear, I'll admit that I was skeptical about how much wear and tear it would take. I will admit that I'm disappointed that it has already failed. I'll make another pull with less pigment (in case that's what caused the problem) but I'm not very optimistic. I'm probably going to end up having to make a stone mold and slipcasting the neck piece in latex like I did with the knees and elbows. The main benefit to this plan is that I'll get another chance to re-size the neck piece and make it a bit more snug.
On the plus side, I finally got around to painting up a set of hand parts:
Then I pulled on a burgundy elbow-length opera glove and started adding pieces:
The burgundy glove is a bit of the wrong color, but I don't think it'll be all that noticeable:
Finally, I did a bit more work reshaping the new upper arm prototype:
There's not much about it that's changed. Mostly I just added about 1/4" of thickness to the area directly above the elbow on either side:
As long as I was testing for fit and functionality, I couldn't end the day without trying on more of the pieces:
It looks a bit silly from behind without the buttplates and the hip pods, but it's a lot more presentable from the front:
I think it'll work:
More progress today. Stay tuned...
Re: Just What This Forum Needs: Another Ironman Build
yep too much pigment can cause rubber to tear easy..
have you tired laying spandex or other stretchy cloth in the rubber. Its like a stretchy version of fiber glass that way?
On the subject of rubber parts, the Vytaflex 50 that I used to cast the neck piece is starting to seem like a bad idea. It was nice and soft and stretchy and the only thing that looked wrong was the size of the neck piece I'd made. Yesterday I set it flat on the corner of the workbench for a few minutes and when I picked it back up I noticed cracks had started everywhere that it was folded:
Since the rubber itself was about the same firmness as a gummy bear, I'll admit that I was skeptical about how much wear and tear it would take. I will admit that I'm disappointed that it has already failed. I'll make another pull with less pigment (in case that's what caused the problem) but I'm not very optimistic. I'm probably going to end up having to make a stone mold and slipcasting the neck piece in latex like I did with the knees and elbows. The main benefit to this plan is that I'll get another chance to re-size the neck piece and make it a bit more snug.
More progress today. Stay tuned...
yep too much pigment can cause rubber to tear easy..
have you tired laying spandex or other stretchy cloth in the rubber. Its like a stretchy version of fiber glass that way?
msleeper
Sr Member
Re: Just What This Forum Needs: Another Ironman Build

I think it'll work:
[url]http://farm6.staticflickr.com/5461/9326135840_5f5f532849_c.jpg[/url]
Re: Just What This Forum Needs: Another Ironman Build
So I've finally developed the new and improved plan for the boots. First, I'm going to make this portion in a dense flexfoam:
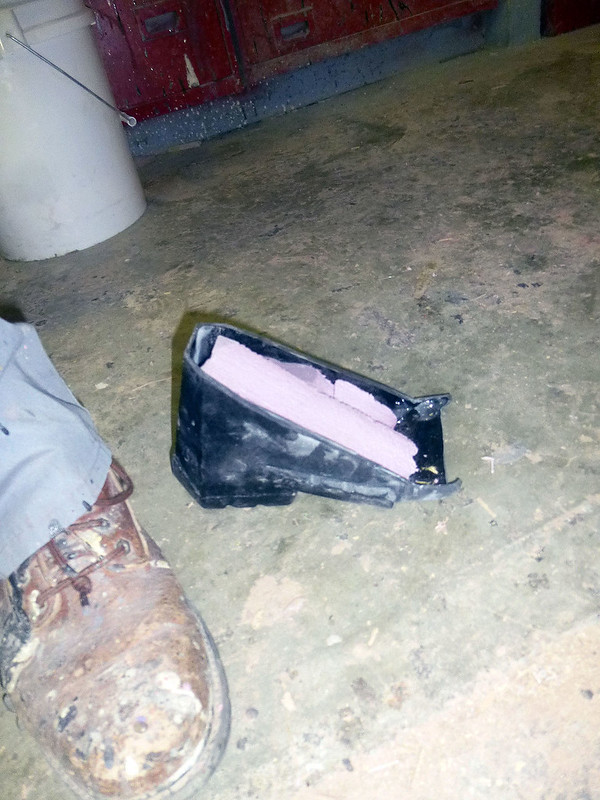
This will give me about a 4" lift:

Which is just about right with the shin in place:

I'll still need to come up with a proper-looking upper half to go over the top of the boot. The sole/wedge will slip inside and it'll just be a question of covering up the seam before painting it.
Here's a shot with the toe in place:


I think they'll work.
In other news, I poured the print coat on the new bicep prototype yesterday:

More progress today. Stay tuned...
So I've finally developed the new and improved plan for the boots. First, I'm going to make this portion in a dense flexfoam:
This will give me about a 4" lift:
Which is just about right with the shin in place:
I'll still need to come up with a proper-looking upper half to go over the top of the boot. The sole/wedge will slip inside and it'll just be a question of covering up the seam before painting it.
Here's a shot with the toe in place:
I think they'll work.
In other news, I poured the print coat on the new bicep prototype yesterday:
More progress today. Stay tuned...
Lunaman
Sr Member
Re: Just What This Forum Needs: Another Ironman Build
More awesome stuff all around. Clever shoe idea, for sure!
I was wondering about your painted pieces, though, is that the final color you'll be going with? The pieces themselves are all fabulous, but the paint on the Mark III is a been deeper. This build got great results by using a few coats of Duplicolor Dark Metallic Cherry auto paint over the red base color. Looks a little less 'primary' in hue.
http://www.therpf.com/f24/ironman-c...mportant-bits-113546/index25.html#post2258083
It's mostly a foam build, but there are fiberglass pieces using the Duplicolor that he was looking to match, and the color looks really great.
Again, this is absolutely incredible work. It's very exciting to see the pieces coming together.
Re: Just What This Forum Needs: Another Ironman Build
The color I've been using so far is Rustoleum "Colonial Red" because I wanted something quick and cheap for the rough draft pieces while I'm working the kinks out of the build. I've got some automotive paints lined up for when I'm happy with how the components work and I'm ready to do a more expensive, more accurate, tougher finish.
The color I've been using so far is Rustoleum "Colonial Red" because I wanted something quick and cheap for the rough draft pieces while I'm working the kinks out of the build. I've got some automotive paints lined up for when I'm happy with how the components work and I'm ready to do a more expensive, more accurate, tougher finish.
Lunaman
Sr Member
Re: Just What This Forum Needs: Another Ironman Build
Brilliant brilliant brilliant. This really is the most impressive IM build I've ever seen.The color I've been using so far is Rustoleum "Colonial Red" because I wanted something quick and cheap for the rough draft pieces while I'm working the kinks out of the build. I've got some automotive paints lined up for when I'm happy with how the components work and I'm ready to do a more expensive, more accurate, tougher finish.
Re: Just What This Forum Needs: Another Ironman Build
hehe those look like toon hands..
So I've finally developed the new and improved plan for the boots. First, I'm going to make this portion in a dense flexfoam:
[url]http://farm8.staticflickr.com/7343/9335740112_9660d86a43_c.jpg[/url]
This will give me about a 4" lift:
[url]http://farm4.staticflickr.com/3719/9335740254_c23450d579_c.jpg[/url]
Which is just about right with the shin in place:
[url]http://farm3.staticflickr.com/2893/9335740420_f2057b6b02_c.jpg[/url]
I'll still need to come up with a proper-looking upper half to go over the top of the boot. The sole/wedge will slip inside and it'll just be a question of covering up the seam before painting it.
Here's a shot with the toe in place:
[url]http://farm4.staticflickr.com/3710/9332950635_f5f2b653f8_c.jpg[/url]
[url]http://farm4.staticflickr.com/3771/9332950447_8ca187299c_c.jpg[/url]
I think they'll work.
In other news, I poured the print coat on the new bicep prototype yesterday:
[url]http://farm4.staticflickr.com/3692/9332950285_8082023c3a_c.jpg[/url]
More progress today. Stay tuned...
hehe those look like toon hands..
quovadis0920
Sr Member
Re: Just What This Forum Needs: Another Ironman Build
Nuff said! Have you tried using elastics for the opening on the abs?
I haven't been posting enough pictures lately. For this I am ashamed.
Nuff said! Have you tried using elastics for the opening on the abs?
ROBOSTEVE 0671
Sr Member
Re: Just What This Forum Needs: Another Ironman Build
Love the suit up pictures! it fits you well!
Love the suit up pictures! it fits you well!
Similar threads
- Replies
- 16
- Views
- 5,126
- Replies
- 0
- Views
- 27
- Replies
- 4
- Views
- 1,917