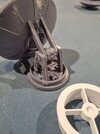
Thanks for that - I got rid of the surface rings, and I also just noticed the penciled in ring marks don't match up as well - cant believe I never noticedThere are three different types of rails in the Uboat kit, each with slightly different spacing between the stanchions, which is why a couple are longer than others. There are a couple bent slightly too.
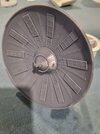
There's also 2 additional sealab parts, combined to form one circle, that sits on top of the Saturn V 3rd stage bottom. You'll also notice that the cut down sealab parts that create the 11 outer "petals' are not curved to match the dish. Those are hard plastic parts and so are flat, with only the two ends glued down.
View attachment 1823115
It basically depends if the come from the shorter version or longer version, but Im sure you already know this
")
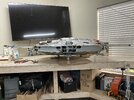
Yep hadn't forgotten the ring on the Saturn - hopefully get that done tonight