You are using an out of date browser. It may not display this or other websites correctly.
You should upgrade or use an alternative browser.
You should upgrade or use an alternative browser.
Y-wing... Why Not... SS Y-wing Build by mjhenks.
- Thread starter mjhenks
- Start date
CheesyGrin
Active Member
Looking great! I love seeing so many builders taking this project on. Our community has benefited greatly from the open source sharing of project IP and skills.
The last week i was able to almost catch up with my cockpit. After using the right bulkhead profile i have the fit right and the tubes now align.
Thank you again dtssyst
Cardboard pattern

Test Fit. Man that bulkhead detail cast is messed up!

Did i mention I totally messed up the bulkhead detail cast piece? Way too short now.
I am not able to get a new one for a few months so i figured i would try and fix it and see if it looks presentable. Using styrene i built out the top and sides to what i think it would have looked like. It looks alot better in primer and i filled the bottom gaps too but no image. Once mounted it will look fine.

I also spent time finish fitting the cockpit halves and that will go together this week.
Since i am missing alot of nurnies right now i moved to the engines. A little disappointment and then a little "go crazy".
I realized i did not get my Saturn lines quite right. The molded full vertical "rails" or pipes are not at the right rotation. Both side are off a bit. I figured the slot for the wing would have been the seam line for the Saturn V body. Guess not.
I am NOT going to fix this. Too expensive so i will adapt. I am OK with that.
I went ahead and attached the T-struts & nose cones so i could start working on the engine details. My own 3D printed T-rail jig.
Man, my workbench is a mess.....


BTW. DO NOT use Mercury Adhesive CA glue accelerator with a model painted with filler primer. It acts as an instant solvant. I ran out of Satellite City NCF Quick and tried this stuff instead. Ordered more NCF.
Then i could not help but do a teaser shot. Finally realizing in person how big this model is.


Engines and cockpit next and then i will have to stall as i ID my missing nurnies and wait for them.
HELP Can anyone point me to some good starboard and port side images for Tie Killer. Neck area and just in front of the wings specifically. I am having a heck of a time finding good ones to ID the nurnies. Have good ones from Red Jammer but i think it is different.
Thank you again dtssyst
Cardboard pattern
Test Fit. Man that bulkhead detail cast is messed up!
Did i mention I totally messed up the bulkhead detail cast piece? Way too short now.
I am not able to get a new one for a few months so i figured i would try and fix it and see if it looks presentable. Using styrene i built out the top and sides to what i think it would have looked like. It looks alot better in primer and i filled the bottom gaps too but no image. Once mounted it will look fine.
I also spent time finish fitting the cockpit halves and that will go together this week.
Since i am missing alot of nurnies right now i moved to the engines. A little disappointment and then a little "go crazy".
I realized i did not get my Saturn lines quite right. The molded full vertical "rails" or pipes are not at the right rotation. Both side are off a bit. I figured the slot for the wing would have been the seam line for the Saturn V body. Guess not.
I am NOT going to fix this. Too expensive so i will adapt. I am OK with that.
I went ahead and attached the T-struts & nose cones so i could start working on the engine details. My own 3D printed T-rail jig.
Man, my workbench is a mess.....
BTW. DO NOT use Mercury Adhesive CA glue accelerator with a model painted with filler primer. It acts as an instant solvant. I ran out of Satellite City NCF Quick and tried this stuff instead. Ordered more NCF.
Then i could not help but do a teaser shot. Finally realizing in person how big this model is.
Engines and cockpit next and then i will have to stall as i ID my missing nurnies and wait for them.
HELP Can anyone point me to some good starboard and port side images for Tie Killer. Neck area and just in front of the wings specifically. I am having a heck of a time finding good ones to ID the nurnies. Have good ones from Red Jammer but i think it is different.
Attachments
This is a good one for the Port side, neck area:

This is Gold 2, but the long detail appears to be the same:

This is good for the Starboard (Right) side, neck area:

Another one:

This is Gold 2, same side. I'm not 100% sure it's got the same detail as Gold Leader, but these might be useful:


This is Gold 2, but the long detail appears to be the same:
This is good for the Starboard (Right) side, neck area:
Another one:
This is Gold 2, same side. I'm not 100% sure it's got the same detail as Gold Leader, but these might be useful:
Last edited:
Slow progress of late. I was able to get access to a Nice-N Gold Leader and take a ton of pictures. With that i made some more progress. I also realized some of my engine detailing is off. I know already that fundamentally my Satrun V body pieces are rotate too far so i already have had to adapt the engines so i am not sure if i will correct things or not.

Probably the biggest area is the engine's. They are now done. Some scratch building and some nurnies. I did find i needed to shorten them some so apart they came and about 1/4" removed.


Now i am working on identification of nurnies to continue on.
Probably the biggest area is the engine's. They are now done. Some scratch building and some nurnies. I did find i needed to shorten them some so apart they came and about 1/4" removed.
Now i am working on identification of nurnies to continue on.
I like the pictures in Post #63, as it makes me ALSO ask the question:
"Just how many bottles of bourbon DOES it take to build a studio scale Y-Wing?"
You seem to be limiting yourself to two, which is admirable, because I lost count after year three of the project... ; )
"Just how many bottles of bourbon DOES it take to build a studio scale Y-Wing?"
You seem to be limiting yourself to two, which is admirable, because I lost count after year three of the project... ; )
Depending on which Y-wing you build I guess. They all have their own nuances and levels of pain.Just how many bottles of bourbon DOES it take to build a studio scale Y-Wing?"
My Gold Leader took 2 bottles of Eagle Rare, and one of Makers Cask Strength.
While I won’t start Gold 5 until next year, I imagine it will be similar.
Perhaps there should be a bourbon rating system?
If it comes out poorly... Early Times.
If it comes out well... Woodford Reserve.
If it comes out museum quality... Makers Mark (Cask Strength), OR Woodford Reserve Double Oaked
If it comes out SUPER flawless... Eagle Rare.
And if it comes out indistinguishable from the ILM screen-used Gold Leader... Old Rip Van Winkle 25 Year Old, because why not spend as much on the bourbon as you did on the original greeblies?
Incentives. Just sayin'...
It has been a LONG while since i worked on my Y-wing.
Honestly i got pulled into a car restoration.
Pulled out the Y-wing yesterday and re-acquainted myself. A few parts i need to locate. any guidance?
2x resin Dragon 1/9 kettenkrad engine halves for the rear wing lower wall.
2x resin airfix 1/24 hurricane engine valve covers. (There is a full engine i can buy on ebay but thought i would post here first.)
Looking forward to making some progress.
Thank you Studio Kitbash for the care package. More parts to sleuth through and i already tore some parts off and replaced them now that i have the right ones.
I was explaining to my son today why this is taking so long. I told him:
Remember your X-wing we built? Remember how you had the directions and the part numbers and there were no extra parts? Well i have none of that.
He said oh... That tough...

Sorry for the lousy images here. Pictures of printed pictures are not great guides.
Can anyone help me ID the parts in yellow below? I think it is three pieces but unsure.

What is the piece in yellow below and is there a map for the green anywhere?

I am having fun still...
I was explaining to my son today why this is taking so long. I told him:
Remember your X-wing we built? Remember how you had the directions and the part numbers and there were no extra parts? Well i have none of that.
He said oh... That tough...
Sorry for the lousy images here. Pictures of printed pictures are not great guides.
Can anyone help me ID the parts in yellow below? I think it is three pieces but unsure.
What is the piece in yellow below and is there a map for the green anywhere?
I am having fun still...
The yellow part is one part, Tamiya 1/35 8Rad. Luckily a brand new one is easy to get, has all the right parts and contributes quite a few pieces to the Y-Wing, depending on which one you're building.
Half of the green are is from the rear bulkhead of the cockpit.
This is a good thread to check out.

 www.therpf.com
Half of the green are is from the rear bulkhead of the cockpit.
This is a good thread to check out.
The One-Stop Y-Wing Thread
The Y-Wing is coming into it's own! With the resurgence of interest in this venerable fighter it seemed only appropriate to combine links to the various Y-Wing projects and reference materials into one thread and sticky it for easy reference. Please do not post individual builds here. Each...
www.therpf.com
Superimposed on top of the green section is the landing strut from the Frog 1/72 Bristol Beaufighter Mk XXI (Part #20).
The piece in yellow is a continuation of the bulkhead piece, cut off just after the tank "bump" and then adjacent with the 90-degree angled intersection with the Aurora Sealab piece that is to the right of it (and laying on a different plane). You should have another bulkhead section in the pieces you received, and should be able to cut that whole section from there.
Making progress. Staying as close as i can. Still having fun. I think all my piping is done. Working on the engine pods and going through my pictures to find my last remaining missing parts. Comments welcomed.


Some question regarding painting as that is my next learning curve.
- On advice from other builders i will paint overall black and the refer white.
- For the colors. I have the Y-wing Decal kit made a year or so ago by another builder. I am pretty sure the yellow nose stripe in part of that decal kit. Is it better to paint that or decal that?
- For engines color. How do you mask around the greebles or do you not worry about that and let the paint lines be super soft?
Personally I would paint the yellow nose stripe. I'm assuming you mean the yellow on top and bottom of the cockpit.
As far as the painting on the engines, I would use Tamiya tape to mask the best I could but not be too worried if it comes out a little soft. The real ones aren't all that crisp.
As far as the painting on the engines, I would use Tamiya tape to mask the best I could but not be too worried if it comes out a little soft. The real ones aren't all that crisp.
bwayne64
Master Member
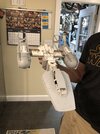
Nobody puts Baby in a corner ! Lol, great R2 man !With some coaxing from Studio Kitbash and dtssyst i will add to the SS forum my Y-wing build. My plan is to head in the direction of Red Jammer but this being my first SS model know i will not hit it 100% and i am OK with that. My background is R2 building and really building anything. Cars, Home, machines, toys, etc. Just never SS models. A few years back i built a Jedi Training remote that turned out great util the paint job. That is my weakness. I suck in fact! I have all the tools but none of the skills. It is really weathering that i suck at and fine detail painting. I have owned a Pyro X-wing kit and SS Tie kit for many years but always been too chicken to try. Mainly because the eventual paint job. I hope this project gives me the confidence to do the other two.
View attachment 1343019
View attachment 1343020
I took the leap because of Dave G's work. Thank you Dave. That and the help from many other's have kept me going. I am actually already well down the road but i will start at the beginning and catch up instead of posting "boom" here i am.
Hope the journey goes well.
Similar threads
- Sale
- Replies
- 6
- Views
- 673