You are using an out of date browser. It may not display this or other websites correctly.
You should upgrade or use an alternative browser.
You should upgrade or use an alternative browser.
Thorssoli's First Order Builds - Captain Phasma FINISHED on Page 21!
dday
Sr Member
Re: Thorssoli's Episode VII Builds
thorssoli; So I"m about to start the silicone/mothermolding of a faceplate like this and I am immensely pleased with the photos you've shown. They will help a lot.
The sprue is basically a cut in the silicone where you made the pour spout? I like the word sprue, I'll use it from now on! Are you just using that syringe as a funnel, or filling it with resin and injecting it in?
Last edited by a moderator:
Re: Thorssoli's Episode VII Builds
A sprue is the place where the casting material enters the mold. In this case, I just cut it into the cured silicone, but you can also plan where it's going to be by gluing a piece of rod or tubing (or a nail or whatever) to the area where you want it to be prior to molding. In this case I was just using the syringe as a funnel, but I do occasionally have molds where it's a good idea to inject the resin into the molds.
A vent is another channel that allows air to flow up and out of the mold in order to keep bubbles from getting trapped in the high parts.
UPDATE:
Last night I formed the first couple of pairs of tinted acrylic lenses:
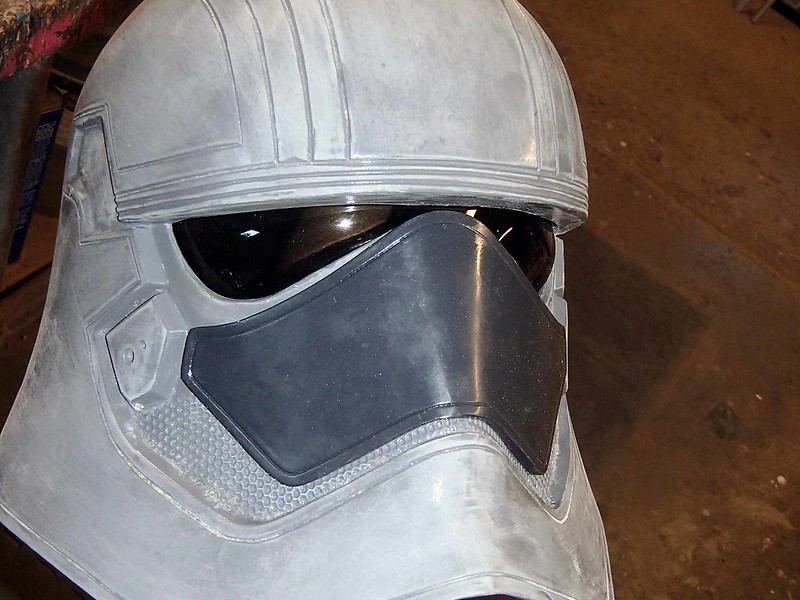
I'm pretty happy with how they came out and I'll be posting a step-by-step with photos to explain how they were made once I've got the photos.
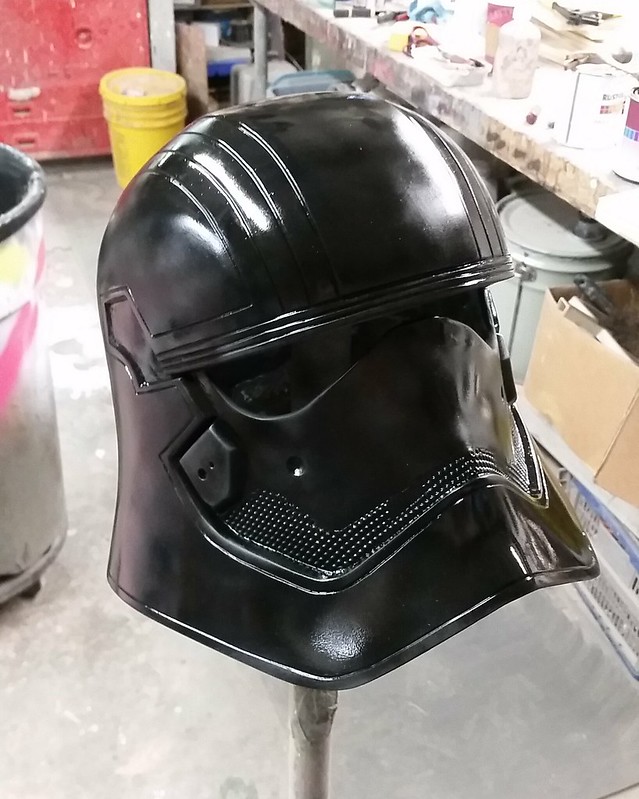
Once I had the lenses figured out, I went ahead and sprayed the helmet with black primer:
Once it dried I couldn't resist the urge to grab a can of silver spraypaint and see how it would look:
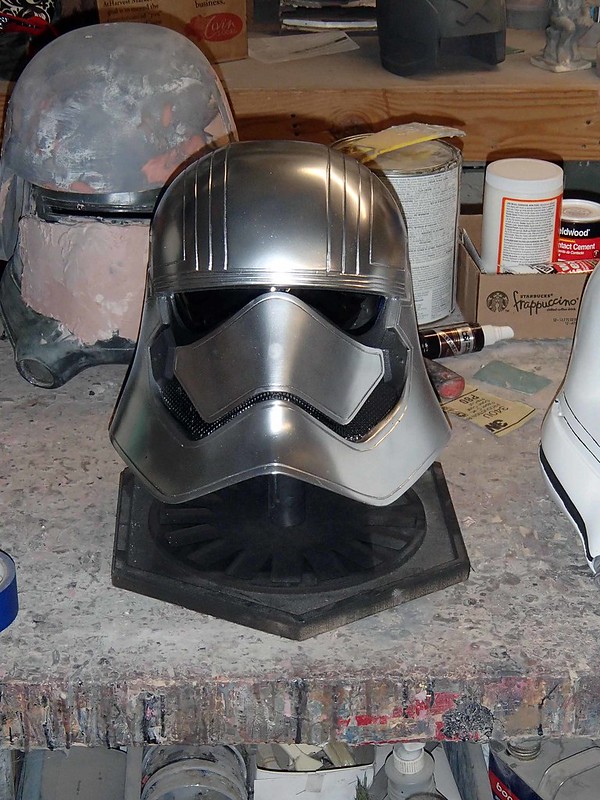
It's just a crappy rattlecan paintjob and I really didn't do any masking, so I'm really looking forward to seeing this with a proper chrome finish:

This is going to be pretty sexy.
Stay tuned...
The sprue is basically a cut in the silicone where you made the pour spout? I like the word sprue, I'll use it from now on! Are you just using that syringe as a funnel, or filling it with resin and injecting it in?
A sprue is the place where the casting material enters the mold. In this case, I just cut it into the cured silicone, but you can also plan where it's going to be by gluing a piece of rod or tubing (or a nail or whatever) to the area where you want it to be prior to molding. In this case I was just using the syringe as a funnel, but I do occasionally have molds where it's a good idea to inject the resin into the molds.
A vent is another channel that allows air to flow up and out of the mold in order to keep bubbles from getting trapped in the high parts.
UPDATE:
Last night I formed the first couple of pairs of tinted acrylic lenses:
I'm pretty happy with how they came out and I'll be posting a step-by-step with photos to explain how they were made once I've got the photos.
Once I had the lenses figured out, I went ahead and sprayed the helmet with black primer:
Once it dried I couldn't resist the urge to grab a can of silver spraypaint and see how it would look:
It's just a crappy rattlecan paintjob and I really didn't do any masking, so I'm really looking forward to seeing this with a proper chrome finish:
This is going to be pretty sexy.
Stay tuned...
Re: Thorssoli's Episode VII Builds
The grill was 3D printed from a design specifically made to fit into the space on this helmet.
Can i ask where or what you used for the grill? what sort of material? and where i could find some? :cool
The grill was 3D printed from a design specifically made to fit into the space on this helmet.
Re: Thorssoli's Episode VII Builds
I guess I couldn't have asked for a better setup than that.
Here's how the lenses are made:
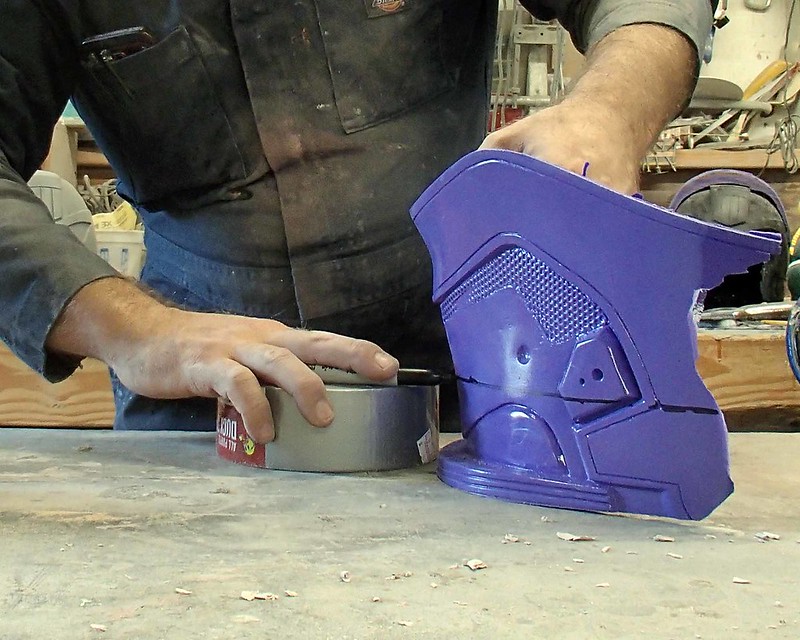
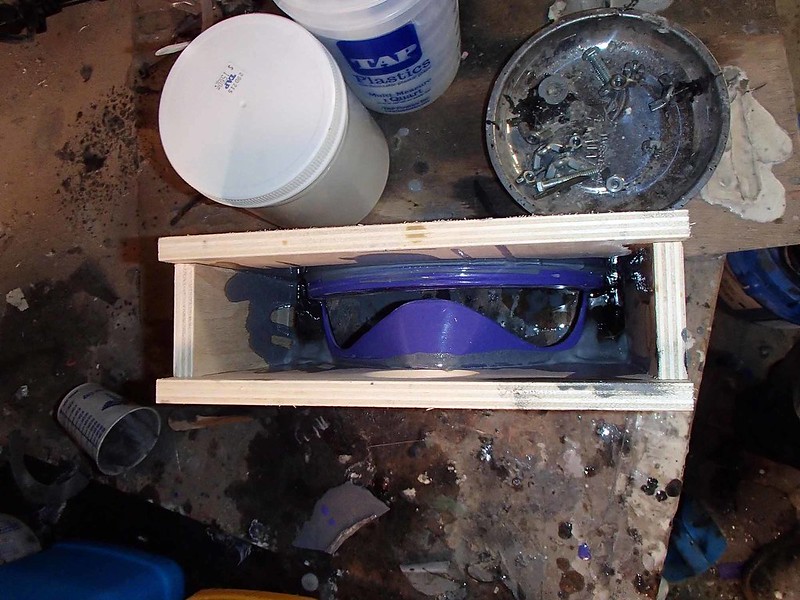
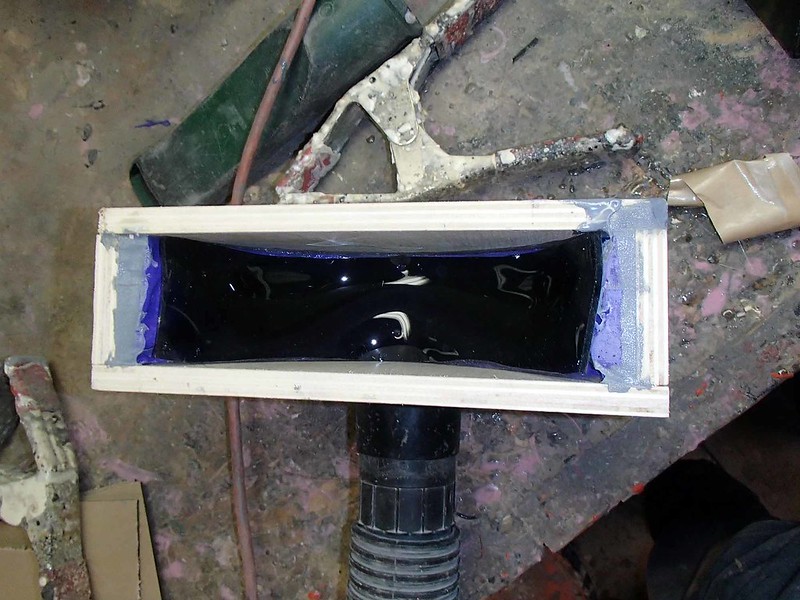
I start by casting a particularly thick copy of the area around the eye holes:

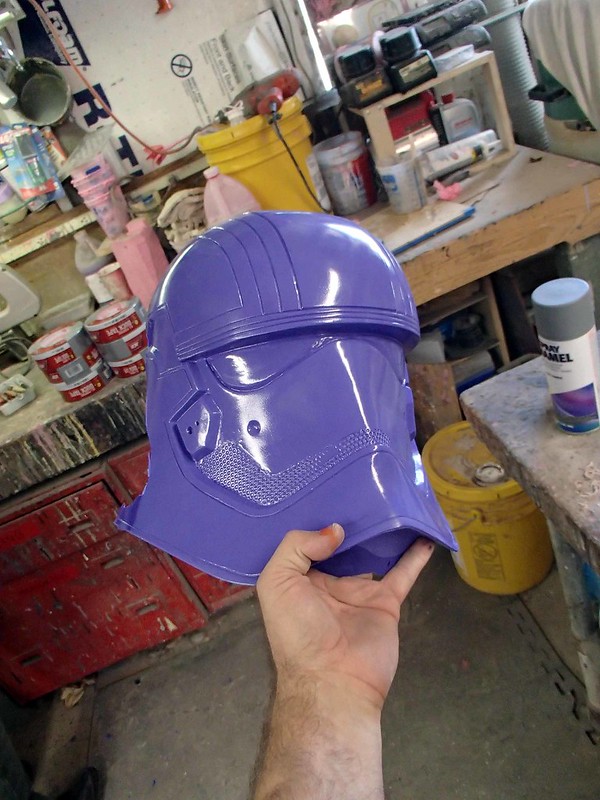
I cast this particular copy in plurple because YOU'RE NOT THE BOSS OF ME:
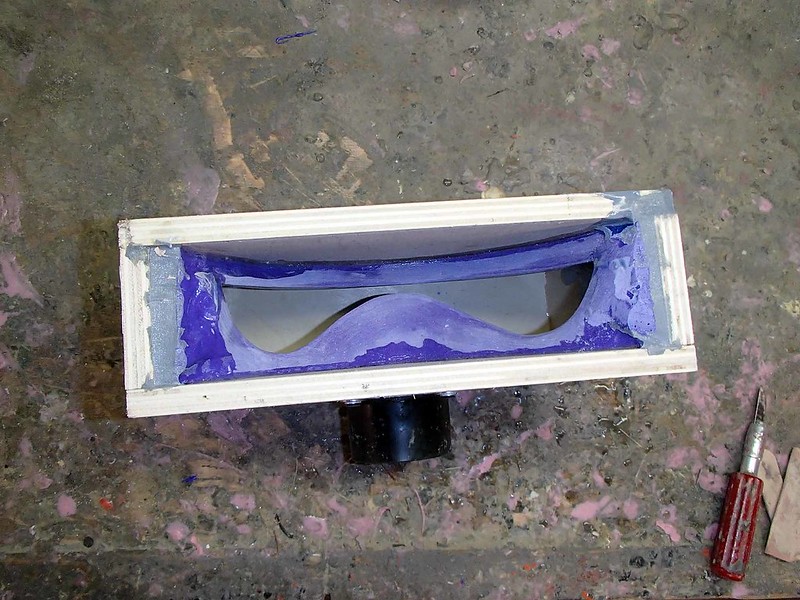
With the cast copy out of the mold, I cut a nice, level slice off of the top:

Then I mark a line parallel to that one, but under the eyes so I can cut that part off too:
Then I cut the ends square so it'll sit flat on the bench while I cut out the eye holes with a tile cutting bit on the Dremel:
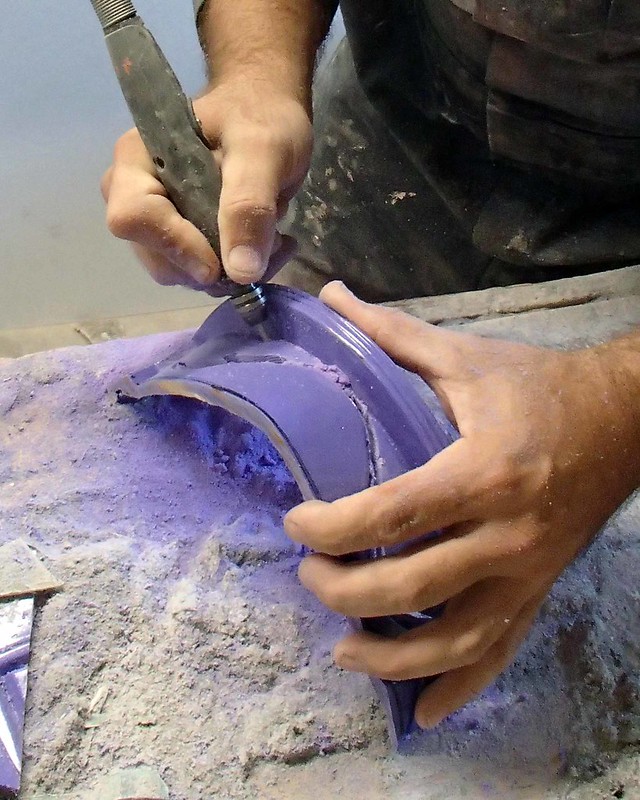
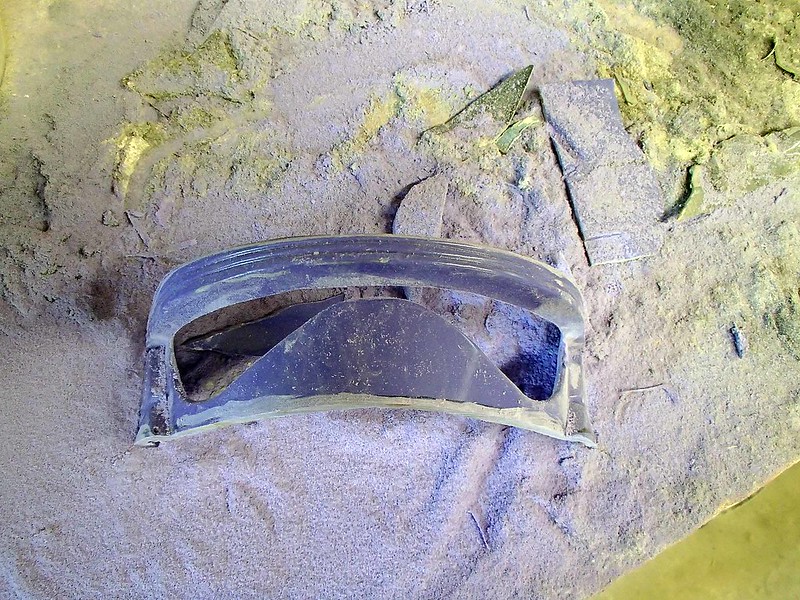
After a bit of touch-up with the sanding drum, the eye holes are nice and smooth and ready to go:
Then I build a box around this piece of the helmet:
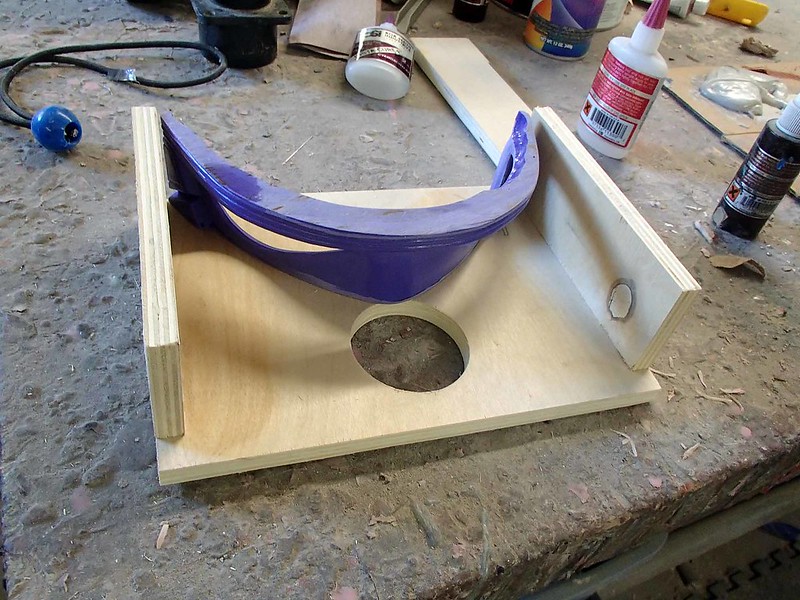
The circular hole is where the shop-vac will be attached later.
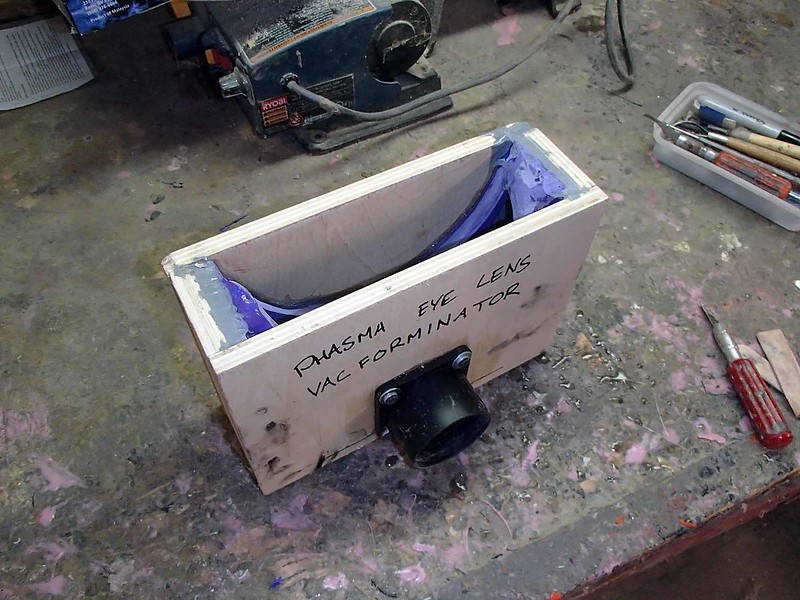
After gluing the faceplate in place and bonding all four sides together, I tape off the edges, set the whole thing upside-down, and pour in some resin to seal the edges:
Then I glue the last piece of plywood in place to seal up the bottom and flip the whole thing upright again. Here's the view from the top:
With a tool adaptor screwed on and a descriptive label, the lensmaker is ready to go:
Now it's time to cut out a strip of tinted acrylic and cook it. For little pieces like this, I use a toaster oven:
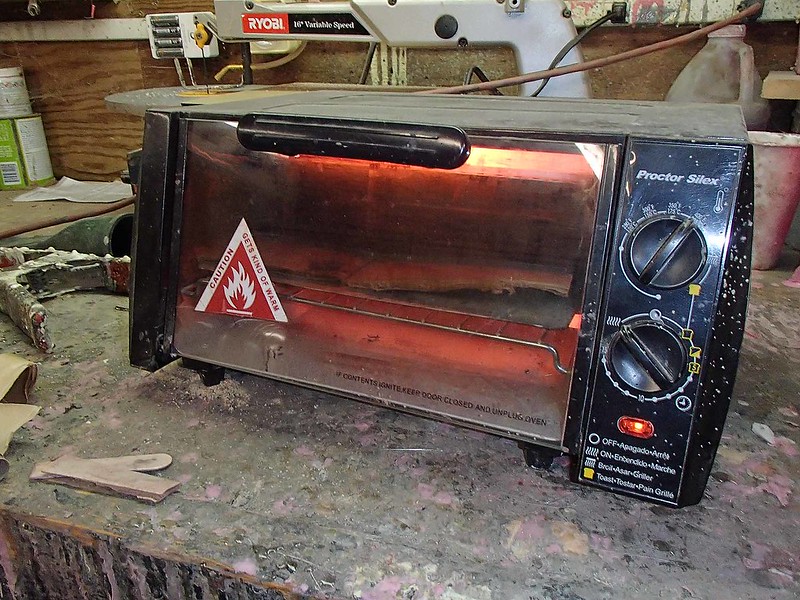
Acrylic is porous and the surface pores tend to fill up with moisture from the surrounding air. This means it needs to be pre-dried at about 100°F for a few minutes before cooking it to forming temperature at about 400°F for a few more minutes. Eventually it gets hot enough that it'll flex and stretch a bit:
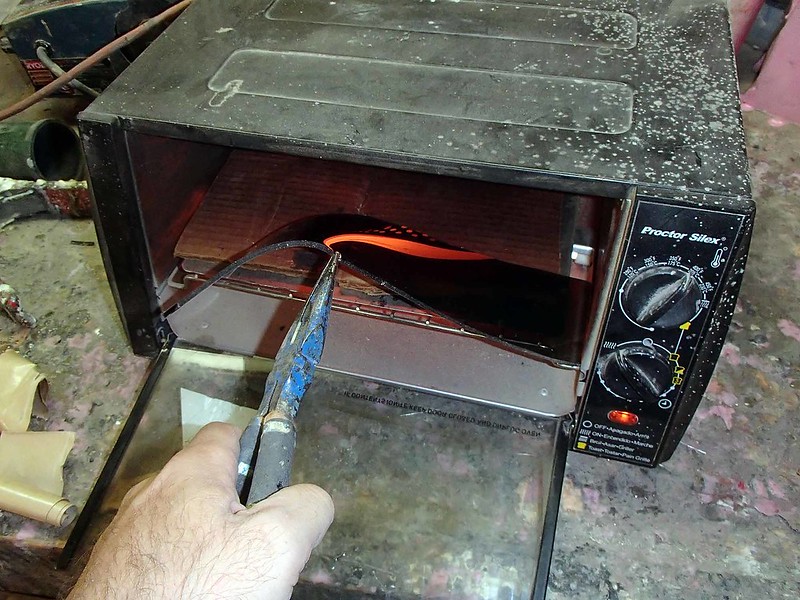
Then it's time to place it into the vacforminator and turn on the shop vac:
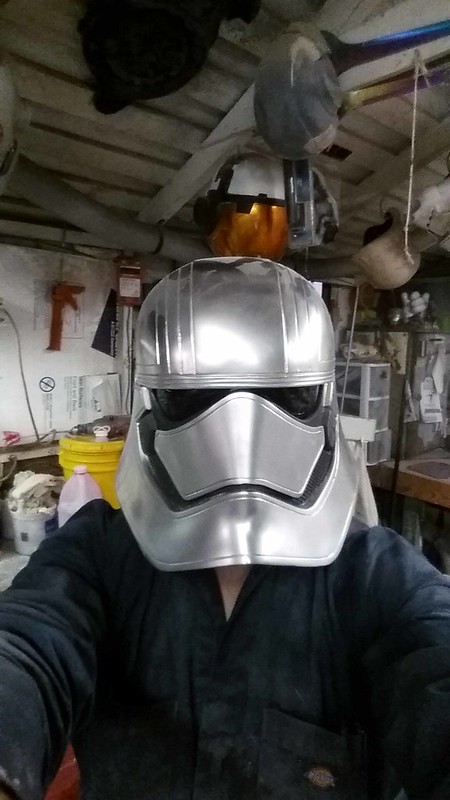
The acrylic is sucked into the hole, but only so much. The shop vac stays on until the plastic has cooled enough to keep its new shape. Then I shut off the vacuum, pop the lenses out, and stick them in a helmet. Then I take a selfie:
If you want the lenses to be more convex, it's just a matter of making the plastic softer by cooking it a bit longer.
And that's how lenses are made.
Mind still blown.
Eagerly awaiting your "lens" method.
Me as well. I'm about to form my own and could do with some learning from @thorssoli;
I guess I couldn't have asked for a better setup than that.
Here's how the lenses are made:
I start by casting a particularly thick copy of the area around the eye holes:
I cast this particular copy in plurple because YOU'RE NOT THE BOSS OF ME:
With the cast copy out of the mold, I cut a nice, level slice off of the top:
Then I mark a line parallel to that one, but under the eyes so I can cut that part off too:
Then I cut the ends square so it'll sit flat on the bench while I cut out the eye holes with a tile cutting bit on the Dremel:
After a bit of touch-up with the sanding drum, the eye holes are nice and smooth and ready to go:
Then I build a box around this piece of the helmet:
The circular hole is where the shop-vac will be attached later.
After gluing the faceplate in place and bonding all four sides together, I tape off the edges, set the whole thing upside-down, and pour in some resin to seal the edges:
Then I glue the last piece of plywood in place to seal up the bottom and flip the whole thing upright again. Here's the view from the top:
With a tool adaptor screwed on and a descriptive label, the lensmaker is ready to go:
Now it's time to cut out a strip of tinted acrylic and cook it. For little pieces like this, I use a toaster oven:
Acrylic is porous and the surface pores tend to fill up with moisture from the surrounding air. This means it needs to be pre-dried at about 100°F for a few minutes before cooking it to forming temperature at about 400°F for a few more minutes. Eventually it gets hot enough that it'll flex and stretch a bit:
Then it's time to place it into the vacforminator and turn on the shop vac:
The acrylic is sucked into the hole, but only so much. The shop vac stays on until the plastic has cooled enough to keep its new shape. Then I shut off the vacuum, pop the lenses out, and stick them in a helmet. Then I take a selfie:
If you want the lenses to be more convex, it's just a matter of making the plastic softer by cooking it a bit longer.
And that's how lenses are made.
pnag
Sr Member
Re: Thorssoli's Episode VII Builds
Fantastic - informative and funny") Thanks for that!
Thanks for that!
And that's how lenses are made.
Fantastic - informative and funny
Thanks for that!Badgersbunk
Active Member
Re: Thorssoli's Episode VII Builds
That's a great tutorial.
That's a great tutorial.
sdhlaw1701
Well-Known Member
Re: Thorssoli's Episode VII Builds
*Jaw on the floor* Wow, that looks awesome! I cannot wait to get mine!
*Jaw on the floor* Wow, that looks awesome! I cannot wait to get mine!
A sprue is the place where the casting material enters the mold. In this case, I just cut it into the cured silicone, but you can also plan where it's going to be by gluing a piece of rod or tubing (or a nail or whatever) to the area where you want it to be prior to molding. In this case I was just using the syringe as a funnel, but I do occasionally have molds where it's a good idea to inject the resin into the molds.
A vent is another channel that allows air to flow up and out of the mold in order to keep bubbles from getting trapped in the high parts.
UPDATE:
Last night I formed the first couple of pairs of tinted acrylic lenses:
https://farm6.staticflickr.com/5730/21742664331_339715e85a_c.jpg
I'm pretty happy with how they came out and I'll be posting a step-by-step with photos to explain how they were made once I've got the photos.
Once I had the lenses figured out, I went ahead and sprayed the helmet with black primer:
https://farm1.staticflickr.com/757/21746245961_67cdd70186_c.jpg
Once it dried I couldn't resist the urge to grab a can of silver spraypaint and see how it would look:
https://farm6.staticflickr.com/5793/21545348550_71bc0ef95c_c.jpg
It's just a crappy rattlecan paintjob and I really didn't do any masking, so I'm really looking forward to seeing this with a proper chrome finish:
https://farm1.staticflickr.com/684/21721731652_7403e4e148_c.jpg
This is going to be pretty sexy.
Stay tuned...
Re: Thorssoli's Episode VII Builds
I know folks have said it before, but it's beyond awesome that you take the time to show us how you make things.
I know folks have said it before, but it's beyond awesome that you take the time to show us how you make things.
Similar threads
- Replies
- 33
- Views
- 1,951
- Replies
- 6
- Views
- 417
- Replies
- 0
- Views
- 325
- Replies
- 5
- Views
- 584