You are using an out of date browser. It may not display this or other websites correctly.
You should upgrade or use an alternative browser.
You should upgrade or use an alternative browser.
The Ultimate Ben Obi-Wan Kenobi Real Vintage Parts Lightsaber Group
- Thread starter Sym-Cha
- Start date


Mouse Vader
Sr Member
Paint stripper (chemical) & an old (manual) tooth brush . Make sure you wear plastic gloves it's nasty stuff & will burn your skin which is why it's effective. Leave it on for an hour or so then brush it off with the tooth brush, pref under water to stop it flicking bits about. Repeat on any bits that haven't moved. Alternative is heat gun & scraper or even blow torch. Outdoors is best for all that.
newmagrathea
Sr Member
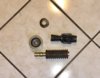
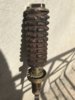
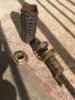
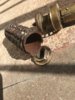
My next part has finally arrived. I was very nervous about itIt’s not in a good shape, but I’m still happy about it. At least I can be sure that its 100 years old
View attachment 1019777 View attachment 1019778 View attachment 1019779
You can get a dog to lick all that peanut butter off.
onderon
Sr Member
Paint stripper (chemical) & an old (manual) tooth brush... Alternative is heat gun & scraper or even blow torch.
Thanks!
You can get a dog to lick all that peanut butter off.
I wish it would be that easy. I would lick it myself
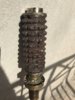
I would be interested in finding out what that yellow “paint” actually is, and how old it is. I have a grenade with a similar looking coating. It appears to be wax-based. Yours clearly looks as though it was painted after it went into the ground. If it’s not contemporary to the part, a and it’s the same stuff as mine, I’d have a lot less angst about stripping mine when the time comes...My next part has finally arrived. It’s not in a good shape, but it’s good enough. At least I can be sure that it is genuinely 100 years old
View attachment 1019777 View attachment 1019778 View attachment 1019779
...and that time has just become much, much sooner:


Thanks beyond all imagining goes to KevinHotchkiss for his remarkable hunting skills, and to teecrooz for being such a good friend looking out for those of us in need. This was the last major vintage part I needed (unless a natural-born female BP ever comes along). And I was beginning to despair it would be attainable at any price.
Now, I just need to find those op-amps and washers I picked up from Parfaitelumiere long, long, ago and managed to lose in my office somewhere...
I’ll have the get all the kids together and post a family photo later on.
Again, so much thanks, guys!
onderon
Sr Member
I would be interested in finding out what that yellow “paint” actually is, and how old it is. I have a grenade with a similar looking coating. It appears to be wax-based. Yours clearly looks as though it was painted after it went into the ground. If it’s not contemporary to the part, a and it’s the same stuff as mine, I’d have a lot less angst about stripping mine when the time comes...
Yes, it feels like the seller painted it to cover how bad shape the grenade is in. But the price was quite cheap so I did not expect much. I did not have time yet to try to remove the paint, but I wouldn't be surprised if it will break into pieces during the process
Last edited:
I had a grenade once that had a thick covering of yellow paint.


I tried all manner of processes to remove the paint which was, as Fusion said, thick and waxy-ish, AND also appeared as though the paint was applied post retrieval of the grenade from the battlefield as the cubes were about 70% intact but they all were completely covered by the paint.
First I tried a brass wite brush. It did nothing but disappoint me.
Next I tried a long bought of freestyle electrolytic rust removal.

This also accomplished basically nothing.
I purchased a tin of industrial paint stripper.

It said on the tin:
For small painted objects coted in very aged or extremely tough paint, fill a glass jar 1/10 full of the paint stripper, set the object in the jar but do not leave the object in the jar for longer than 30 minutes.
...which I tried:

...and 30 minutes did nothing.
SO, I put the frag back in the jar with some fresh paint stripper and left the frag in the jar for 5 days straight.


Still there was paint:


By this point I was aggravated and felt defeated. I was willing to try anything, the more aggressive and brutal, the better! I decided to go with probably the oldest way to remove paint which is FIRE!
I built a raging campfire one night at approximately 6:30PM. I tossed the frag into the glowing spot in the middle and let it burn and burn and burn until about 3:00AM.


Here were the results:


After all that time, effort, and money for supplies, I swore off attempting to restore grenades ever again!
3 YEARS LATER...
I picked up this guy:

After seeing the restoration job newmagrathea was doing on The Ninja ’s Pack ‘O Hales, I wws inspired and decided to give restoration one more try.
Here is a closeup of what I am dealing with:


First thing is first: White Vinegar


Now, you are probably thinking to yourself “Hey, you can’t put all those different types of metal together in there!” And you are absolutely right! My steel turned copper over rust and my brass pieces turned an unhealthy copper color. The gold was gone...
Neverheless, after dressing myself down, I plunged ahead anyway and tried some more physical approaches to rust removal and restoration. After several hours of hard labor:


Thanks to Dustin’s inspiration, I may have saved this relic for actual usage. A few days later I went at it again, cleaned it up some more, gave it a long bath in old motor oil, and voila:


And of course I threw all of my current OB1 parts together just to see how she looks...


Sorry for the image bombardment.
I tried all manner of processes to remove the paint which was, as Fusion said, thick and waxy-ish, AND also appeared as though the paint was applied post retrieval of the grenade from the battlefield as the cubes were about 70% intact but they all were completely covered by the paint.
First I tried a brass wite brush. It did nothing but disappoint me.
Next I tried a long bought of freestyle electrolytic rust removal.
This also accomplished basically nothing.
I purchased a tin of industrial paint stripper.
It said on the tin:
For small painted objects coted in very aged or extremely tough paint, fill a glass jar 1/10 full of the paint stripper, set the object in the jar but do not leave the object in the jar for longer than 30 minutes.
...which I tried:
...and 30 minutes did nothing.
SO, I put the frag back in the jar with some fresh paint stripper and left the frag in the jar for 5 days straight.
Still there was paint:
By this point I was aggravated and felt defeated. I was willing to try anything, the more aggressive and brutal, the better! I decided to go with probably the oldest way to remove paint which is FIRE!
I built a raging campfire one night at approximately 6:30PM. I tossed the frag into the glowing spot in the middle and let it burn and burn and burn until about 3:00AM.
Here were the results:
After all that time, effort, and money for supplies, I swore off attempting to restore grenades ever again!
3 YEARS LATER...
I picked up this guy:
After seeing the restoration job newmagrathea was doing on The Ninja ’s Pack ‘O Hales, I wws inspired and decided to give restoration one more try.
Here is a closeup of what I am dealing with:
First thing is first: White Vinegar
Now, you are probably thinking to yourself “Hey, you can’t put all those different types of metal together in there!” And you are absolutely right! My steel turned copper over rust and my brass pieces turned an unhealthy copper color. The gold was gone...
Neverheless, after dressing myself down, I plunged ahead anyway and tried some more physical approaches to rust removal and restoration. After several hours of hard labor:
Thanks to Dustin’s inspiration, I may have saved this relic for actual usage. A few days later I went at it again, cleaned it up some more, gave it a long bath in old motor oil, and voila:
And of course I threw all of my current OB1 parts together just to see how she looks...
Sorry for the image bombardment.
Last edited:
Yes, it feels like the seller painted it to cover how bad shape the grenade is in. But the price was quite cheap so I did not expect much. I did not have time yet to try to remove the paint, but I would be surprised if it will break into pieces during the process
Quite honestly, getting your hands on any WW1 relic is a cause for celebration at the end of the day, so congratulations! And yes, the paint helps hide condition but I think there are also laws requiring that color of paint for things that go boom... not quite sure on that one
mugatu did a restoration using JB Weld Stick (the putty stick, not the goopy tubes) and it is stiff enough to reshape the threads around the brass pieces. I think he applied it, screwed it together, and unscrewed it while the putty was firm but not rock solid. He also put a paperclip in there for grip I think, not sure. It was really quite professional and might have saved the grenade from further degradation.
I had beige and red paint, as well as rust on my grenade above. I did a bath of white vinegar for quite a few hours, brushing it with a little 99 cent wire brush. Next I did a WD40 bath overnight, and brushed it some more. Some rust needed sandpaper, but I kept that to a minimum because it technically could remove material I wanted to keep. I fully cleaned the thing after the baths too, wd40 can be corrosive over time. Instead I cleaned it with Dawn/warm water, dried it with a paper towel, held it over a stove burner to make sure all the water was gone (you can sometimes hear sizzling as droplets boil away) and once it cooled.. (Actually I used Birchwood Casey perma blue to get the bare steel a little darker at this point). THEN I used Barricade by Birchwood Casey, which is gun oil. it've very thin and a perfect protective finish. If you're going to handle it a lot, or it's in bad shape you could also just use enamel clear coat to seal it for good. I did that on a grenade I had previously
Ever thought about doing a little "reveal" with some cool parts that you could see inside that hole? It would be custom but it would make for a cool lightsaber war relic!
also, was the motor oil to darken it or grease/seal it from future rust? I didn't bathe my parts in barricade, just wiped it on.. should I have?
Tom, I was considering that actually. Like this lightsaber speaks of worlds unknown, of lives unlived, destinies not unfurled.
This lightsaber is from another reality. A reality where Anakin, not Obi-Wan, had the high ground that day on Mustafar. Where it was Obi-wan, not Anakin, left to burn by the river side. Chopped up bad and even Obi-Wan’s lightsaber did not escape the brutality!
Remember to not use that pot for coffee now
Oh, GREAT! NOW you tell me, veektohr. At least that explains the blood...
newmagrathea
Sr Member
I had a grenade once that had a thick covering of yellow paint.
View attachment 1028882
View attachment 1028883
View attachment 1028884
I tried all manner of processes to remove the paint which was, as Fusion said, thick and waxy-ish, AND also appeared as though the paint was applied post retrieval of the grenade from the battlefield as the cubes were about 70% intact but they all were completely covered by the paint.
First I tried a brass wite brush. It did nothing but disappoint me.
Next I tried a long bought of freestyle electrolytic rust removal.
View attachment 1028881
This also accomplished basically nothing.
I purchased a tin of industrial paint stripper.
View attachment 1028889
It said on the tin:
For small painted objects coted in very aged or extremely tough paint, fill a glass jar 1/10 full of the paint stripper, set the object in the jar but do not leave the object in the jar for longer than 30 minutes.
...which I tried:
View attachment 1028893
...and 30 minutes did nothing.
SO, I put the frag back in the jar with some fresh paint stripper and left the frag in the jar for 5 days straight.
View attachment 1028890
View attachment 1028891
View attachment 1028892
Still there was paint:
View attachment 1028894
View attachment 1028895
View attachment 1028896
By this point I was aggravated and felt defeated. I was willing to try anything, the more aggressive and brutal, the better! I decided to go with probably the oldest way to remove paint which is FIRE!
I built a raging campfire one night at approximately 6:30PM. I tossed the frag into the glowing spot in the middle and let it burn and burn and burn until about 3:00AM.
View attachment 1028944
View attachment 1028945
View attachment 1028946
View attachment 1028947
View attachment 1028948
View attachment 1028943
Here were the results:
View attachment 1028900
View attachment 1028901
View attachment 1028904
View attachment 1028906
View attachment 1028907
After all that time, effort, and money for supplies, I swore off attempting to restore grenades ever again!
3 YEARS LATER...
I picked up this guy:
View attachment 1028911
After seeing the restoration job newmagrathea was doing on The Ninja ’s Pack ‘O Hales, I wws inspired and decided to give restoration one more try.
Here is a closeup of what I am dealing with:
View attachment 1028917
View attachment 1028918
View attachment 1028919
View attachment 1028920
First thing is first: White Vinegar
View attachment 1028909
View attachment 1028910
Now, you are probably thinking to yourself “Hey, you can’t put all those different types of metal together in there!” And you are absolutely right! My steel turned copper over rust and my brass pieces turned an unhealthy copper color. The gold was gone...
Neverheless, after dressing myself down, I plunged ahead anyway and tried some more physical approaches to rust removal and restoration. After several hours of hard labor:
View attachment 1028921
View attachment 1028922
View attachment 1028924
View attachment 1028925
Thanks to Dustin’s inspiration, I may have saved this relic for actual usage. A few days later I went at it again, cleaned it up some more, gave it a long bath in old motor oil, and voila:
View attachment 1028927
View attachment 1028928
View attachment 1028929
View attachment 1028930
And of course I threw all of my current OB1 parts together just to see how she looks...
View attachment 1028931
View attachment 1028932
Sorry for the image bombardment.
That is awesome. That paint looks caked on there. Very creative putting it the fire and using motor oil. I've tossed the idea around of using linseed oil to do the finish instead of gun blueing. It's a similar process as seasoning a cast iron skillet.
There is a chance that you can restore the copper colored brass. I've been toying with the idea because I did the same thing to my first grenade. The basic idea is that you use a solution of NaOH and zinc dust heated up, put the copper brass parts inside the solution which will turn them a silver (zinc) color, then you use a flame to heat the surface, it will turn back to brass. I did this in high school chemistry class with pennies. Brass is just an alloy of copper and zinc, so you just remake the surface brass. I think it would cost about $40 usd to do before shipping costs.
onderon
Sr Member
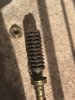
Thats how it ended up. Sadly it is missing too much from the top so it cannot put together without the filler. I feel scammed a little by the seller but I'm still happy that I have this piece. I think I will use it to remake the damaged metal part from scratch and then use the original copper parts to put it back together.
I used paint thinner, but that did not help with the filler, the filler had to be burned (my wife's chef torch was great for this). After it burned it can be scraped off easily. Almost like clay. WD40 did a nice job too (I made the photos before spraying it).
I used paint thinner, but that did not help with the filler, the filler had to be burned (my wife's chef torch was great for this). After it burned it can be scraped off easily. Almost like clay. WD40 did a nice job too (I made the photos before spraying it).
Attachments
onderon, here is a link to my repair of the same end of the frag that you are dealing with that thd9791 mentioned earlier. Your Hales does appear to have a little less to work with than what I had, but I think it is still mendable and could be “fixed up”.
If you are interested, I’d be more than willing to take a crack at it for you, however, from what you said about working on it already, you sound like you have the skillset to do it on your own.
If you are interested, I’d be more than willing to take a crack at it for you, however, from what you said about working on it already, you sound like you have the skillset to do it on your own.
Got most of the guys together for a family picture:

Still haven’t decided what I’m going to do about the transistors/washers/heatsink(s). But, I have one of these in beat up enough shape to justify sawing off for an internal like others have suggested:

I am highly motivated by the idea of making my saber all-vintage inside and out. Which means sourcing the internal hardware from some old hunk-a-junk from the early ‘70s or better.
It also means figuring out how to remove the booster from the heat-shroud of that Browning. It appears to be press-fit in there (weld is gone). I really, really hate the idea of taking that thing apart. It is such a cool artifact. But boosters have become so rare and precious, it hardly seems practicable (or fair) to dream of finding another. I just feel lucky to have the one. So, maybe I end up breaking down and using a replica in one place or the other.
It’s not like I’m on a deadline or anything... life is good.
Still haven’t decided what I’m going to do about the transistors/washers/heatsink(s). But, I have one of these in beat up enough shape to justify sawing off for an internal like others have suggested:
I am highly motivated by the idea of making my saber all-vintage inside and out. Which means sourcing the internal hardware from some old hunk-a-junk from the early ‘70s or better.
It also means figuring out how to remove the booster from the heat-shroud of that Browning. It appears to be press-fit in there (weld is gone). I really, really hate the idea of taking that thing apart. It is such a cool artifact. But boosters have become so rare and precious, it hardly seems practicable (or fair) to dream of finding another. I just feel lucky to have the one. So, maybe I end up breaking down and using a replica in one place or the other.
It’s not like I’m on a deadline or anything... life is good.
...It also means figuring out how to remove the booster from the heat-shroud of that Browning. It appears to be press-fit in there (weld is gone)...
Hey, Joe.
I must alologize about for the following text being so lengthy, so...
TL;DR
I think that your booster is likely stuck inside/stuck to the barrel jacket by way of fouling and not by pressure fitting.
Paul Harvey/Garrison Keilor Version
In researching the British ANM2, I was made aware of MK evolutions and changes made to these .303 Machine Guns in order to alleviate issues that cropped up.
One of the earliest issues the British encountered with this sized-down version of the USA Colt MG40 that needed to be figured out was how to keep the guns cool while firing in their primary location, fixed within the wings of RAF fighter planes. The British were already deeply into the manufacture of the .303 caliber cartridge, it having seen widespread usage by the English in the SMLE Enfield rifle in the muddy trench Hell that was WWI. The British became very familiar with the .303 and as the wings of their new fighters were thin, a light-to-medium caliber cartridge was necessary for space saving reasons to be able to fit the ANM2 inside a wing. Add that to the fact Britain already had the manufacturing infrastructure capability for the never-before-seen mass production requirements of the caliber well established established.
Incidentally, the ANM2 had to be installed on its side as positioning it prone would make the receiver and feed portion of the gun too tall to fit within the wing. This orientation presented other design criteria for the gun that set it apart from both the .30 version of the US ANM2 as well as the US .50 Browning ANM2 Heavy Machine Gun used by the Americans in both Ball Turret and Flexible Mount positions in US Bombers: both calibers of US ANM2 were oriented upright, where the the mount-on-side requirement of the British ANM2 carried the additional requirement that the Medium Machine Gun be capable of being belt fed its ordnance from either side. The .303 ANM2 also fired from an open bolt position, thought to help with cooling the 4 wing mounted guns by having the bolt and action left agape when not activated; both calibers of the US ANM2 fired from a closed bolt position, which had the benefit of alleviating any possible ammunition “cook off” events. This open bolt configuration is what gave the British ANM2 its legendary high rate of fire and helped make this Machine Gun “the Gun that Saved Britain” in the Battle of the Bulge.
Consequently, the extremely high rate of fire (as well as a few “minor” tweaks to the muzzle end devices) would cause problems for the ANM2 initially. Sending that much steel down the pipe so quickly caused intense build up of fouling (combustion gases plus unburnt powder plus hot temperatures) in the small bore of the original MKI booster causing catastrophic damage to both the boosters, barrel jackets, barrels, flash cones, and even occasionally the receiver and wing.
Several variations were tried out in an attempt to fix this often disasterous chain of events including: reaming the throat of the boosters (and flash cones), replacing the smooth flash cones (which had no MK designation yet I believe) with stunted compensator cones (or muzzle nuts, which is the MKI designation if I recall correctly), progressing back to a single piece combined muzzle nut/flash cone (now with heatsink rings (the MKII), and also changing the one piece flash cone/muzzle nut with the two piece combo we most often find now (designated MKII*). There are more variations than that including an upgrade which plated the inside of the booster with chromium.
Other changes to the rest of the gun included a barrel jacket with smaller air vent ports to larger vent ports as well as increasing the number of vent ports.
By the time the MKII** was moving into heavy production, the European theater of conflict of WWII was all but ended, with the British ANM2 having accrued a total build tally of 440,000 units with another 100,000 units worth of spare parts, manufactured by three factories on two continents (not including the original modified MG40 prototype guns built by Colt) seeing action and usage from Australia all the way around the world (the long way) to the Pacific.
If I had money to bet (I don’t), I’d say there is mass fouling built up in between the threads of your booster and the threads of your barrel jacket that has had over 70 years to set up shop and get comfy. You might say they Fused (like your screenname, LOL! Okay I’m a grandpa now so I’m allowed to tell that kind of dumb joke).
I’d guess a little heat will get that booster unwound. See newmagrathea ’s removal video in his thread or in The Ninja ’s collection thread for lesther strap usage to not damage the booster vanes.
*Fun fact about the extremely high rate of fire: the vibrations generated by the .303 caliber ANM2 came at such a fast pace, the intesity often times walked the flash cone/muzzle nut out of the booster (MKII) or the flash cone out of the muzzle nut (MKII*) or most problematic of all, the booster itself out of the barrel jacket, THUS, the welding nub on the booster which tack welded the booster to the barrel jacket.
Similar threads
- Replies
- 94
- Views
- 11,107
- Replies
- 17
- Views
- 2,828
- Replies
- 26
- Views
- 5,715