The Rocka-who? My Rocketeer Cosplay Build - WIP

Solarean

New Member

Hello, everyone!​

I grew up watching this film. I've wanted to do a Rocketeer cosplay for probably 15-20 years now. But it was always either too expensive, or required skillsets I didn't have. So when my best friend talked me into going to Dragon Con later this year (both of our first times), I decided now was the time. I'm so excited to finally be doing this.

What I'm going with...​

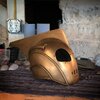
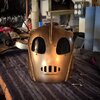
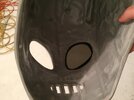
Rocket Pack - The wonderful "Veepy" Jetpack model by gnolivos. This is not the easiest 3D print in the world. But if you're experienced in printing it's not too bad. Some of the shapes are a little awkward, and I chose to slice some into 2+ pieces to make printing a little easier (and post processing a little harder). There's a few things that can be done to make the model require less supports, but I decided to not go through with that and just accept the extra time and material waste. But seriously, I can't say enough good things about this model. I can't imagine how much time gnolivos has invested into this.
Helmet - I originally looked at the 3D printable helmet remixed by drokle on Thingiverse. But by their own addition, it isn't very screen accurate. So I settled on Do3D's 3D Printable Helmet. combined with the helmet liner from Valor Replicas. Thanks Valor! Why Do3D's helmet? Because gnolivos doesn't offer one :)
Jacket - After much debating, I placed an order for the Wested replica jacket. And I'm currently (eagerly) awaiting its arrival.
Harness - ???
Pants - ???
Boots - ??? Magnoli boots are a little more than I wanted to spend (for now).
Gloves - ??? Maybe the Magnoli gloves.

Open Questions...​

  1. What are you all using for the harness? The harness from South Beach doesn't seem to be that great. I see a lot of you make your own, I'm not sure I have the skillset for that at the moment. Anyone open to a commission?
  2. Of course, The buckle. Anyone know how the mech on the upper buckle works? I'm working on something for the buckle and this would be helpful. More to come on that in the future.
  3. I'll be buying an airbrush for this project. I think I know which one I'm going to buy after reading through the forums and Adam Savage videos. But the question I still have is what would be a good air compressor for an airbrush?
  4. How is everyone gluing in their rivets without making a mess and ruining the paint finish?

Current Status​

I ran out of black PETG part way :) I'm currently waiting on my friend with a resin printer to print some of the smaller pieces for me. Hopefully going to start sanding and priming this weekend. All the (FDM printed) parts were printed in PETG using my 2 Bambu P1S's.

PXL_20250324_154202012.jpg


Ideas I had that I think will work well.​

Cast look on bell housing​

I noticed after looking at some reference photos of the real rocket pack that the taurus shapes on the booster bell housing look cast, while the cylindrical parts in between look machined. Almost like a crankshaft in a call. I really liked this look so I wanted to try and replicate it. I saw a bunch of people (Adam savage included) uses a painting technique that gave the booster a cast look. But, I had an idea... I decided to try using a feature built into most 3D printing slicer softwares called "Fuzzy Skin". So, I used modifiers to only apply the fuzzy skin where I wanted it. And after a little tuning of how aggressive I wanted the fuzzy skin to be, I think this turned out really nice!
Screenshot 2025-03-27 194509.png
PXL_20250320_150355897.jpg


Alignment pins​

I really wanted to not glue in the center hull piece in case I needed to take this pack apart for maintenance or upgrades. But I didn't want it just sitting there loosely either. So I think I've come up with a good idea, but time will tell. What I've decided to do is go with extra long rivets in key locations shown below (6 on top, and 4 on bottom). This way, the extra long rivets can be used as alignment pins when attaching the side tanks. That should be enough that when you squeeze the tanks together with the threaded rod, that nothing moves around.
PXL_20250320_020619116.jpg


I'll post more updates as I progress...
 
Last edited:
First paint tests. Turned out pretty good! Unfortunately it also revealed a lot of defects in my prints. So I'm going to sand it down and fix them, and repaint.

I followed the same process as others on this site. Really couldn't have done it without the help if the community.

1000007716.jpg
1000007723.jpg
 
It’s looking great! I’m actually making the same thing right now out of PETG as well, but you’re ahead of me. I’m still on the assembly and sanding, but I’m following your progress with great interest!

I love the idea of the fuzzy texture on the engine bells, so I’ll probably reprint mine.
 
You could use a filler primer followed by a +200 grit sanding. That reveals some of the defects which you can fill. Saves you some paint and helps filling smaller defects without too much work.

I wetsand the last layer of filler primer with a 600 sometimes followed with 800 grit.

Cool stuff btw!
 

Big Update!​

Sorry I haven't posted in some time. I got very sick from COVID and then took a vacation and went to London.

Pack and helmet status update​

I "finished" painting, clearing, and assembled the core of the pack. I'm still waiting on a lot of pieces from my friend with a resin printer. But this is enough for me to start making a pattern for the harness. The Helmet has received it's base coat and is waiting to be weathered and cleared.
PXL_20250511_023848182.jpg


This is after a clear coat (Alclad II Aqua Gloss Clear). It dulled it down just the right amount (in my opinion).
PXL_20250521_230418209.jpg


Jacket update​

This turned into an ordeal. So, story time... Back in April, Wested contacted me to let me know they were canceling my order. They had some issue with their leather supply and have stopped all orders of this jacket until further notice (They estimated 2 months delay, maybe more). I looked at buying the more expensive jacket from Magnoli instead, but they stated it would be a 2-4 month turnaround. And I was getting nervous it wouldn't arrive in time for Dragon Con. So in the end, I decided to buy a Wested jacket I found on eBay that was close to my size and I would just have it tailored. The tailoring ended up costing almost as much as the jacket, but the jacket is perfect now.

This is the jacket pre-tailoring. Also, I looked like **** because I had COVID.
PXL_20250422_180840652.jpg


Lenses Experiment​

The Helmet 3d files I purchased came models for the lenses. And I had an idea which I thought was really clever. I decided to have lenses printed by PCBWay in their clear resin. I've seen this done a few times on youtube for various clear parts and it looked really nice. And when they first arrived, they looked amazing. But, upon further inspection, it was clear ;) they were not going to work. The best way I can describe it is that they are perfectly clear, but not optically clear. And when you look though them (shown below) it's like wearing beer goggles. So that unfortunately didn't work.
PXL_20250403_231702624.jpg

PXL_20250404_001723488.jpg

PXL_20250404_002133591.jpg


Misc updates​

I just picked up some leather to start experimenting with for the harness. I'm working on making a pattern for the harness now. My plan is to release this pattern for everyone to use once it's done. This will not be screen accurate. I do not have a sewing machine capable of leather, so I want to experiment with a construction method more similar to wallets or belts where it's punched and hand sewn (Yes, this will be time consuming). This will make it more accessible for new customers (myself included). And you might still be able to use the pattern for a more accurate harness as well.
PXL_20250531_184656714.jpg


And lastly, my Magnoli gloves arrived.
PXL_20250531_194450961.jpg


Coming up...​

Right now I'm focusing on the harness while I'm waiting for more parts. But I'm getting ready to leave for NY for a week and then having all of my wisdom teeth removed. So it may be a hot minute before you hear from me again. Really hoping I can get all this together in time for Dragon Con. Thanks for all the support, it means a lot!
 
Last edited:
I used a sheet of smoked acrylic for my lens, once heated up with a heat gun, I popped one into each eye hole and let them cool, they firm up and match the curve of the helmet really well
 

Attachments

  • rocketeer helmet 01.jpg
    rocketeer helmet 01.jpg
    119 KB · Views: 6
  • rocketeer helmet 02.jpg
    rocketeer helmet 02.jpg
    142.9 KB · Views: 6
  • Rocketeer lens.jpg
    Rocketeer lens.jpg
    314.2 KB · Views: 6
Back
Top