The Map - Star Wars Ahsoka

Good job tracking down the puzzle ball. Looking forward to seeing some of the prototypes of the various processes to achieve a good-looking prop.
 
Got the gold mexaminx ball from AliExpress today. Definitely ready for some plates! Not sure how to get that same chrome finish on new parts though. Mine at least does have a nice mechanical clinking type sound when you move it around.

One annoying thing is when you take the arickers off it takes a thin layer of the gold color off as well. Not a big deal since they’ll be covered back up though.

IMG_1616.jpeg


And after an hour or so and a super sore fingernail…

IMG_1620.jpeg
 
Last edited:
Got the gold mexaminx ball from AliExpress today. Definitely ready for some plates! Not sure how to get that same chrome finish on new parts though. Mine at least does have a nice mechanical clinking type sound when you move it around.

One annoying thing is when you take the arickers off it takes a thin layer of the gold color off as well. Not a big deal since they’ll be covered back up though.

View attachment 1741079

And after an hour or so and a super sore fingernail…

View attachment 1741117
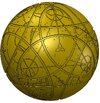
invest in plastic razors, they're GODSENDS (and cheap)
 
Got the gold mexaminx ball from AliExpress today. Definitely ready for some plates! Not sure how to get that same chrome finish on new parts though. Mine at least does have a nice mechanical clinking type sound when you move it around.

One annoying thing is when you take the arickers off it takes a thin layer of the gold color off as well. Not a big deal since they’ll be covered back up though.

View attachment 1741079

And after an hour or so and a super sore fingernail…

View attachment 1741117

As the stickers don't go to the edge, would they not be covered by the plates anyway? Might they also help with the adhesive?

Good to hear they have a click. Hopefully mine will. When eventually delivered.
 
yes, the plates will cover most of the megaminx, also, to me, the megaminx should be pretty weathered behind the plates as there isn't much shine visible in the crevices.
 
Currently working on a fully 3D printable version with all 63 pieces to work just like the megaminx sphere and very well detailed thanks to the many reference images in this thread so thank you for those and if you have more of some of the sides in their palms would be super helpful but man this model has a crap ton of sketches about halfway done so stay tuned!
 

Attachments

  • Starmap-Halfway.JPG
    Starmap-Halfway.JPG
    153 KB · Views: 104
Currently working on a fully 3D printable version with all 63 pieces to work just like the megaminx sphere and very well detailed thanks to the many reference images in this thread so thank you for those and if you have more of some of the sides in their palms would be super helpful but man this model has a crap ton of sketches about halfway done so stay tuned!
good work so far and good luck with the rest of the model, I know from 2 weeks of work that it is not easy! you mean 62 pieces though, right?
cheers
 
good work so far and good luck with the rest of the model, I know from 2 weeks of work that it is not easy! you mean 62 pieces though, right?
cheers
63 includes the central core piece the 12 sides would be mounted to. Might end up being more in order to make it 3D printer friendly as a perfect sphere is hard to printmaybe two halves of the sphere not sure yet but will share progress as it gets closer to it.¯\_(ツ)_/¯
 
I know its been a while since I last updated but I have finished my fully functioning puzzle sphere as well as a magnetic levitation version and they can be found here at their respective links... Thank you everyone for the support and input from this forum thread to get the best pictures to make the most detailed model we have for the Ahsoka series Starmap! have a safe and happy Holidays/ New Year everyone!

 
Is anyone still working on the plates for the puzzle balls?
yes, Wonderknight is offering resin printed tiles from my accurate 3D model for sale on her website, see the project run here:

(she is releasing the full ball version super soon, and is also working on painted tiles and full balls.)
 
Wonder Knight , would you consider sharing with us your weathering technique? I'll understand if you want to keep that proprietary, but it's so good!

Thank you!

Hi Astyanax,

Thank you so much :D

The base of my map is varnished brass chrome (which helps a lot with the weathering stages).
For the chrome I work with Alclad (painted on a Tamiya gloss black paint) which I varnish with Liquitex high gloss, but I have just tested the Molotow chrome in pen which is really great especially if you don't have an airbrush, it also seems to react well with the liquitex high gloss varnish. And for the brass color, I use alcohol tints in the Liquitex (after one or two coats without tinting to protect the chrome).

For the weathering:
I use browns, black airbrush paints and a little bit of green (like military green) well diluted in thinner.

First I give a very light airbrush to get a slightly rusty effect.

Then I do several washes with the three colors lightly mixed but not completely to have variations, then I clean with a cloth soaked in thinner areas that I want to make more shiny.

Finally I redo certain spots a little cleaner as in the original props with the same paint still well diluted.

The advantage with the varnish underneath is that it allows us to rework its effect by erasing it with the thinner if it doesn't suit us.

I hope this will help you :)


IMG_0475.JPEG
 

Your message may be considered spam for the following reasons:

If you wish to reply despite these issues, check the box below before replying.
Be aware that malicious compliance may result in more severe penalties.
Back
Top