RuBBaFishE
New Member
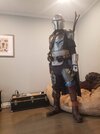
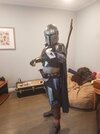
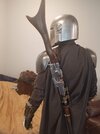
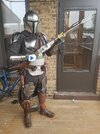
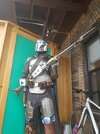
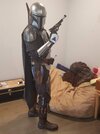
Hey all. It's my first time posting here, but though it worth sharing my newly completed Din Djarin Mandalorian beskar armor build. This was my COVID quarantine project and it turned out great.
Goin into this, I had little experience with sewing, electronics, and designing mechanical components. This has been an amazing project for learning those skills as well as airbrushing, which I immediately fell in love with.
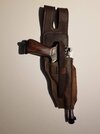
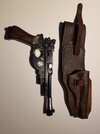
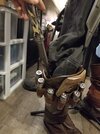
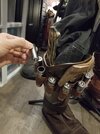
I do have plenty of experience with leather-working so making the bandolier and blaster holster were a real treat.
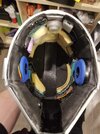
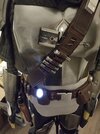
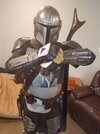
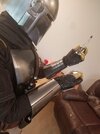
The helmet contains 3 electronic systems. For the voice amp, I used a tiny mic with high compression that outputs from a speaker mounted to back keyholes. Because of the 'poor quality' of the mic, the sound output is perfectly 'crunchy' as it sounds on the show. For hearing through the helmet, I mounted 2 small mics hidden inside the visor lens. These output to bone transducers, so the incoming stereo sound is perfectly clear. Still a bit hard to hear anything that is not in my field of view. Lastly there is also a fan cooling system that pulls in from the bottom-sides, under the ears, and is vented downwards along the inside visor to prevent fogging and keep my face cool. I designed some vents with fittings for the fans that match the inside profile of the helmet so they don't take up much space.
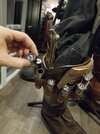
The Whistling birds are motorized and pop out/light up with a button on the little pad at the front of the bracer. I had to design a corkscrew and rail system with a servo motor small enough to fit into the top canister. That was a fun challenge. Also thanks to all the RP-ers out there and the good folks over at the 501st for their tips on making the mando-puter in the right bracer as well as some ideas for the helmet audio and fan systems.
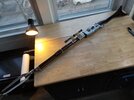
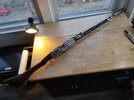
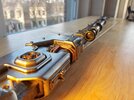
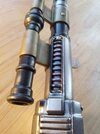
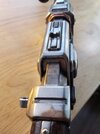
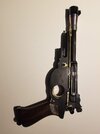
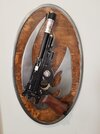
I would very much like to thank GreatApe studios for their amazing armor models as well as Fieldmarshal for their incredible aluminum blaster replica. All other parts were sewn/printed/designed/stitched, and otherwise made by me.
Hope you all like it.
Goin into this, I had little experience with sewing, electronics, and designing mechanical components. This has been an amazing project for learning those skills as well as airbrushing, which I immediately fell in love with.
I do have plenty of experience with leather-working so making the bandolier and blaster holster were a real treat.
The helmet contains 3 electronic systems. For the voice amp, I used a tiny mic with high compression that outputs from a speaker mounted to back keyholes. Because of the 'poor quality' of the mic, the sound output is perfectly 'crunchy' as it sounds on the show. For hearing through the helmet, I mounted 2 small mics hidden inside the visor lens. These output to bone transducers, so the incoming stereo sound is perfectly clear. Still a bit hard to hear anything that is not in my field of view. Lastly there is also a fan cooling system that pulls in from the bottom-sides, under the ears, and is vented downwards along the inside visor to prevent fogging and keep my face cool. I designed some vents with fittings for the fans that match the inside profile of the helmet so they don't take up much space.
The Whistling birds are motorized and pop out/light up with a button on the little pad at the front of the bracer. I had to design a corkscrew and rail system with a servo motor small enough to fit into the top canister. That was a fun challenge. Also thanks to all the RP-ers out there and the good folks over at the 501st for their tips on making the mando-puter in the right bracer as well as some ideas for the helmet audio and fan systems.
I would very much like to thank GreatApe studios for their amazing armor models as well as Fieldmarshal for their incredible aluminum blaster replica. All other parts were sewn/printed/designed/stitched, and otherwise made by me.
Hope you all like it.
Attachments
-
 20200222_163457.jpg1.2 MB · Views: 236
 -
 20200222_163537.jpg1.2 MB · Views: 250
 -
 20200222_163740.jpg860 KB · Views: 243
 -
 20200222_163801.jpg479.7 KB · Views: 232
 -
 20200222_163845.jpg445.1 KB · Views: 220
 -
 20200222_164043.jpg450.5 KB · Views: 207
 -
 20200222_164120.jpg443.2 KB · Views: 206
 -
 20200222_164130.jpg431.4 KB · Views: 228
 -
20200527_204214.mp4963.3 KB
-
20201019_150046.mp42.4 MB
-
20201117_230558.mp43 MB
-
 20201216_141233.jpg628.6 KB · Views: 251
 -
 20201219_162718.jpg568.8 KB · Views: 259
 -
 20210508_213504.jpg381.3 KB · Views: 262
 -
 20210508_213602.jpg449 KB · Views: 222
 -
 20210508_213620.jpg368.5 KB · Views: 217
 -
 20210608_170537.jpg568.9 KB · Views: 216
 -
 20210608_170545.jpg537 KB · Views: 232
 -
 20210612_205137.jpg839.5 KB · Views: 235
 -
 20210612_205345.jpg478.9 KB · Views: 254
 -
 20210612_205449.jpg558.4 KB · Views: 233
 -
 20210612_205459.jpg681.4 KB · Views: 228
 -
 20210612_205503.jpg517.8 KB · Views: 278
 -
 20210620_160016.jpg383.1 KB · Views: 274
 -
 20210620_160232.jpg446.7 KB · Views: 281
 -
 20210620_160241.jpg422.3 KB · Views: 256
 -
 20210620_160334.jpg408.9 KB · Views: 258
 -
 20210620_160425.jpg400 KB · Views: 255
 -
 20210620_160618.jpg1.1 MB · Views: 268
 -
 20210620_160709.jpg1.5 MB · Views: 294
 -
 20210620_162721.jpg238.1 KB · Views: 259