Looks great! Glad that you're able to start to seeing positive results.
You are using an out of date browser. It may not display this or other websites correctly.
You should upgrade or use an alternative browser.
You should upgrade or use an alternative browser.
Star Trek TOS Inspired Home Office Remodel
- Thread starter Starbase101
- Start date
Starbase101
Sr Member
Thanks! I thought there might be yet another delay today. The desk's hutch assembly is quite bad. They sent simply two offset brackets (black) and some screws. Well, this is a corner desk, and guess where I placed it....yep, in a corner. There is absolutely no way of attaching the brackets with it against the wall (they go on the outside) and for sure the hutch is not getting attached before moving the desk into the corner. Without the slider feet it does not move easily and the main desk by itself is quite heavy, so the desk + return + pedestal + hutch = no way without a crane. Besides, black brackets on the outside would look ugly. My solution - drill alignment holes in the top of the desk/return and bottom of the hutch, and use solid steel dowels to keep it in position. After several hours I finally came home with steel dowels today. (Don't you just love when a store's website specifies a quantity in stock at a particular store so you drive across town to get them and hear "we don't carry that item, the website is wrong". Some inventory managers just need a good slapping.) After several attempts at various hardware stores in the state's capital city I finally found the metal dowels needed for my scheme. We are so not looking forward to lifting the hutch up onto the desk - it is heavy.Looks great! Glad that you're able to start to seeing positive results.
Starbase101
Sr Member
The hutch is on, which ended up being very easy to do (work smarter, not harder). I decided to not use any dowels. It would be too complicated getting them perfectly aligned, and the hutch is so heavy it's not going anywhere anyway. The last big piece to place before attaching the various underside drawers and shelves is this roll-out printer shelf.

That's where the laser printer is going instead of occupying desktop space like before. The yellow tackboard on the right was removed because I intend to shorten it and re-skin with mustard/gold "Galaxy" replica fabric from trekkerguy when available. It will also get a burgundy frame inset around it for matching the TOS wall panels.
Today I will be attaching the next silver strip and the remaining desk pieces. I also need to straighten the doors and drawer faces, as they were installed crooked at the factory and I want them to be properly aligned.
Last edited:
Starbase101
Sr Member
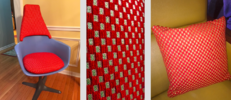
It's the yellow fabric I'll be interested in rather than the red:Hope to have a fresh run of the "Galaxy" checkerboard fabric available soon. Perfect for a bulletin board, and many other uses (not to mention Sickbay!)
Yes, I hope to have that available sometime later in 2021, too. These are small runs with a U.S. mill, which frankly has been busy with other projects and running at full-steam (despite Covid.)
Starbase101
Sr Member
Well dang it, the under-desk printer shelf (which is intended for placement under a desk) is too tall and doesn't fit. I will need to trim it down.


Starbase101
Sr Member
Wrapped in plastic to keep as much sawdust off as possible, especially the roller bearings, and taped to deter laminate chipping:

Just as clean as a phaser cut:

A whole 1/4" had to be removed (that's well outside of manufacturing error tolerance) but it now fits properly under the desk:

But another Maverick goof - no grommet hole for electrical....and this is specifically a printer shelf. Since my printer isn't battery-powered, I'm going to have to make another hack. By the way, that unsightly lock on the top drawer will be vanishing - I've got a replacement drawer face coming with the second furniture delivery and will swap it out so all the drawers are smooth except for the handles. Unfortunately it was not an option having no handle holes (100% smooth faces like the hutch doors). I would have preferred to install push-release spring latches behind the drawers instead of handles, but since all their drawer faces are pre-drilled for handles I opted for the most "futuristic" looking handles in their catalog.
I really liked the idea of having the printer below the desk instead of consuming desktop real estate but it's going to interfere with an oversized keyboard tray I ordered (so both the keyboard and mouse pad are off the desk). The printer shelf will need to be placed on desk's left side instead where there's a little more room.

So....I guess it's time to apply another silver stripe while I consider alternate drawer and shelf arrangements for the desk.
Just as clean as a phaser cut:
A whole 1/4" had to be removed (that's well outside of manufacturing error tolerance) but it now fits properly under the desk:
But another Maverick goof - no grommet hole for electrical....and this is specifically a printer shelf. Since my printer isn't battery-powered, I'm going to have to make another hack. By the way, that unsightly lock on the top drawer will be vanishing - I've got a replacement drawer face coming with the second furniture delivery and will swap it out so all the drawers are smooth except for the handles. Unfortunately it was not an option having no handle holes (100% smooth faces like the hutch doors). I would have preferred to install push-release spring latches behind the drawers instead of handles, but since all their drawer faces are pre-drilled for handles I opted for the most "futuristic" looking handles in their catalog.
I really liked the idea of having the printer below the desk instead of consuming desktop real estate but it's going to interfere with an oversized keyboard tray I ordered (so both the keyboard and mouse pad are off the desk). The printer shelf will need to be placed on desk's left side instead where there's a little more room.
So....I guess it's time to apply another silver stripe while I consider alternate drawer and shelf arrangements for the desk.
Last edited:
Starbase101
Sr Member
I got the molding ordered for the tackboard frame - the best match I could find is SeaTeak Bulkhead Cap Molding (aka teak cap molding) and I'll simply reduce its height. The last material for me to source is still the red alert panel frame. Does anybody have ideas/suggestions on where to find this frame material in 1" width? It's not flat, there is a slight bevel to it.

Last edited:
Don't know where you can find it - but given your comfortable with power tools, is it something you can make?
On a different note, I've been doing a home office revamp and was building a custom printer stand this weekend. While it will be usable, let's just say my tolerances are about as good as what you've been experiencing <joke>.
Keep the updates coming, very much enjoying seeing this come together.
On a different note, I've been doing a home office revamp and was building a custom printer stand this weekend. While it will be usable, let's just say my tolerances are about as good as what you've been experiencing <joke>.
Keep the updates coming, very much enjoying seeing this come together.
Starbase101
Sr Member
I know, right? You'd think it would be that easy. Picture frames are all too ornamental (nothing plain like that) and much too thick. I have found something else that might work, though...That molding you're looking for looks like picture frame stock installed fat side in rather than out. Try your local custom frame store.
Starbase101
Sr Member
Alright, some significant progress made today. First on the agenda was installing the oversized keyboard tray. You'd think Maverick would have had this all worked out, since I bought the desk and keyboard tray at the same time - obviously I intended to use the larger tray in place of the standard one. But my cardboard template for the bracket locations revealed a big problem:

In the tray's optimal location one of the desk's metal brackets for connecting the right side interferes with one of the tray's brackets. Dang it. Since there was no way I was drilling two holes through 1/8" hardened steel the only workable solution was push the tray back:

The bad news about this is now the tray doesn't extend as far as it's meant to:

For what this desk cost, the expectations were a lot higher than the shoddy manufacturing I'm seeing. Luckily my ergo-keyboard is large enough that I can just pull it back while working, but really - at $3,500 I shouldn't have to be doing that.

After another seemingly daily trip to a home-improvement store getting replacement drawer sliders for another customization, I finally got all the pieces assembled from the initial furniture delivery and after 3 months of working from the kitchen table I get to start working from my new desk tomorrow:

And now a brief up-close "tour" beginning with how most of today was spent, left-side customizations:

Up top is an office drawer so I don't need to keep all my pens, stapler, USB drives, etc on the desk anymore. Under that is a roll-out paper shelf for utilizing the space between the top drawer and laser printer, which was a good use of the standard keyboard tray that came with the desk (but needed its width trimmed 1/8" to fit the opening). At the bottom is a roll-out printer shelf, handy for accessing a flatbed scanner on top of the machine. And yes, all the work was done with my typical attention to detail:

Here's why I wanted an oversized keyboard tray (the TRON mousepad probably isn't Starfleet regulation):

Lastly, hidden under the desk beside the right-side drawers is a PC shelf:

Although my job remote-work system uses an HP notebook and I use a MacBook Pro for anything "serious", an ancient 32-bit Windoze PC is needed for interfacing with my Alps printer, so this shelf provides a nice out-of-the-way place for that computer.
The next few days will be mostly just "moving in" work (populating the cabinets and drawers) and finishing the gray transformation of the long shelf going above the closet doors. I'm also ready to start working out the desk intercom location and assigning functions to the 8 rocker switches. Each switch will be functional, such as activating the monitors (I mean, viewscreens...), the old PC (so I don't need to reach under the desk), a KVM switch (for the two PC's to share the same keyboard, mouse, and monitors), hutch lighting, colored accent lighting in the room, etc.
In the tray's optimal location one of the desk's metal brackets for connecting the right side interferes with one of the tray's brackets. Dang it. Since there was no way I was drilling two holes through 1/8" hardened steel the only workable solution was push the tray back:
The bad news about this is now the tray doesn't extend as far as it's meant to:
For what this desk cost, the expectations were a lot higher than the shoddy manufacturing I'm seeing. Luckily my ergo-keyboard is large enough that I can just pull it back while working, but really - at $3,500 I shouldn't have to be doing that.
After another seemingly daily trip to a home-improvement store getting replacement drawer sliders for another customization, I finally got all the pieces assembled from the initial furniture delivery and after 3 months of working from the kitchen table I get to start working from my new desk tomorrow:
And now a brief up-close "tour" beginning with how most of today was spent, left-side customizations:
Up top is an office drawer so I don't need to keep all my pens, stapler, USB drives, etc on the desk anymore. Under that is a roll-out paper shelf for utilizing the space between the top drawer and laser printer, which was a good use of the standard keyboard tray that came with the desk (but needed its width trimmed 1/8" to fit the opening). At the bottom is a roll-out printer shelf, handy for accessing a flatbed scanner on top of the machine. And yes, all the work was done with my typical attention to detail:
Here's why I wanted an oversized keyboard tray (the TRON mousepad probably isn't Starfleet regulation):
Lastly, hidden under the desk beside the right-side drawers is a PC shelf:
Although my job remote-work system uses an HP notebook and I use a MacBook Pro for anything "serious", an ancient 32-bit Windoze PC is needed for interfacing with my Alps printer, so this shelf provides a nice out-of-the-way place for that computer.
The next few days will be mostly just "moving in" work (populating the cabinets and drawers) and finishing the gray transformation of the long shelf going above the closet doors. I'm also ready to start working out the desk intercom location and assigning functions to the 8 rocker switches. Each switch will be functional, such as activating the monitors (I mean, viewscreens...), the old PC (so I don't need to reach under the desk), a KVM switch (for the two PC's to share the same keyboard, mouse, and monitors), hutch lighting, colored accent lighting in the room, etc.
Last edited:
Starbase101
Sr Member
Oh, and this arrived today (the first of 3 different glass types to be evaluated):

(That's Engineering red, not Security...)
(That's Engineering red, not Security...)
Last edited:
Starbase101
Sr Member
Evaluating colors for the rocker switches. Some colors are simple with a consistent reference from multiple sources, other colors such as the light blue are more difficult to match since recommended paints have been discontinued and are unavailable. Multiple colors were brought home and several quickly discarded as too incorrect (luckily they can be returned with their receipts). There is one more blue color I want to check, and some other colors I recently learned of from Trek Props & Stuff, then I will begin narrowing the paints down to 8 colors.

Last edited:
Starbase101
Sr Member
I haven't done anything yet to neaten-up all the desk cables - the first priority was to just get my work computer moved, so this was never meant to be permanent:

And that's not even all the cables yet - there are still cables to be added for the 32-bit PC, KVM switch, Alps printer, hutch lighting, magnifier hobby lamp, intercom and rocker switches. The plan for cable management is pipes and concealer conduit. Two boxes of conduit arrived today and the gray is close enough that it will be indistinguishable from the desk color when mounted underneath:

In addition to printed labels on each of the pipes and conduits for identification (because that's how I am), as a nod to TOS corridor pipes I was thinking of adding stripes with colored tape:

A cover plate still isn't added to the desk's wall outlet hole because I'm now thinking it will look better covered with a greeblie reminiscent of the corridor plant-ons:

I'll model a replica in my CAD software and 3D-print the parts later when the printer is back online. Power conduits will feed into it such that it appears "functional", and I'll have the cover removable by attaching it with hidden screw keyholes on the backside. Surge protector strips and various power "bricks" will also get disguised in a similar fashion. Now I just need to track down some good reference pics for making the cover models.
And that's not even all the cables yet - there are still cables to be added for the 32-bit PC, KVM switch, Alps printer, hutch lighting, magnifier hobby lamp, intercom and rocker switches. The plan for cable management is pipes and concealer conduit. Two boxes of conduit arrived today and the gray is close enough that it will be indistinguishable from the desk color when mounted underneath:
In addition to printed labels on each of the pipes and conduits for identification (because that's how I am), as a nod to TOS corridor pipes I was thinking of adding stripes with colored tape:
A cover plate still isn't added to the desk's wall outlet hole because I'm now thinking it will look better covered with a greeblie reminiscent of the corridor plant-ons:
I'll model a replica in my CAD software and 3D-print the parts later when the printer is back online. Power conduits will feed into it such that it appears "functional", and I'll have the cover removable by attaching it with hidden screw keyholes on the backside. Surge protector strips and various power "bricks" will also get disguised in a similar fashion. Now I just need to track down some good reference pics for making the cover models.
Last edited:
Starbase101
Sr Member
That's exactly what I did - update forthcoming.About the keyboard bracket not fitting couldn’t you move the desk bracket a bit out of the way?
Starbase101
Sr Member
Being a programmer, it really bothered me not having practical access to the full keyboard, so I examined the offending metal bracket to assess relocating it. As it turns out, the metal bolt sockets have hex heads and threaded sides rather than being hammered in - so I was able to remove them and drill new holes:


I also shifted the tray to the right so the keyboard is more in-line with the monitors. Now the mouse pad is partially obstructed by the return but I can live with that since I use the keyboard more than the mouse, and its new location enables the left-side drawer to be opened while the keyboard tray is extended.

Since it's still too cold outside for painting the rocker switches and I don't want the enamel smell or overspray in the house, I'm starting now on the red alert panel. With one piece of glass already here (probably the one I'm going to use) and two others in shipment, I've started planning this more seriously rather than just a would-be neat-to-have decoration. Battery-powered lights don't seem bright enough for this and since I've got an electrician coming to the house next week anyway to wire new patio lights I've asked him to hook up a trio of low-profile LED ceiling lights. These have a 5-position brightness setting so I'll be able to choose a level which looks good. (Product information to be shared later after I've verified they will work instead of being returned for something different.) I've acquired the lumber needed to build a light box, and more important the material for scratch-building a frame. It's called "beveled cedar siding" and I'll be using 1" from the thin end:

I've also sourced molding for the tackboard frame. It's called "SeaTeak Cap Molding" and its 7/8" width is close enough to the 1" target, especially with the smaller size of my tackboard. It's scheduled to arrive today and I'll simply cut off its bottom half and then screw it on from the backside.

Next I'm cutting holes in drywall for the red alert panel and wall intercom!
I also shifted the tray to the right so the keyboard is more in-line with the monitors. Now the mouse pad is partially obstructed by the return but I can live with that since I use the keyboard more than the mouse, and its new location enables the left-side drawer to be opened while the keyboard tray is extended.
Since it's still too cold outside for painting the rocker switches and I don't want the enamel smell or overspray in the house, I'm starting now on the red alert panel. With one piece of glass already here (probably the one I'm going to use) and two others in shipment, I've started planning this more seriously rather than just a would-be neat-to-have decoration. Battery-powered lights don't seem bright enough for this and since I've got an electrician coming to the house next week anyway to wire new patio lights I've asked him to hook up a trio of low-profile LED ceiling lights. These have a 5-position brightness setting so I'll be able to choose a level which looks good. (Product information to be shared later after I've verified they will work instead of being returned for something different.) I've acquired the lumber needed to build a light box, and more important the material for scratch-building a frame. It's called "beveled cedar siding" and I'll be using 1" from the thin end:
I've also sourced molding for the tackboard frame. It's called "SeaTeak Cap Molding" and its 7/8" width is close enough to the 1" target, especially with the smaller size of my tackboard. It's scheduled to arrive today and I'll simply cut off its bottom half and then screw it on from the backside.
Next I'm cutting holes in drywall for the red alert panel and wall intercom!
Last edited:
Similar threads
- Replies
- 4
- Views
- 2,520
- Replies
- 3
- Views
- 1,859
- Replies
- 47
- Views
- 21,261
- Replies
- 3
- Views
- 1,607