[Scratch build] Star Trek Nemesis: phaser rifle

Dreamscape

Active Member
So hot on the back of my success with a cardboard Optimus Prime helmet, I decided to have a go a prop I've been longing after (but can't afford a kit for) - the phaser rifle.

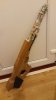
I did my usual and forget to take any progress photos until I'd got pretty far in. There's a lot still to do, including filling in gaps to hide the unsightly cardboard ridges. My plan is to eventually use paper mache to smooth out some bits and hide the seams. So here's where I've got to so far:

20180903_202632.jpg

20180903_202709.jpg

20180903_202720.jpg

It's pretty heavy as it's built from several 'template' layers of cardboard and then more cardboard bolted on to hide the edges. So it's basically solid cardboard all the way through.

And while it's not 100% accurate, I'm pretty happy with it.
 
So after a failed attempt at creating a curved barrel:

20180904_221408.jpg

I decided to go back to what I know works. I built up several template flat pieces that progressively got smaller and then wrapped it in a thin single ply sheet of card.

20180904_221449.jpg

I can't wait to get all the cardboard finished so I can start the paper mache!
 
So tonight I just added the thin card to the bottom of the barrel and a second further piece over the top.

20180905_202342.jpg

I also blocked up the stock which makes the shape much clearer.

20180905_202354.jpg
 
So I wasn't overly happy with the barrel, so here is my third attempt now covered with the first layer of paper mache. The end of the barrel is a bit too narrow - but I'm happy enough that I'm not doing this again.

20180917_004028.jpg

As you can see I've also reinforced some of the cardboard with a second black 2-ply. This had a smaller corrugation so looks smoother and less prone to bending.

I'm still deciding whether I should buy some black foam to wrap around the barrel and grips.
 

Attachments

  • 20180917_004028.jpg
    20180917_004028.jpg
    652.4 KB · Views: 335
So I decided to try the foam route to create the barrel.

I've realised that the end of the barrel is a bit chunky - but at this stage I'm not going back for a fourth time to redo it. But I'm pretty happy with the results. Definitely not accurate, but going to look cool in my office once finished.

20180917_213717.jpg
20180917_213601.jpg
 
Looking good. The bottom line is that if you are happy with it then it is good enough. It also doesn't hurt that 90% of the people who see when it is done will think it is perfect.
 
How sturdy will this be when finished?

At it's thickest point it's 14 layers of 2-3mm single wall corrugated cardboard sandwiched together, all glued together by heat gun. I've also varied the angle of the card so each layer has the grain running a different direction.

Think this:

corrugated-board-grades.jpg

Obviously it's still card, but I can give it a good punch with the palm of my hand and none of it moves. So pretty sturdy, even giving the barrel a good slap shows no sign of it coming away from the main gun. The paper mache will help.
 
So after some further updates to this, using a number of materials, I realised that because I was a little bit rushed in the base - it was making it difficult to get a good smooth surface.

But it's given me some practice with a number of materials, and have decided to start this from scratch again.

First step was printing out the template for the main part of the rifle. Everything else will hang off of this.

20200412_164418.jpg
 
I made some adjustments to the template - and have done 3 layers (13mm). I need to build up this base template to 27mm.

20200413_134944.jpg


I need to wait for a few days as I've run out of cardboard, and I've got 20 sheets of 125gsm A2 cardboard being delivered.
 
So I've been filling in some of the corrugation in the cardboard with heat gun glue, and then building up with wood filler (and then sanding down).

20200428_201458.jpg


So far the results are pretty good - although there is bound to be imperfections which are difficult to spot with the different materials. Once I've got the whole thing filled and smoothed, a layer of primer should show up where i need to do more work.

20200428_201528.jpg


I ran out of wood filler and hardware stores are still mostly closed in the UK during lockdown. So my next update may depend on when I can source some more!
 

Attachments

  • 20200428_201458.jpg
    20200428_201458.jpg
    928.9 KB · Views: 170
Finally got some wood filler, and started to build up the rear handle. I also cut inserts for the handle grips and temporarily fitted some foam to see what it looks like.

20200510_181728.jpg
 
Small update.

The handle feels really solid now. This already weighs 350g and there's a fair bit that needs wood filler adding to. So I reckon it will be over 1kg by the end.

20200511_233357.jpg
 
So I've given part of it a coat of plastic filler primer, so highlight the bits I need to focus on. I was surprised that there wasn't as many as I thought.

20200517_125137[1].jpg


20200517_125214.jpg


I'll need to carve into the wood filler the gaps between the panels at the top (as the filler filled them in). I'll probably try and get a square block to rap the sandpaper around to create a V shaped groove.
 

Your message may be considered spam for the following reasons:

If you wish to reply despite these issues, check the box below before replying.
Be aware that malicious compliance may result in more severe penalties.
Back
Top