Sci-Fi modeling on Elegoo Mars -- Community support/tips

Right?! So satisfying when you Fi ally get to pull the print off and examine it!

It's like magic almost when you do a complete start to finish in just a few hours

You start with some liquid in a vat, you get a 3D figure, cure it, prime it, paint it all in the span of one day.

It's almost like it was conjured out of thin air

These 1/72 figures all went from resin in a bottle to fully painted and standing on the shelf within a span of 10 hours.

IMG_4747 (3).JPG
IMG_4749 (3).JPG
 
Just got my Saturn and I’m pretty pleased with it. I read some stuff on Reddit about how the Saturn is completely different to the Mars and more difficult to use etc. I haven’t really found that to be the case.

It’s much quicker to print (I use 4 second exposures compared to 8 on the Mars) and seems pretty user friendly. I have noticed that there are some visible lines on the prints, which I never found on the Mars. It may actually be due to the 3D model itself though.

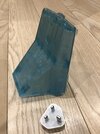
the bigger print area is really helpful, I managed to print the entire tail piece of the razor rest in one piece at 1/48 scale, using up the whole of the print area front to back. Don’t ask me why I used transparent blue resin. image.jpg
 
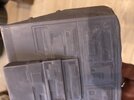
Hmm, here’s an odd one. I just printed the wings of the razorcrest and most of the print is really weird and blurred, and then the last third is really crisp. I think I paused the print to add more resin to the vat at about the point at which it goes from blurry to sharp. Any ideas what went wrong?

In the picture the [edit] left part was the last bit to be printed. B7D13077-C020-4499-B4E9-4256CA299C59.jpeg
 
Last edited:
Hmm, here’s an odd one. I just printed the wings of the razorcrest and most of the print is really weird and blurred, and then the last third is really crisp. I think I paused the print to add more resin to the vat at about the point at which it goes from blurry to sharp. Any ideas what went wrong?

In the picture the [edit] left part was the last bit to be printed. View attachment 1377275
I could imagine that while you opened the printer for refilling, the layer of liquid resin on the part was cured partially by ambient light and destroyed some of the detail. Was (indirect) sunlight falling on the model while you had the printer open?

After one of my first prints with the Mono X I almost destroyed my VAT when a gap in the clouds came very unexpected... And even through closed windows, this resin cures FAST when hit by the sun!
Ah that must be it - although we haven't had any direct sunlight here for days! I did have the lights on inside, and I suppose there must be some degree of UV emitted from them? Although I only had the lid off for maybe ten seconds total.
 
Hmm, here’s an odd one. I just printed the wings of the razorcrest and most of the print is really weird and blurred, and then the last third is really crisp. I think I paused the print to add more resin to the vat at about the point at which it goes from blurry to sharp. Any ideas what went wrong?

In the picture the [edit] left part was the last bit to be printed. View attachment 1377275
Was your build plate tightened enough? Is it hollow or solid?
 
Was your build plate tightened enough? Is it hollow or solid?
I didn’t adjust the build plate when I topped up the resin so I assume it was ok - I see what you mean as I can imagine a wobbly build plate would give you that sort of blurry effect.

the pieces were hollowed out using chitubox, with 4mm walls min. They’re pretty solid.

I did the supports in chitubox, I think i used the “heavy” setting.
You should manually add the supports, to be honest. Chitubox does an OK job but doesn't always hit every 'island'. Plus, it can overdue alot of the supports.

A shaky build plate can cause minor issues like that. A minimum exposure to your room light wouldn't affect the resin.
 
Did any of the supports disbond with the object? I'd have to see a pic of it before it was removed from the bed, with all the supports intact before I can make a better assessment.

TazMan2000
 
Last edited:
I agree Chitubox is not very good at supports. I changed to using PrusaSlicer for orienting and supports. It does a MUCH better job. I then export the build plate with supports as an STL file and use Chitubox to slice the model and save the CTB file. I have had perfect prints since.
 
Did any of the supports disbond with the object? I'd have to see a pic of it before it was removed from the bed, with all the supports intact before I can make a better assessment.

TazMan2000
Yes they came off at both ends, but it was relatively minor.

I’ll give the screw bit a bit of lube too. Thanks for all the tips guys!

I know chitubox gets a lot of criticism for the auto supports but I’ve never had huge problems. I think it does go overboard a lot of the time, which I’m fairly happy with. Given the annoyance of cleaning everything up, replacing FEPs etc if there’s a failed print I’d rather be safe than sorry. I’ve tried using Prusa’s auto settings and they have always led to failed prints. I can see why, if I was printing figures which need support on areas of detail it would make sense to add supports manually t minimise them, but I am normally printing things which have a base or an internal surface that can have as many supports as chitubox wants without ruining the detail on the outside.


I just printed the front hull bit and it came out a lot better, although being able to directly compare the previous one I printed on the Mars v the Saturn there are definitely more noticeable layer lines on the Saturn. I’ve been printing at 0.05 layer height, as I read that it really doesn’t improve the detail to print smaller than that, but I think I’ll give it a go at 0.03 for my next print
 
This thread is more than 3 years old.

Your message may be considered spam for the following reasons:

  1. This thread hasn't been active in some time. A new post in this thread might not contribute constructively to this discussion after so long.
If you wish to reply despite these issues, check the box below before replying.
Be aware that malicious compliance may result in more severe penalties.
Back
Top