You are using an out of date browser. It may not display this or other websites correctly.
You should upgrade or use an alternative browser.
You should upgrade or use an alternative browser.
Sci-Fi modeling on Elegoo Mars -- Community support/tips
- Thread starter Hunk a Junk
- Start date

Analyzer
Master Member
How can I fill in the interior of a model?
For example, I have a model that I an scaling down, but scaling down makes the interior wall thickness way to thin to support itself, plus a part at that size would be way more prone to breaking even if I made the wall thicker and having it solid would not use up that much resin
In this case it is a figure.
I have tried the "Make Solid" option in Meshmixer but it leaves the top half of the head, the calves and the feet hollow still (on top of deforming the surface and losing some detail
Is this better done in something like Blender or some slicing software? Chitbox only seems to have a "Hollow" option
I use FreeCad to make solid shapes from shells. Here are the steps:
I have not noticed any loss of detail. FreeCad has a bit of a learning curve, but there are a lot of videos on YouTube.
I have not noticed any loss of detail. FreeCad has a bit of a learning curve, but there are a lot of videos on YouTube.
Hunk a Junk
Sr Member
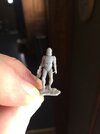
It is a ridiculous confession to make, but I got my Mars for my birthday back in June and I only now had the free time to actually try it out (keeping my marriage from falling apart during COVID was a higher priority). I used standard gray resin and after leveling the bed I printed a pair of rooks. The first attempt failed and I ended up with two thin circles stuck to the FEP. The second attempt worked and I got two nice clean rooks. Cleaned with IPA followed by Mean Green and a toothbrush. Cured using a UV light and solar powered turntable. All good. Next printed a free Baby Yoda/Grogu from Thingaverse and again had success. I'm very impressed with the detail. Next downloaded a clonetrooper and scaled it down to roughly 1/72 to test how a figure would print at that scale. I printed two, but one debonded from build plate. The one that survived turned out nice. Since then, I've made three attempts to print a small Planet of the Apes Icarus model and all three attempts failed. Everything is sticking to the FEP. I'm going to try sanding the build plate and I'm going to pick up some PTFE lube for the FEP.
While I figure that out, I started some tutorials on Fusion 360 to build some simple parts. My goal is to print some replacement Bussard collector/engine grill things for the 1/350 refit. It can't be too hard, can it???
While I figure that out, I started some tutorials on Fusion 360 to build some simple parts. My goal is to print some replacement Bussard collector/engine grill things for the 1/350 refit. It can't be too hard, can it???
Attachments
Hunk a Junk
Sr Member
I'm a week into experimenting now and I gotta say I'm pretty frustrated. Over half my print attempts fail -- most because they stick to the FEP. I've replaced the FEP, used some PTFE lube on it, and sanded the build plate down to metal. I've re-leveled the build plate multiple times. I still get failed prints. I spent some time re-reading the thread and I know some of you had the same experiences. Any troubleshooting advice would be welcome. Are there exposure and layer settings I should try that could make a difference?
One thing that can absolutely cause failed prints is if your printer is not level. The Elegoo Mars has adjustable feet that can be extended or retracted to adjust the level. Place a level on top of the printer and adjust front-to-back and side-to-side until the bubble is centered in each direction. Also, make certain that you shake your resin to mix it thoroughly before pouring it into the vat. Or, if it has been sitting in the vat for an extended period of time, give it a good stir with a popsicle stick or something similar that will not gouge or scratch the FEP film.
If you have a failed print and you have cured resin material stuck to the FEP, a very simple way to remove it without damaging your film is to empty out the unused resin from the vat (through a strainer back into the bottle), then pour in some 91-99% isopropyl alcohol into the vat deep enough to cover the entire FEP film and let it set for several minutes. Then, place a gloved finger underneath the FEP film and gently apply pressure to the underside of the cured resin while carefully scraping against the edge of the part from above with the plastic spatula. This will allow the failed print to easily break free from the FEP without damaging it in any way. I have been using the same FEP film since I bought the printer over a year ago, and it still looks and performs almost like new.
E
Last edited:
My understanding is that increasing the number of base layers and the exposure of those layers is the primary way to ensure the print sticks to the plate instead of the FEP. I’ve used the standard chitubox settings to good effect though. I have had failed prints but probably not more than 10%. Mainly my failed prints have been likely due to poor orientation of the model on the plate. I’m sure you’re aware, but the higher the surface area of any individual layer that is being printed the higher chance of the print sticking to the FEP instead of the plate, eg if you had a hollow cube to print you would print it at 45 degrees so that there isn’t a whole flat square of resin being cured at any point.I'm a week into experimenting now and I gotta say I'm pretty frustrated. Over half my print attempts fail -- most because they stick to the FEP. I've replaced the FEP, used some PTFE lube on it, and sanded the build plate down to metal. I've re-leveled the build plate multiple times. I still get failed prints. I spent some time re-reading the thread and I know some of you had the same experiences. Any troubleshooting advice would be welcome. Are there exposure and layer settings I should try that could make a difference?
I haven’t actually used these specific settings myself, but you could try these Elegoo Resin Settings for Best 3D Printing Results + Table
I don’t know how much difference it makes but it could be that your FEP is too tight (or too slack). I’ve heard some people say it needs to have some slack in it when you install a new one. To be honest I’ve had good results from making it really tight. I know that’s bot
Have you tried a new bottle/color of resin to make sure you don’t just have a bad batch?
TazMan2000
Master Member
I'm a week into experimenting now and I gotta say I'm pretty frustrated. Over half my print attempts fail -- most because they stick to the FEP. I've replaced the FEP, used some PTFE lube on it, and sanded the build plate down to metal. I've re-leveled the build plate multiple times. I still get failed prints. I spent some time re-reading the thread and I know some of you had the same experiences. Any troubleshooting advice would be welcome. Are there exposure and layer settings I should try that could make a difference?
I'm not sure where you are printing, but I found temperature plays a big part in having the resin bond. If it is cool in the room, try moving the printer to a warmer location and allow a day for the resin to acclimatize to the room and then try a print. Like me, most of us put this in the basement or a cooler room nobody goes to because of the odour of the resin.
If you're using Chitubox, ensure you program your resin into the settings.
TazMan2000
Analyzer
Master Member
I'm a week into experimenting now and I gotta say I'm pretty frustrated. Over half my print attempts fail -- most because they stick to the FEP. I've replaced the FEP, used some PTFE lube on it, and sanded the build plate down to metal. I've re-leveled the build plate multiple times. I still get failed prints. I spent some time re-reading the thread and I know some of you had the same experiences. Any troubleshooting advice would be welcome. Are there exposure and layer settings I should try that could make a difference?
How does it fail? Can you post some pictures?
based on my experiences...
Do you get nothing sticking to the build plate and only sticking to the FEP?
If so, you may have to much of a starting gap between your build plate and FEP
I think the PTFE lube is not really necessary. If the FEP is tight enough and your build plate is level, there should be issues with sticking to the FEP
Sometimes sticking to the FEP is also a sign that your FEP is too loose and when the build plate lifts up, the print does not release from the FEP since it stretches too far
Do you get the based and supports printed, but not the model? If yes, then most likely you need to adjust your supports
or do you get other types of failures?
Hunk a Junk
Sr Member
Thanks for the relies, guys! I've increased the exposure time on the bottom layers and thickened the raft settings. I also tried shaking the resin for several more minutes before pouring it in the vat. I successfully printed a Pokemon figuring for my daughter and I'm now attempting an Icarus nose cone that seems to be working. Maybe the failures were as simple as that -- a few minor tweaks. I also (and this is going to sound really dumb) realized I can pause the print after the first 30 minutes or so to check to see if the raft is successfully on the build plate. Until now I didn't want to touch anything until the plate was high enough out of the vat to see underneath.  There is definitely a steep learning curve for me on this thing.
There is definitely a steep learning curve for me on this thing.TazMan2000
Master Member
Initially with my first filament printer, I had a lot of problems but now, rarely do I have them. Only when I forget to level the bed on occasion and spray hairspray on the mirror, do I have issues. With my resin printer, I had nothing but trouble in the beginning. I tried tons of experiments and some have been successful. I still get the occasional issue, but its not like it was before. I bet half the problems of what I had were of an old batch of resin. The stuff does have a shelf life.
TazMan2000
TazMan2000
moom1881
Active Member
I've recently started pausing my prints at 20% or so to check them too - just don't forget to resume it for hours like I did. After I did remember to restart it the print ended up failing a few hours later by breaking at the point I'd stopped it.
Does anyone else find that the latest Chitubox version seems much worse at autogenerating supports? I've had a few prints fail by pulling off the supports recently.
Does anyone else find that the latest Chitubox version seems much worse at autogenerating supports? I've had a few prints fail by pulling off the supports recently.
I was getting a lot of failures at first too. They started out not sticking to the build plate, I tried the PTFE with a little success. It finally stopped failing and began sticking to the build plate reliably - I think I solved it with a systematic combination of the tips already mentioned... room temperature, good leveling of the machine and the plate, new resin, longer base layer exposure, etc. Unfortunately it is much more of an art than a science to get reliable prints.
I won't use Chitubox for supports anymore. I was getting a lot of failures. I think you're right, the new version of Chitubox is worse for me than the old one. I prefer PrusaSlicr for the supports, it works way better for me. I do bounce between the two sometimes though. I like the way Chitubox hollows and drills better than PrusaSlicer. Once the model is hollow and fully supported I export the plate including supports and use Chitubox for slicing. I end up with a lot of files along the way, but I have developed a good workflow that keeps it all organized.
Don't give up, you'll get there eventually.
Analyzer
Master Member
I avoid pausing if I can but have heard of others having the same problem, not just on the Elegoo but also on the Anycubic
I can often see a difference in color at points where I filled the vat while printing and in some cases can even see failures or splits at that point. I am guessing probably to do with resin temp differences possibly
I can often see a difference in color at points where I filled the vat while printing and in some cases can even see failures or splits at that point. I am guessing probably to do with resin temp differences possibly
I've had failing prints after pausing due to air bubbles forming between the support struts, which were then caught between the build plate and the VAT in between the supports.
I feel with the more modern printers with reliable leveling mechanisms, the risk of a failed print is higher after pausing then due to bad levelling, so I just leave it running and inspect it through the cover during printing, as soon as that's possible.
I feel with the more modern printers with reliable leveling mechanisms, the risk of a failed print is higher after pausing then due to bad levelling, so I just leave it running and inspect it through the cover during printing, as soon as that's possible.
Hunk a Junk
Sr Member
This is one half of the Icarus nose cone I printed up. This is my biggest successful print and I'm pretty happy with it. It's going to make a good sized model if I can get the rest of it printed. As you can see, there is a line visible where I paused the print, but it'll be easy to clean up while smoothing out the entire piece. I'm attempting to print the window section now, but I've had two failures so far. Trying for a third attempt this morning.


TazMan2000
Master Member
Hunk a Junk , clean and lube up your Z shaft. Your Z shaft connection with the plate, may be loose. Hold down your printer and move your plate up an down to see if you can hear a jiggle and see if there is backlash. I'm uncertain it can be adjusted, since I've never done it myself.
TazMan2000
TazMan2000
Similar threads
- Replies
- 2
- Views
- 309
- Replies
- 13
- Views
- 356
- Replies
- 2
- Views
- 289