You are using an out of date browser. It may not display this or other websites correctly.
You should upgrade or use an alternative browser.
You should upgrade or use an alternative browser.
ROTJ detonator charges
- Thread starter Dagobah Don
- Start date
Wow!!! I just finished printing mine and I came here to ask the same question.If I draw it free hand it’ll look like a Hutt did it.
Is there a good flat photo I can crop and print in grayscale to create a stencil?
starving4rtist
Active Member
If you download the files directly from the Van Oaks Props website, I believe the zip also contains a high resolution copy of the graphics that I cut out to make a stencil.

ID10T
Sr Member
Working this thing…
I bought some brown primer, trying to get a lighter brown finish. The “lumpy” paint is really cool but seemed too dark.
Anyway, the primer isMUCH darker than the cap color.
The main body is straight lumpy stuff and the “skirt” has been over-painted with the brown primer. Which would you choose?

I bought some brown primer, trying to get a lighter brown finish. The “lumpy” paint is really cool but seemed too dark.
Anyway, the primer isMUCH darker than the cap color.
The main body is straight lumpy stuff and the “skirt” has been over-painted with the brown primer. Which would you choose?
starving4rtist
Active Member
Mr Mold Maker
Master Member
In regards to the main body found part.. I’m really not sold on it being from a steering column. Being made in a bright orange plastic is what is throwing me off. I think motor housings are still the best bet but narrowing it down is incredibly challenging of course.
Last edited:
ID10T
Sr Member
Well, I guess I’m going to use the straight brown primer over the lumpy paint. I really like the complexity of the lumpy stuff, but the color is too dark for me. The primer is too, but I’m not buying more paint for this…
working out a few details and painting. I need smaller screws for the plates on the side too. I got 4-40 screws, thinking they went in the large hole, but they go into the smaller holes, so back to the store…

glued the LEDs into the lenses. Perfect fit.

Put an o-ring on the pot shaft to give a bit more resistance.

Drilled to pass the wires in.

Testing! I may get a dropping resistor… these are bright, even with the lens on top!

Here I’m filing the small flange off the bottom so they press into the hole.
working out a few details and painting. I need smaller screws for the plates on the side too. I got 4-40 screws, thinking they went in the large hole, but they go into the smaller holes, so back to the store…
glued the LEDs into the lenses. Perfect fit.
Put an o-ring on the pot shaft to give a bit more resistance.
Drilled to pass the wires in.
Testing! I may get a dropping resistor… these are bright, even with the lens on top!
Here I’m filing the small flange off the bottom so they press into the hole.
Attachments
Mara Jade's Father
Master Member
Are you going for idealized paint/texture? I’ve often wondered what I would do if I were to a build of this replica? I’d probably go idealized.
ID10T
Sr Member
You might be able to use “wrinkle” paint and then sand it a bit. I haven’t tried that.
I’m getting everything ready so I can paint the main body.

spraying the silver bits…

They look good from ten feet!

I have four neodymium magnets in here but I don’t think they’ll hold the final assembly… I suggest you go to eight of them if you plan to add lights

there’s a switch in there. Testing the wiring out before I solder.

All set. You need to use both piles of the switch to allow one, and then both, lights to illuminate.

testing with lights passed.

lights ready to install.
I’m getting everything ready so I can paint the main body.
spraying the silver bits…
They look good from ten feet!
I have four neodymium magnets in here but I don’t think they’ll hold the final assembly… I suggest you go to eight of them if you plan to add lights
there’s a switch in there. Testing the wiring out before I solder.
All set. You need to use both piles of the switch to allow one, and then both, lights to illuminate.
testing with lights passed.
lights ready to install.
ID10T
Sr Member
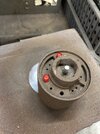
More progress for today.

Testing the magnets… with no batteries (two AAA size) and no other stuff on it, it holds

Holes drilled for the 2-56 screws I got to hold the vents on. This is before I over-coated with the brown primer.

you can’t beat real hardware. Not the exact fastener match but at least it’s a slotted head.

Lights are installed. Friction fit but they won’t fall out.

Michell knobs look convincing…

extra-blurry picture of the 5-position two-pole rotary switch and LED wiring.

I don’t know…

Knobulator mock-up. I left the gear as a raw print. Looks fine. I stuck the boot studs and cable clamp in too, but I guess I didn’t get a picture. I need to make a sleeve for the switch shaft to fit the printed knobulator. I should be able to knock that out tomorrow. I also painted the silver on the slider knobs. I’ll do the black sides in the morning and they can dry while I destroy several adapter sleeve attempts. And change some relays on an obsolete board
The final hurdle is attaching the skirt assembly to the main body. I can’t just glue it because I’ll have to change batteries at some point. There is a long bit of the center screw sticking up I thought I could use but I haven’t figured that all out yet.
Testing the magnets… with no batteries (two AAA size) and no other stuff on it, it holds
Holes drilled for the 2-56 screws I got to hold the vents on. This is before I over-coated with the brown primer.
you can’t beat real hardware. Not the exact fastener match but at least it’s a slotted head.
Lights are installed. Friction fit but they won’t fall out.
Michell knobs look convincing…
extra-blurry picture of the 5-position two-pole rotary switch and LED wiring.
I don’t know…
Knobulator mock-up. I left the gear as a raw print. Looks fine. I stuck the boot studs and cable clamp in too, but I guess I didn’t get a picture. I need to make a sleeve for the switch shaft to fit the printed knobulator. I should be able to knock that out tomorrow. I also painted the silver on the slider knobs. I’ll do the black sides in the morning and they can dry while I destroy several adapter sleeve attempts. And change some relays on an obsolete board
The final hurdle is attaching the skirt assembly to the main body. I can’t just glue it because I’ll have to change batteries at some point. There is a long bit of the center screw sticking up I thought I could use but I haven’t figured that all out yet.
ID10T
Sr Member
Update: ready for final paint!
I plan to do the yellow and red detail paint panels and the Scribble logo on the side today.
The magnets BARELY hold it on that console, but they hold. I think the number should be doubled to eight.

I had to make a bushing to adapt the switch to the knob. A piece of 1/4” copper tubing was sacrificed for the cause. (This took nearly as long as making a new knob out of aluminum…)

Here’s my attachment solution. It works.

wiring made more socially acceptable.

Side view of the assembly clip thing.

Battery box mounted (make sure you don’t interfere with the spring! I need a way to keep it clocked properly…

repainted the knob. It didn’t survive rework with fitting the copper spacer etc. Weathering of the top cap was serendipitous- just handling it so much did that. I satin cleared that and the gear to keep the look.

slider knobs painted. The black wouldn’t cover the silver “chrome” paint. There’s like 47 coats of black. And it looks like it.

magnet test, fully loaded… it barely holds.

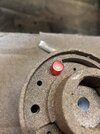
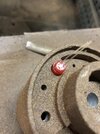
Clicking solution- 3/16 stainless precision pin glued in the skirt with a corresponding notch in the body.

It still holds, even with the added weight of photon emission!

And here’s where we are at now. Just the color panels left to do, the text and some weathering. Maybe a few orange dots on the top edge…
Overall, I’m very happy with it. I had a vision of the “clicks knob” activating the lights, and I have it! Four clicks- 0,1,2 position just click; 3 turns on one light and 4 has both lights on.
I plan to do the yellow and red detail paint panels and the Scribble logo on the side today.
The magnets BARELY hold it on that console, but they hold. I think the number should be doubled to eight.
I had to make a bushing to adapt the switch to the knob. A piece of 1/4” copper tubing was sacrificed for the cause. (This took nearly as long as making a new knob out of aluminum…)
Here’s my attachment solution. It works.
wiring made more socially acceptable.
Side view of the assembly clip thing.
Battery box mounted (make sure you don’t interfere with the spring! I need a way to keep it clocked properly…
repainted the knob. It didn’t survive rework with fitting the copper spacer etc. Weathering of the top cap was serendipitous- just handling it so much did that. I satin cleared that and the gear to keep the look.
slider knobs painted. The black wouldn’t cover the silver “chrome” paint. There’s like 47 coats of black. And it looks like it.
magnet test, fully loaded… it barely holds.
Clicking solution- 3/16 stainless precision pin glued in the skirt with a corresponding notch in the body.
It still holds, even with the added weight of photon emission!
And here’s where we are at now. Just the color panels left to do, the text and some weathering. Maybe a few orange dots on the top edge…
Overall, I’m very happy with it. I had a vision of the “clicks knob” activating the lights, and I have it! Four clicks- 0,1,2 position just click; 3 turns on one light and 4 has both lights on.
ID10T
Sr Member
Started the stripes today. I made the stencil for the “lettering” too, but it’s too big, so I printed another.

authentic color bleed…


spray into the cap and cut in the edges with a brush.

Marked the correct side, and correct orientation of the stencil… then figured out it’s too big.

Masking a “straight” line on the skirt- put it on a plate and put a spacer under the blade. Drag it around slowly and… straight!


applying the antique flat red. This is an old can of Testors (used on my snow speeder stripes) from 20+ years ago. Still smells the same!
authentic color bleed…
spray into the cap and cut in the edges with a brush.
Marked the correct side, and correct orientation of the stencil… then figured out it’s too big.
Masking a “straight” line on the skirt- put it on a plate and put a spacer under the blade. Drag it around slowly and… straight!
applying the antique flat red. This is an old can of Testors (used on my snow speeder stripes) from 20+ years ago. Still smells the same!
ID10T
Sr Member
Done!

Made a new stencil for the scribble.

Stencil done.

looks kinda right.

getting the black ready.

I did a dusting of flat black over the yellow and red, to take it down a notch. Then went over stuff with the brown antiquing wax. I just dipped my gloved fingertip in the wax and rub it into the grooves. I think I got a “handled a lot but not beat up” sort of look to it…
Made a new stencil for the scribble.
Stencil done.
looks kinda right.
getting the black ready.
I did a dusting of flat black over the yellow and red, to take it down a notch. Then went over stuff with the brown antiquing wax. I just dipped my gloved fingertip in the wax and rub it into the grooves. I think I got a “handled a lot but not beat up” sort of look to it…
Mr Mold Maker
Master Member


Figured I’d share my current WIP on one of these bunker bombs. I printed this on my Elegoo Saturn with files from FolkyPatrol on Etsy. I’m just waiting for the red paint from Archive X, and then I’ll paint the red and yellow stripes and finish up the weathering on this one.
I’m working on three total. Idealized with a “metal” base (above), idealized with an orange base, and finally an “accurate” one. I think it will be a cool set to see together and I’ll definitely snap and share some pics when they’re done.
Similar threads
- Replies
- 10
- Views
- 387
- Replies
- 3
- Views
- 515
- Replies
- 9
- Views
- 993