You are using an out of date browser. It may not display this or other websites correctly.
You should upgrade or use an alternative browser.
You should upgrade or use an alternative browser.
ROTJ detonator charges
- Thread starter Dagobah Don
- Start date
Neat! Now I guess I need to build one. Does anyone offer a cast of the original body yet? I know I'm never going to find a whole freaking drill for that! I also wouldn't want to destroy a tool.
Mr Mold Maker
Master Member
Curious teecrooz and Mr Mold Maker what tools you adopted to cut the adapter cone?
Wall seems thin enough for a variety; but I think do’s and dont’s would be helpful if you have opinions")
Wall seems thin enough for a variety; but I think do’s and dont’s would be helpful if you have opinions
Mr Mold Maker
Master Member
I used the back edge of an xacto blade to score right in the corner of the step. Just basically held the xacto with one hand and spun the cone with the other until I could see the score line from the outside. Then I did one final pass with the blade.Curious teecrooz and Mr Mold Maker what tools you adopted to cut the adapter cone?
Wall seems thin enough for a variety; but I think do’s and dont’s would be helpful if you have opinions
Just needs a very light touch of sand paper to finish it up, the cut itself is very easy and clean.
woodywaverider
Sr Member
Thanks for posting, I did see this on Facebook a while back. I was wondering how long it would be before it was posted here, but wasn’t sure if I should have posted myself as I know the content creators/persons who made the discovery are members and assumed they would post something.
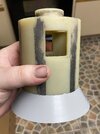
Drilled the pilot holes. Need to pick up a new endmill because the hole size I want is in between the two sizes I had.
*update, new endmills ordered so I can make larger holes.
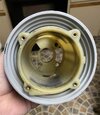
I also cut the housing down to size. Wasn't sure I wanted to but I guess I’m all in on finishing this thing now.

*update, new endmills ordered so I can make larger holes.
I also cut the housing down to size. Wasn't sure I wanted to but I guess I’m all in on finishing this thing now.
Last edited:
So cool!
Out of curiosity, how large are those windows in the vintage Kango, Chris? I had a dickens of a time trying to bend the vintage dynodes over Roy's replica, and I'm wondering if the larger window would make the task easier.Drilled the pilot holes. Need to pick up a new endmill because the hole size I want is in between the two sizes I had.
*update, new endmills ordered so I can make larger holes.
I also cut the housing down to size. Wasn't sure I wanted to but I guess I’m all in on finishing this thing now.
View attachment 1561826
Interesting pointOut of curiosity, how large are those windows in the vintage Kango, Chris? I had a dickens of a time trying to bend the vintage dynodes over Roy's replica, and I'm wondering if the larger window would make the task easier.
(On my replica kit from Roy I actually didn’t pre bend my dynodes, I used the screws, got them going a little bit… And then screwed them in incrementally until they seated which bent it around the radius of the housing. They don’t slip anyway due to the friction and luckily the print quality is great so it stands up to the amount of resistance)
Thanks for the tip. I actually tried that very approach thinking the screws themselves would bend the dynode as needed, but the screw holes weren't quite positioned in the exact spot where the holes are on the dynode so I ended up having to pre-bend them and then use the screws to create new holes in the Kango.Interesting point
(On my replica kit from Roy I actually didn’t pre bend my dynodes, I used the screws, got them going a little bit… And then screwed them in incrementally until they seated which bent it around the radius of the housing. They don’t slip anyway due to the friction and luckily the print quality is great so it stands up to the amount of resistance)
Gotcha, maybe I got lucky with my dynodes from RoyThanks for the tip. I actually tried that very approach thinking the screws themselves would bend the dynode as needed, but the screw holes weren't quite positioned in the exact spot where the holes are on the dynode so I ended up having to pre-bend them and then use the screws to create new holes in the Kango.
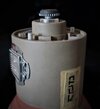
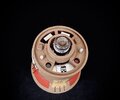
Thought I'd share some WIP of my all real parts Bunker

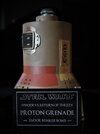
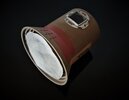
The bunker charge with the broken skirt is up for auction soon - there are some great photos in the catalog.
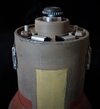
Final pieces arrived for the all original, found parts Bunker! Top view and next to roygilsing awesome kit!
- Vintage Kango Motor Housing (Orange)
- Vintage Ferguson Slider Knob x2
- Vintage Wader Boot Stud x2
- Vintage Michell Fluid Tone Arm Screw x2
- Vintage Renwal V8 Timing Gear Part 54
- Vintage RS Spin Knob
- Vintage EMI Dynode x2
- Vintage Steel Chair Glide
- Vintage Mulbrod clip
- Found Part Red LED Cap x2
- Original Plastruct Skirt
Attachments
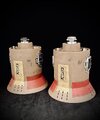
3251bimmer congratulations and thanks for this wonderful side by side comparison!
And it was so nice to meet you in person and chat props. I wished I could do this more often with others as well.
Roy
And it was so nice to meet you in person and chat props. I wished I could do this more often with others as well.
Roy
Similar threads
- Replies
- 10
- Views
- 367
- Replies
- 3
- Views
- 500
- Replies
- 9
- Views
- 971